Thursday, January 31, 2019

RASPBERRIES GO TO THE GRILL– FOR THE ULTIMATE MINI TART APPETIZER

Raspberries go to the grill recipe is a mini tart with cheese and smoky raspberries on top- Yummy!
Raspberries go to the grill recipe is a mini tart with Brie and smoky raspberries on top- Yummy!

Known to help aid weight loss, be a cancer preventer, and assist your autoimmune system, raspberries are one of the fresh fruits that can have a short availability depending on where you live.  I like to take advantage of the fresh harvest and use them of course in desserts but I also like to blend them with savory items for a perfect bite of balanced flavors.

That’s why I’m taking fresh raspberries and smoking them first to enrich their flavor then combining them with creamy brie cheese for a great, five-ingredient appetizer.

Take a trip to your fresh produce stand, farmer’s market, or even the grocery store and pick up some raspberries for this easy recipe.

Ingredients & Prep

There are not too many ingredients for this easy recipeBeautiful fresh raspberries are going to the grill for a smoking that will turn them into a perfect jam-like consistency to be added to a tartlet.  First, gather these five ingredients for a full cook event on your favorite grill:
  • 1-1/2 cups raspberries
  • 2 tablespoons granulated sugar
  • 1 tablespoon cornstarch
  • 30 phyllo tart shells
  • 8 oz. Brie
If you plan to use a charcoal grill for the cooking, do the grill’s set up first so the fire can die down to hot embers.  You’ll want to remember that no matter if you use a charcoal or LP/Gas grill, you’ll be setting up a two-zone cooking method, which by now you likely know is my favorite way to grill and smoke foods.  You’ll also need a couple of wood chunks for the smoke infusion which will be placed on the hot coals of a charcoal grill or the heat shield or in a smoking box of the gas grill.

While your heating up the grill, rinse and pat dry the 1-1/2 cups of raspberries – fresh or store bought – and place in a disposable foil pan.  When the grill is ready, add your disposable pan of raspberries to the unlit side of the grill.  Leave to cook for about 15 minutes.

Turning Fruit to Fruit Sauce-Raspberries go to the grill!

Raspberries on the grill with a wood chunkAfter bringing the raspberries to the grill and cooking with wood chunks for about 15 minutes, you’ll find that the raspberries have softened and broken down, making for the perfect sauce-like consistency.  Time to sweeten and thicken them up.  Start by adding 2 tablespoons of sugar and 1 tablespoon of cornstarch to the pan and stir to combine.  Allow the mixture to continue to cook for another 10 minutes.  Then stir again and place on the warming rack of your grill.

Tart Time

I love the ready-made phyllo tart shells available in most grocery stores.  This makes our recipe super fast and easy.  You’ll need 30 premade phyllo tart shells and about 8 ounces of Brie.
Brie cut into small squaresTaking the brie, cut into ½-inch slices and then cut those slices in half.  Cut the slices into ½-inch cubes.  You’ll need about 2-3 cubes per shell so prepare 90 cubes.  Use the leftovers in other recipes or eat on their own. Be sure the brie is cold when you cut it especially if you’ve purchased a double crème or you’ll have issues keeping the cubes firm.

With the brie cubed and the tart shells laid out in a pan, it’s time to take these tarts to the grill for some melting.  Just like when the raspberries were smoked using a two-zone method, we place the tart shells on the unlit side of the grill and the raspberry filling on the warming rack.  Close the lid and allow the brie to melt and absorb the great wood flavor from our wood chunks.  As the cheese melts, you may need to rotate the pan to ensure an even melting.

After the brie-filled tart shells have melted, it’s time to take the smoked raspberry sauce that we sweetened and thickened to become our sweet-tart complement to the brie’s creaminess.  Simply spoon a tablespoon or so of smoked raspberry sauce on top of the melted brie, making sure to stay within the tart shell edges.  Allow the tarts to cook for just a few additional minutes, then remove from the grill and serve immediately.

With the crunch and lightness of the phyllo shell, the creaminess of the brie and the sweet-tart of the smoked raspberry sauce, this is the perfect light appetizer that will be enjoyed by everyone.  And don’t forget, the entire recipe can be done on the grill!

Thursday, January 24, 2019

THE WATER PAN EXPLAINED FOR GRILLING & SMOKING

The Water Pan explained for grilling and smoking techniques!

If you’ve purchased a smoker, you’re likely familiar with the term “water pan”.  If, however, you’re more of an LP/Gas Grill person, than this term is likely one that escapes your knowledge.

Water pans are a means of introducing valuable moisture into the cooking environment which has immense value when grilling and smoking.  Let me explain each of the pros of learning and using a water pan for your outdoor cooking, no matter the type of equipment you’re cooking on.

Water Pan Pro #1

Temperature control.  This is the ultimate need when you grill or smoker, especially when you smoke.  Maintaining a stable temperature that you’ve predetermined.  When the day is scorching hot and the equipment is made of metal, you will experience a challenge with temperature control.  Introduce a water pan, and your battle can be won.

A water pan goes above the heat source.  If using a charcoal grill or charcoal/wood smoker, this pan would be placed above the coal area.  Have an electric unit and you’ll find the pan over the electric heating element.  If you want to introduce a water pan on an LP/Gas Grill, this would be placed over the lit burners.  Many vertical smokers come with a water pan.

Water Pan Pro #2

Water cannot go above the boiling point which is 212°F.  Additionally, evaporative cooling also takes place as the water is exposed to heat.

Water Pan Pro #3

A water pan can become the number one tool when doing direct heat cooking over an open flame.  Why?  It acts as a repellent for the flame giving your foods a chance to survive without becoming a blackened, dried out, former piece of food.

Water Pan Pro #4

Are you having trouble with hot spots in your equipment?  Well, a water pan will even them out.  Now, the temperature you desire can essentially be locked in just by using a water pan.

Water Pan Pro #5

Humidity that develops from the use of a water pan keeps the surface of the meat moist, which in turn, attracts smoke vapor, which in turn, produces great flavor.  The water vapor mixes with the combustible gases which are emitted from the burning material and add to the overall flavor.  Yes, water is a passageway to all things flavorful!

What Goes in the Water Pan

It’s called a water pan for a reason.  It is designed to hold water, specifically hot water to keep the cooker from wasting energy on heating cold water put in the pan.  Here’s a tip when you fill the water pan: use a teapot to fill the pan while it’s in place so you don’t take the chance of spilling hot water on surfaces or you.  Remember, water evaporates while other liquids don’t evaporate.

Don’t Make the Water Pan a Drip Pan

Here’s the thing with a drip pan.  Due to its location directly over the heat source, when used on vertical units it often serves double duty as a drip pan.  Don’t do that!  Here’s why.  The rendered fat drippings can produce an oil slick on the surface of the water which will prevent water evaporation.

Make Cleaning a Snap

Here’s a couple of tips when using a water pan.  If your unit comes with a water pan, line it in aluminum foil which will allow you to simply pull the foil off and preserve the condition of the original pan.

If you’re using a unit that has no water pan but want to introduce one, simply purchase a disposable foil pan.  You will want to purchase one that is compatible in size to the unit your using, that will fit comfortably over the heat source, and that can hold enough water to prevent you from having to make refill trips every 15 minutes.

Thursday, January 17, 2019

Grilled Seafood Recipe: Simple but Exquisitely Mediterranean

The raw squid and mussels ready for our grilled seafood recipe
Our Grilled Seafood Recipe for Squid and Mussels

Over the past several weeks, my good friends at SmokinLicious® have allowed me to make their Tips & Techniques blog platform “my home away from culinary home” to highlight the cooking with wood style.  I hope you’ve enjoyed the articles as much as I’ve enjoyed writing them.  Before I begin an extended hiatus overseas, as my thanks, I thought I’d leave you with a pretty easy and flavorful recipe that showcases all the virtues of wood grilling with a couple of my favorite seafood- squid and mussels.  The cooking style is one that is very popular in the Mediterranean region.  Give it a try and let us know how it fared!

Let’s start out with squid or “calamari” as my Italian friends remind me.  Whether it’s squid or calamari, it’s got to be fresh!  Prepare first by thawing and rinsing thoroughly with cold water.  Drizzle with a good quality of EVOO.

Grilling the Squid

Chef Calle drizzling extra virgin olive oil over the squid and MusselsGrill over the hottest part of the wood fire, cover to get a shot of wood smoke flavor.  It’s important to not overcook the calamari.  If your grill is really hot (and it should be) cook just long enough to get a grill sear mark (30-40 seconds per side) Remove immediately when ready. Drizzle again with EVOO, season with salt and pepper.  Spritz with a squeezed fresh quartered lemon section and garnish with a sprig of fresh parsley.  Plate and serve right off the grill!

Mussel Preparation


Grilling over the hottest part of the fire and spritz with lemonNext, grilling the mussels in the shell!  Rinse the shelled mussels with cold water. Remove the beard with a quick, firm yank.  Working in batches, place shelled mussels directly on grill grate over the hottest part of the wood fire.  When shells just begin to open, cover to allow for a wood smoke infusion.   After a minute, uncover and remove with tongs.  Make sure you discard any unopened mussels.  Quickly but carefully, remove the mussel meat from the opened shells with a fork or spoon and collect the meat in a mixing bowl.

Finished grilling of mussels
After shelling out the mussels, drizzle with a good amount of EVOO (1/8 cup), season with salt and pepper and a hefty spritz of a squeezed whole fresh lemon.  Plate and serve right away.  For a flavor option, if desired, before grilling the mussels, prepare a mixture of clarified butter (about 2 tablespoons per 1 dozen mussels) with equal amounts (1/8 to 1/4 teaspoon) of finely chopped garlic, oregano, and parsley.  Season the grilled mussel meat with the mixture, plate and serve with wedges of fresh lemons.

I hope you enjoy these recipes.  Keep on cooking with wood!  Bon Appetite!
Grilled calamari and mussels- great side dishes!

Thursday, January 10, 2019

Grilling & Smoking Shallots a Finesse Technique


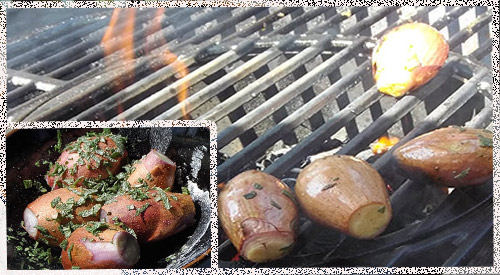
Chef Calle's finesse technique of Grilling & Smoking Shallots on the charcoal grill using Charwood for the smoky wood flavor
Chef Calle’s finesse technique of Grilling & Smoking Shallots on the charcoal grill using Charwood for the smoky wood flavor

For all my BBQ cooking friends who have been under the assumption that grilling is only for protein food groups, (beef, pork, fish etc.) boy do I have a taste revelation that could transform you into a disciple of the vegetable sections at local farmers marketsChar Grilled and Smoked Shallots!

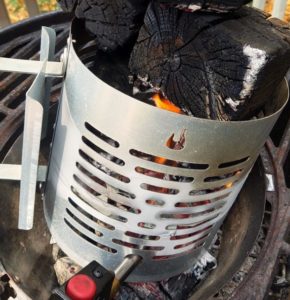
Using chimney starter to ignite charwoodGrilling Process

The process is fairly straightforward but doesn’t get the impression that this food item is something that you can flop on the grill grate and walk away from for an extended period of time.  Finesse is the cooking standard that must be applied to enjoy the maximum flavor result rendered from this sweet cousin of the onion family.

You can tell by my strong friendship with the folks at SmokinLicious®, that I’m a big advocate of grilling with a hardwood fire.  It allows for uniform cooking temperatures while simultaneously infuses food items with a natural wood smoke flavor.
So, as we begin, go about preparing your grill with only the best hardwood cooking wood and remember- never, ever start your fire with a chemically based liquid starting fluid.  Use a chimney starter!

While your grill preheats to a medium temperature, prepare the whole shallots by cutting off the tips and drizzling them with skins on using the high-quality EVOO and a touch of Kosher salt. You can even season with fresh thyme or sage and let marinate for a few minutes.

Shallot Technique

Grilled shallots are a great side dish or garnish to prepare alongside your protein or immediately after you have removed your meat to let it rest.

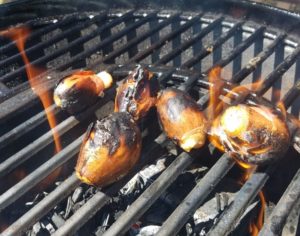
Charring shallots on grill gratePlace the shallots on the grate directly over the outer fringes of the embers, ideally between the smoking wood chips and outer ring of embers.  Do not place them directly over the center most concentration of the embers.  If you want a slightly stronger smoky flavor, cover.  If not, leave uncovered.

Here’s where the finesse part comes in- over the next 3-10 minutes, (depending on the heat and size of the shallots) watch over the shallots like a hawk watches over hatchlings in a nest.  Turn often, get a good char on all sides but, for Heaven’s sake – don’t allow them to ignite into a raging conflagration!  If this happens, you will lose much of the smoky sweetness and be left with a bitter tasting, burnt onion.  You can best determine a great finish when the outer skins are charred nicely while the centers have a soft, moist feel when gently squeezed with cooking tongs or fingers.

Remove from the grill, let them cool a bit.  Once cooled for 2-5 minutes lightly squeeze the charred outer skin and out will come the sweet and delicious interior.

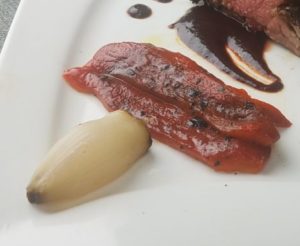
Finished dish with tasty grilled shallots
After you experience the fabulous smoky flavor of your grilled shallots, I’m sure you’ll have a greater appreciation for all the food flavor benefits that can be had from your backyard grill!

Thursday, January 3, 2019

STRAWBERRY BELLINI BOTH SWEET & SMOKY


I’ve worked on a trio of recipes to take full advantage of the short seasonal harvest of strawberries we have here in Western New York State.  I’ve already shared with you my Smoked Strawberry Hand Pie and my Creamy Smoked Strawberry Semifreddo.  Now, it’s time for a refreshing cocktail that also features smoked strawberry.

Just grab a couple of quarts of fresh strawberries or even store bought when they are out of season in your area and pick your smoke technique: we have three options – the charcoal grill which is how I did my strawberries, the gas grill or the handheld food smoker.  Then prepare to make our version of the strawberry Bellini which has a trademark smoked strawberry to balance the sweetness of simple syrup and Prosecco.

Simple Syrup


the pot of simple syrup ingredients blending over low temperaturesAfter smoking the strawberries using either a handheld food smoker, stovetop smoker, gas grill or charcoal smoker – we have instructional videos on all these techniques – the next step for our Bellini is to make the simple syrup.  Taking 1 cup of sugar and 1 cup of water, I add both to a saucepan set over medium heat and stir constantly until the sugar is dissolved.  Then I remove it from heat and allow to cool.  At this point, I like to pour the simple syrup into a liquid measuring cup to make adding to our cocktail easier.

Bellini Base

strawberries and simple syrup mixture in the blender adding ice to chillTime to start making the Bellini.  I add ice cubes to a blender and pulse them into crushed ice.  I then take my smoked strawberry juice which I reserved from my previous smoked strawberries and add about 1 cup to the crushed ice.  If you’re using whole smoked strawberries, you can pulse these into the crushed ice.  After adding my smoked strawberry juice, I add about 1 cup of simple syrup.  Pulse the mixture until blended and make any necessary adjustments to ice, strawberry or syrup flavors until you have the consistency and balance of sweet and smoky that you like.  Keep in mind, you will be pouring this mixture into the glass first, then adding the sparkling Prosecco so don’t over-sweeten.

Perfect Balance

Now it’s time to bring everything together for the final drink.  First, grab a bottle of Prosecco.  Take the glass of your choice and fill it about halfway with the smoked strawberry mixture.  Fill the rest of the glass with chilled Prosecco.  I like to top my glass off with some fresh mint.  Serve immediately.  Immensely refreshing on a hot day and festive looking too. The perfect way to use less than perfect strawberries.  Cheers from SmokinLicious®!

Tasting Notes

Now, this is a drink base that easily can be adapted for other liquor content.  Feel free to add tequila, rum, even vodka.  Just reduce the hard liquor amount to 2 ounces.