Thursday, November 29, 2018

BREAKFAST PIZZA PRETZEL- OVER THE FIRE!


Our Breakfast Pizza Pretzel served with Eggs!
Our Breakfast Pizza Pretzel served with Eggs
We’ve all heard the reasons why breakfast is so important – it boosts your metabolism for the day, helps curb cravings that could lead to poor food choices, helps improve memory and concentration, and can set your mood for the day.  Let’s face it.  Not all breakfast items make you leap to the table.


slice of the breakfast pizza pretzelI’m going to give you a ready-to-take-on-the-day breakfast recipe that is cooked on the grill.  The name alone is likely to bring your kids to the table easily too.  Combine the versatility of a pizza with the shape, texture, and saltiness of a pretzel, I’m making my version of a breakfast pizza pretzel featuring Mediterranean flavors you’re going to love.

Ideal Ingredients

This is one of those fun recipes where you really can’t go wrong with the ingredients you select.  Just keep in mind, that raw egg won’t necessarily be the best choice since we don’t have the same amount of dough surface to hold the raw egg until cooked.  If you want to incorporate egg, do a boiled, fried, or scrambled egg.  For my Mediterranean feature, gather the following ingredients:
  • ½ cup of basil pesto sauce (homemade or store-bought)
  • ¼ cup freshly grated Parmesan
  • 3 roasted sweet peppers, sliced (I prefer to wood fire the peppers first)
  • 2 medium tomatoes sliced, with the slices cut in 1/2
  • 6 large eggs, steamed for 13 minutes
  • 5 slices of provolone cheese, cut into quarters
  • 20 basil leaves
  • 1lb. store-bought frozen bread or pizza dough, thawed and left to rise according to package directions
  • fresh ground pepper
  • coarse salt for the top of the pretzel
  • 1 egg and 1 teaspoon water for the egg wash
  • flour for rolling the dough

Our simple ingredients for this recipe eggs, tomatoes, parmessan cheese, pesto, bread or Pizza doughFirst step is to let your dough rise so make sure you either do this step a few hours before making the recipe or let the dough rise the night before.  Follow the directions on the dough packaging.

If you want to include egg in your recipe, you’ll need to steam the 6 large eggs.  I use a deep pot with a steamer insert, placing about two inches of water in the pot.  Place the eggs in the steamer basket, put the lid on the pot, put the heat to high, and set a timer for 13 minutes.  Prepare a bowl of ice water to immerse the eggs in once the timer goes off, which will halt the cooking process.  When cool, peel the eggs and slice.

After the dough has risen, you’ll need to get a couple of items ready before starting the recipe.  First, decide what type of grill you’re going to use for cooking.  A gas grill will not take as much set up time as a charcoal unit.  Either grill, you want to do a two-zone setup.  For the gas grill, that means turning on only the burners on one half of the grill.  Those lit burners will also hold the wood chunks for adding the wood flavor.  For the charcoal grill, get a chimney starter of charcoal going.  Once the embers are hot, pour into one half of the charcoal area and add a few wood chunks directly on the hot coals.  I recommend starting the grill just before you assemble the pretzel.

A Tasty Trough

With our grill heating, our dough has risen, and our ingredients at the ready, it’s time to assemble the breakfast pizza and form into our pretzel.  First, roll the dough into a 30-inch long rope.  Roll the width to where the rolling pin can sit in the center of the dough and still have an inch of dough on each side of the pin.  Taking the rolling pin, press it down the center of the dough forming a trough.  Starting with the pesto, spread a thin layer down the dough trough.  Sprinkle Parmesan cheese over the pesto, then layer the quartered tomato.  The wood-fired pepper slices are next, followed by the basil leaves, egg slices, and provolone cheese quarters.  Put a final sprinkle of Parmesan cheese to the inside and then we will seal the filling inside the dough.


Thje ingredients on the dough prior to rolling.Here comes the messy part!  Carefully, bring the two sides of the dough together pinching off where the dough meets.  Continue to seal the mixture contents all the way down the dough.  At this stage, I like to move the filled dough to my parchment lined sheet pan or pizza stone to make shaping into the pretzel shape easier.  Make your pretzel shape – make an upside down “U”; twist the ends over each other, then twist again and bring the ends up to center, pushing the holes open while you press the ends into the dough.  Once shaped, brush the surface of the dough with egg wash and then sprinkle coarse salt and Parmesan cheese over the top.  Note: you can make pretzel rods versus a traditional pretzel shape by rolling out 3-4 dough sections into 10-inch lengths, following the same directions as above on assembling.

Fire Cooking

With the pretzel on a parchment lined sheet pan or placed on a pizza stone, place on the unlit side of the grill, with a temperature of about 300°F.  Close the lid and allow to cook for 15 minutes before checking.  If you notice the side closest to the heat turning brown faster than the other side, simply rotate your sheet pan or stone.   Total cooking time will be about 25 minutes until golden brown.  Keep in mind, pretzel rods will likely cook a bit faster.

A Breakfast to Savor


Our finished doughOnce cooked through, remove from the grill and allow the pizza pretzel to rest for 5 minutes.  Cut pretzel rods on the diagonal and the twisted pretzel like you would a bundt cake; into slices.  With the freshness of the pesto and basil, the sweetness of the tomato, and salty cheese, this is a substantial breakfast that will get you full of energy for the day.

Thursday, November 22, 2018

THE ULTIMATE WOOD-FIRED CLAMS CASINO


Our wood-fired clams casino on the offset grill with brick and the finished product

Have you ever noticed how many ingredients go with clams?  This low fat, high protein seafood also has many beneficial minerals.  They are also one of the most sustainable seafood resources.
I thought I would provide an easy wood-fired cooking method that can be done on your charcoal grill (you certainly can modify a few setup items and do this on the gas grill as well using wood) and produce the most flavorful clams casino out there.

Go find some similarly sized clams, fire up the grill, and get ready for this recipe and technique to become your favorite.

Hot Coal Grilling

Our recipe is quite simple: gather together

    our ingredient table with everything ready for the stuffing!
  • 1 tablespoon olive oil
  • 2 oz. sliced pancetta or bacon, finely chopped
  • 1 cup finely diced red bell pepper
  • 1/3 cup chopped shallots
  • 2 large garlic cloves, minced (you can use pre-minced garlic)
  • ¼ teaspoon dried parsley
  • 1/3 cup dry white wine
  • 4 tablespoons freshly grated Parmesan
  • 2 tablespoons panko breadcrumbs
  • salt & fresh ground pepper
  • 18 medium clams, shucked, bottom shells reserved

Before starting on the casino filling, it’s important that you get the grill ready.  First, you’ll want to get a chimney starter of charcoal going.  I’m using SmokinLicious® charwood in place of traditional charcoal as this is a partially charred product that will also provide for some hardwood flavor infusion.  Once lit, the chimney starter needs to burn down the charwood to hot coals – no flame should be visible when you dump this into the grill.

our wire mesh on the charcoal rack to retain all the small and hot pieces
For my charcoal grill, I’ve set a mesh screen at the base of my kettle grill to allow me to retain as many hot coals as possible.  The screen helps to prevent small coals from falling through the charcoal area.   I’ve also covered brick with heavy-duty foil to act as a heat conductor and radiator.  This will help to keep a constant temperature during the actual cooking process.  The brick will also separate the cooking area from the fuel area.  A bit of unlit charwood is also added to the charcoal half of the grill so these bits can ignite from the hot coals and sustain the heat level more evenly.

Casino Mixture

With the charwood burning in the chimney starter, I can now start on the casino filling.  After adding a tablespoon of oil and cooking the pancetta or bacon in a skillet, I’ve put that aside on a paper towel lined dish and added the diced red pepper to the fat drippings in my pan.  After cooking a few minutes, I had the shallots, garlic, and parsley to the same skillet and sauté until the shallots are tender and translucent, which is about 5 minutes.  Add the white wine and simmer until it is almost evaporated.  Remove the skillet from the heat and cool completely.

our ingredients in the mixing bowl with cheese addedAssembling the Casinos

While the casino mixture is cooling, I prepare my clams.  Here you have a couple of options depending on your skill level and time management.  You can shuck the clams as normal and reserve the bottom shell with the clam, or you can steam the clams until just open, separate the top from the bottom shell, reserving the bottom shell.  I loosen the clam from the shell so it’s easier to consume with the casino mixture.  After the clams are readied, I take the cooled casino mixture and add the previously cooked pancetta or bacon, 2 tablespoons of grated Parmesan, and fresh pepper mixing well.  I then take a tablespoon of the mixture and mound it over the clam in the shell.  The finished clams are placed in a grill-proof pan.

Wood Firing Brings Depth of Flavor

With all my top neck clams stuffed with casino filling, I sprinkle the remaining Parmesan and the 2 tablespoons of panko bread crumbs over each clam.  I am now ready to place the tray on the grill.  Since I’m using a two-zone cooking method, I can safely put the lid on the grill without concern for charring these clams too far.  With a steady temperature of about 300°F, these will take between 15-20 minutes.  You can rotate the tray if you feel the heat level in your grill is not even or steady.  For those that like a crunchy outside to the clam feel free to place these under the broiler for a few minutes.  The clams pick up the wood flavor in a very balanced way, giving just hints of charry goodness with each bit.  Super easy, super flavorful, and super fun to make.  Take your clams to the wood fire for your next event.

Thursday, November 15, 2018

WHY CHAR-WOOD IS THE BETTER OPTION OVER CHARCOAL

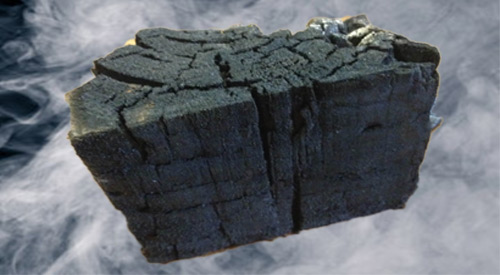
Our Char-wood is produced by Direct firing our North American hardwood blocks until the right amount of Carbonization is achieved!

Frankly, the term “charwood” may be a new one for you.  Although its function is like charcoal, the benefits clearly outweigh those of charcoal.  Let’s examine the key reasons why charwood may be the better option for outdoor cooking over standard charcoal.


Carbonization

Hopefully, if you’ve been engaging in outdoor grilling and/or smoking for some time. You’ve understood the need for a fuel material that burns evenly and hot.  You’ve likely also heard the controversy that’s brewed for years about what is the best product to use for the fuel.  Products range from briquets, lump hardwood charcoal, specialty wood charcoal, and compressed woods like pellets and compressed wood blocks.  The key is to understand that some of these products could contain binding agents as well as accelerants to make for easy lighting.

Carbonization is the conversion of an organic matter into carbon.  Carbon is an element that forms when the organic matter is heated to a high level without oxygen, burning off the volatile gases, leaving the pure carbon behind.   Although commercial material production, whether briquet, hardwood charcoal, or standard charcoal have different percentages of carbonization in the outcome, most are above 90%.  That high level of carbonization is what allows for heat to be produced for outdoor cooking.


Flavor

When you use straight charcoal briquets, you are getting heat only with no flavor as that is a fully carbonized or charred product.  Many prefer to use briquets because they are uniform in size and give the same outcome every time they are used.  Fill a chimney starter with briquets, and you’ll have the same number of briquets fit in the chimney every time.

When you use lump hardwood charcoal, you will get variation in sizing from small, chip-like pieces to half-log size pieces.  Here’s information you need to know.  Although the label may read “hardwood”, there is no information on where that hardwood derived from.  Often, manufacturers of lump hardwood charcoal produce their product from recycled materials such as old pallets, lumber scraps from flooring, cabinet, and furniture makers.  They may take in scraps from lumber mills. 

When this material is carbonized, it will do so at various levels due to the variation in material sizing.
That means when you cook with it or for that matter when you lite it, expect great variation from use to use due to all the inconsistency in sizing.  The inconsistency will produce a lower percentage of carbonized material than briquets.  So know you may get some minimal flavor from lump hardwood due to poorly carbonized larger pieces of product.  This is the reason there is more ash production with lump hardwood charcoals.

Specialty charcoals, generally made in other countries, are a particularly hard substance, light in weight product, that can be a challenge to lite.  Once they are ignited, however, they produce a lot of heat – often more than the standard briquet.  Very little ash is produced and there is no flavor from this product.


Benefits of SmokinLicious® Charwood

When SmokinLicious® made the decision to manufacture a charwood product, we researched extensively why the Japanese binchotan charcoal, also called white charcoal, was so popular and expensive.  We found that though it could be a challenge to lite, it burned extremely hot, clean, leaving little to no ash, produced no smoke and no flavor.  We produced a similar set up to the Japanese direct-fire method with our charwood production.  Instead of using miniature branches, we use consistently sized wood blocks.  Unlike the binchotan, we do not do a complete carbonization.  The result is you get the ease of lighting like a lump hardwood charcoal, the flavor of premium hardwood.  Plus, the reduced ash production of a briquet, and reduced smoke output than burning wood alone.  We see this as the best of all the options out there.

Now, instead of viewing your charcoal as just a heat generator, when you use SmokinLicious® charwood you have one product that can be used as fuel for temperature while the reduced carbonized center portion produces the flavor.  A premium product that gives premium results!

Friday, November 9, 2018

SNAPPER GETS WRAPPED IN CORN HUSK & COAL FIRED

Snapper Gets Wrapped in Corn Husk and is now ready to rest on our bed of coals to get roasted!


When fresh fish comes in season, whether you catch it yourself or find your perfect catch at the seafood market or store, there is no better way to release the flavor than on the charcoal grill.  I found some splendid snapper fillets that I plan to marinate, wrap in a corn husk, and cook on the coals of my charcoal grill.  Let’s get started!

The Perfect Marinade


Fish does not require a lot of marination time so know in the time it takes the fish to absorb the marinade’s great flavors, you can set up the charcoal grill.  I like to lite the chimney starters while I make the marinade.  For that, you’ll need:
    The final blended ingredients for this tasty marinade!
  • 6 white fish fillets (tilapia, branzino, snapper)
  • ½ cup finely chopped scallion
  • 10 garlic cloves, minced
  • 1 cup oil
  • ¼ cup lime juice
  • 1 teaspoon paprika
  • 1 teaspoon curry powder
  • Salt – 1 teaspoon
  • ½ teaspoon black pepper
  • 12 pieces of soaked corn husks
Mix together the scallion, minced garlic, oil, lime juice, paprika, curry powder, salt and black pepper.  Place the fish in a baking dish or in a sealable storage bag and top with the marinade mixture.  Marinate the fish in the refrigerator for a minimum of 1 hour.

Wrapping the Snapper

It’s time to take our marinated fish and encase it in the corn husk.  If you have fish fillets that will fit in a single corn husk, then one will do.  However, if you are doing larger pieces of fish, usually over a few ounces in weight, you will need to place 2 corn husks on a work surface overlapping the husks.  Place one piece of fish on a pre-soaked corn husk wrapping the husk around the fish.  Tie the ends of the husk with meat twine noting that most of the fish is enclosed in the corn husk.  Repeat with the remaining pieces of fish.  You’ll see that what has been made is a steam packet for the fish.  The corn husk is strong enough to allow the extra marinade to stay within the husk and simply tenderize the fish.

Grill Setup


The grill has the Smokinlicious Smoker Wood Chunks around the brick and the snapper wrapped in corn husk on the grillI’m using a kettle grill with a wire mesh placed in the charcoal area to retain more of my hot coals.  Since I started the chimney starters while preparing the marinade, I pour these into the charcoal area that also holds some unlit charcoal.  On top of the hot coals, I place a couple of wood chunks which will add great flavor.   I’ve also included a foil-covered brick to act as a heat conductor and retention device.  This is a two-zone setup.  I’ll keep the hot coals and wood going on one side of the brick and place my corn husked fish on the other side of the brick.  In less than 20 minutes, these will be ready to go, fully cooked, and full of moisture.

Coal Fired to Perfection

Our finished Snapper wrapped in corn husk opened to show this wonderful method of cooking fishKnow that when you coal or ember cook foods, the temperature even from these small embers is high.  The grill will average between 300-350° F for the cooking.  There is no need to turn the corn husks, just simply monitor to ensure they don’t catch fire.  A spray bottle of water on hand is helpful at this stage.  In the end, the char flavor will penetrate the husk and produce the most fantastic flavor to the fish.  Simply cut the ties from the corn husk ends and enjoy the fish with your favorite sides.  There is nothing like natural fire cooking for fish.

Thursday, November 1, 2018

WHY WE WON’T SELL PRODUCT ON AMAZON ®

Our shopping cart full of products ready to be shipped to customers by FedEx. Shipping is included in our price which is why we won’t sell product on Amazon.

I won’t deny that I am just as guilty as the next person when it comes to wanting more out of every 24 hours I can get.  This is the main reason why I am an internet shopper.  I rarely frequent an actual retail store aside from a wholesale club to purchase office supplies and the occasional trip to the grocery store.

I also won’t deny that I am an avid Amazon.com shopper!  Just about everything you can think of, I have purchased: clothes, specialty paint, make-up, kitchen supplies, food products, small appliances, area rugs – like I said, just about every category they offer.

So why aren’t SmokinLicious® products offered for sale on Amazon.com?

“Negative” Feedback Services

Today, there is literally a service for anything and everything.  That includes services to pay individuals to post negative reviews on a seller’s product and services.  Let me be clear.  SmokinLicious® certainly has had negative issues arise from time to time in the past 13 years.  When they occur, we have our own procedure in place for remedying the situation which often results in great appreciation from the customer and a brand loyalty relationship developing.  However, when negative feedback occurs when selling on Amazon.com, it can take a little as .0008% reported issues of the total products sold to kick you out as a seller!  Kicking you out means you’ve lost all the inventory costs you started out with as Amazon.com ties up your account.

Open Market for Copy Cats

As anyone who has been in business for themselves can attest to, you spend months working on verbiage for your products, photo imagery for a gallery, and unique header descriptors to bring attention and get you sales.  The last thing you want is someone stealing your work and posting to a seller’s listing on Amazon.com.  That can and has happened!  When it does, you are obligated to show proof of ownership of all content if you want to bring issue against an Amazon.com seller.

Worse yet, the other seller may be allowed to continue to sell a product that looks exactly like yours but maybe lesser quality in similar packaging!  Plus, it is easy for your photo to be high-jacked and replaced with another image to cause high percentages of returns.  Remember, there is a return option that states the item “does not match description,” allowing the buyer to make the return easily while you get a demerit from Amazon.com.

Sinking Price Margin

By far this is the number one issue for my brand to use Amazon.com.  For a good majority of shoppers on this site, they are price driven in their choices.  Imagine SmokinLicious® Grande Sapore® wood chips going against the company that sweeps wood shavings off the floor from their flooring or cabinet making business, placing them in a cheap plastic bag, and slapping a simple label over the bag.  That company can afford to list the price at $3.99 a bag when they have no extra costs involved for the material, just the cheap packaging.  We are not in the market to compete on price.  We are in the market to compete on quality and purity of product.  That’s it!

For the brand SmokinLicious®, we are all about quality, safety, legitimacy, and value!  Our goal is to enable anyone around the globe who enjoys wood-fired cooking to do without having to think about the cleanliness and type of wood.  We’ve selected the safest hardwoods to cook with, stripped them of all the impure bark, reduced the wood to just heartwood so you have the fillet of the tree and dialed in the moisture so you have success at the grill, smoker or plancha every time.  You’ll find us online 24/7 to fill your needs in North America, the UK, and soon, in South Africa and New Zealand.