Thursday, January 28, 2021

BRINING SCIENCE WORTH THE EFFORT FOR THE ULTIMATE MEAT

Brining Sciene for the ultimate meat!
Brining Science for the ultimate meat!

BRINING SCIENCE -You’ve likely heard the term brining and might have a general understanding of what is involved when a brine solution is applied to meat, but have you ever understood the simplicity of how brining improves overall quality and flavor?  For all you science geeks, yes we’ve covered the scientific principles here but please don’t lose sight that this process is relatively easy and the little time invested will certainly lead to favorable results for your taste buds!

Let’s equip you with the science behind brining and a guide on producing a successful brine solution for meats, poultry and fish.

Osmosis and Diffusion

Brine is a salt and water solution used to soak food in, usually meat proteins, to improve the overall quality by a change in the structure of the proteins in the muscle of the brined meat.  There are three primary reasons to brine: texture, flavor, and moisture retention.  To get these results, osmosis must take place.

Osmosis is the movement of a higher concentration of water to a lower concentration of water through a semi-permeable membrane.  To create osmosis, you must start with a solution. The water being solvent (higher percentage of water) and the salt being the solute (lower percentage of salt to the water percentage).

With a balanced solution, brined proteins have an increased level of moisture when compared to non-brined proteins.  Now, know up front, that you certainly could soak a protein in plain water and have it gain moisture but this process would be much slower than if you add salt to the water.  Also, proteins don’t bind to water as effectively during the cooking process which is why salt is introduced when cooking.

Here’s the process of a brine: Salt is sodium chloride (NaCl) and when dissolved into water, it breaks into a positively charged sodium ion and negatively charged chloride ion.  Both these ions will diffuse throughout food flowing from areas of higher concentration to areas of lower concentration.  It takes 100-1,000 times longer for salt to diffuse into food than heat.  The negatively charged ions repel one another creating gaps in the muscle fiber for water to enter the food product.  The food protein will then bind water more tightly which prevents the muscle fibers from shrinking and squeezing water out during the cooking process.

Three Types of Brining Strategies

There are three recognized methods of brining: Dry Rub Brining, Gradient Brining, and Equilibrium Brining.

Dry Rub Brining:

This is likely the most widely used form of brining as it is fast and easy.  Salt and other dry ingredients like herbs and spices rubbed onto the surface of the meat.  How do you know the percentage of salt?  Start by calculating 1% of the proteins weight.  For example, if you are doing a rack of pork ribs that weigh 3 pounds, the amount of salt used in the dry rub would be 1% of that weight minus the bone weight, which is generally calculated as 40% of the gross weight.  Thus, that 3 pound rack of ribs would be reduced to 1.8 pounds for the calculation of salt at 1%.

Gradient Brining:

This is referred to as a traditional brining method as is includes a 5-10% salt content which after the food is soaked in the brine solution, the surface of brined foods is rinsed under cold water to remove excess sodium from the surface.   Salt is dissolved into water with the amount of salt used determined by the desired brine salinity, again, usually between 5-10% of the weight of the water (desired brine salinity X water weight = salt weight).  As an example, it takes 1,000 grams of water to cover chicken.  If we want 5% salinity, then we would require 50 grams of salt in our brine solution (1,000g X .05 (5%) = 50g salt).

Equilibrium Brining:

This method of bring requires a salt or salinity meter to read the salt content in the brine solution during the brining process.  The goal is to have the parts per million (PPM) on the meter drop to half of its initial reading.  This is the state of equilibrium and brining is complete.  This method requires you to calculate the PPM – 1 parts per million equals 1mg/1,000g.  1g = 1,000mg.  If you desire a 1% salt water solution, dissolve 10g or 10,000mg of salt into 1,000g or 1,000,000mg of water producing a salt content of 10,000PPM.

A Bit of Sweet

Although we refer to a brine as a salt and water solution, there is a third component to consider for use.  Sweetener usually in the form of sugar but can be honey, or even a sugar-based soda.  Although sugar does nothing for the texture of the brined meat, it does add flavor and promotes better browning of the skin. 

Once you have your brine solution, there are a few methods to speed up the brining process.

Jaccard meat tenderizer
Jaccard
 

The first method is a Jaccard, a mechanical meat tenderizer.  A Jaccard tenderizer utilizes several rows of thin, penetrating blades, honed to a razor sharp edge on two sides that cooks can press into the meat’s surface, to create a series of small channels that break up the tough tissue and create a more tender texture.

Injection tube for adding brine deep into food
Injection

The second, is injection.  A special marinade/brine injector dispenses the brine to the interior of the meat, thus, speeding up the process of diffusion.
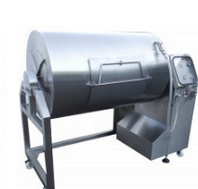
Vacuum brining machine
Vacuum brining

 The last method is vacuum tumbling.  This process “tumbles” proteins and brines/marinades together under vacuum.  The combination of low atmospheric pressure and the tumbling process can reduce the time needed for brining to mere minutes.

Brining Guide

The goal of a brine is to produce juicy, tender and seasoned items. Overall, brining foods adds less than 1/8 teaspoon of salt equivalent to your overall daily sodium consumption so you can brine without worry about exceeding the recommended sodium allowances.

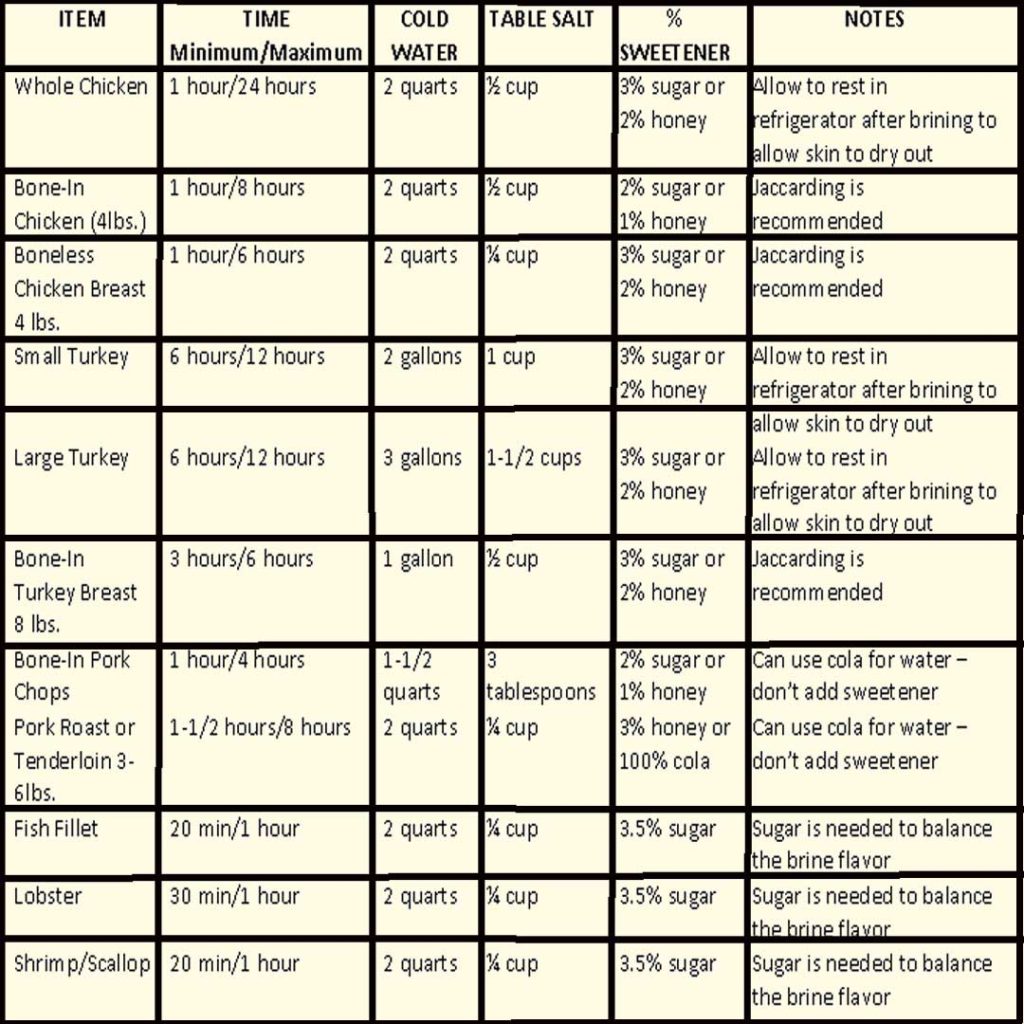
Smokinlicious Brine guide


Thursday, January 21, 2021

SMOKED BACON JAM

Our Smoked Bacon Jam recipe a tasty spread for any meal!

 I love introducing you to options with a common food item that you may have never thought of. Bacon, especially the smoked variety, is something that can be easily incorporated into so many recipes as either the star ingredient or a featured player. Be sure to check out my technique for curing and smoking your own bacon which is easy and by far, more delicious than any store-bought bacon.

Most definitely, today’s recipe has bacon in the starring role- Smoked Bacon Jam! I consider this the perfect recipe for an easy appetizer and recommend you keep a jar or two around during the busy holiday period or for those spur-of-the-moment guest pop ins.

Rendering Smoked Bacon

Start with 1-1/2 pounds of smoked bacon, preferably your own smoked bacon, and cut it crosswise into 1-inch pieces. Place the cut smoked bacon pieces into a large skillet placed over a medium-high heat. Cook, stirring occasionally, until the fat renders and the bacon is lightly browned (about 20 minutes). With a slotted spoon, transfer the cooked bacon to paper towels and drain. Pour off all but 1 tablespoon of fat from the skillet and add 2 medium yellow onions that have been diced small and 3 cloves of garlic that have been peeled and smashed. Cook the onion and garlic until translucent, about 6 minutes. Add ½ cup of cider vinegar, ½ cup packed dark brown sugar, ¼ cup pure maple syrup, and ¾ cup brewed coffee. Bring the mixture to a boil, stirring and scraping up the browned bits from the pan. Add the previously cooked smoked bacon and stir to combine.

Slow Cooking Makes It Perfect

Here is the step that ensures a jam-like consistency. Time to transfer the mixture to a 6-quart slow cooker and cook on high, uncovered, until the liquid becomes syrupy. This will take about 3-1/2 to 4 hours. If you don’t have a slow cooker, you can cook it in the oven until the consistency is reached using a temperature of 300°F. Once ready, transfer the mixture to a food processor and pulse until coarsely chopped. Let it cool, then refrigerate in airtight containers for up to 4 weeks.

Don’t forget, in addition to making a great appetizer for guests, this is a super hostess or holiday gift. Simply add your favorite bread, baguette, even pancakes, and enjoy!

What’s your favorite recipe featuring homemade smoked bacon? Leave us a comment to opine and subscribe to get all our postings on tips, techniques and recipes. Bringing innovation to wood fired cooking with recipes, techniques and the science behind the fire, smoke, and flavor. That’s SmokinLicious®.

Thursday, January 14, 2021

SMOKE A TURKEY- LEARN HOW

Smoke a Turkey with our easy to do tips will result in awesome color and flavor. Give it a try!

 There are so many ways to smoke a turkey with the main difference found in the amount of time for both preparation and cooking. One of the favorite methods is hot smoking whether done on a traditional smoker, charcoal grill, or gas grill.

To smoke a turkey, you’ll need the following supplies:

  • Grill or Smoker plus fuel for the equipment (charcoal, propane)
  • Wood Chunks
  • Meat Thermometer
  • Dry Rub and/or Brine (about 1 cup of dry rub and 2 cups brine)
  • Whole Turkey preferably fresh and less than 18 lbs.
  • Aluminum Pan
  • Aluminum foil and towels or an insulated blanket

Preparations Before You Smoke a Turkey

The cleaning of the bird is the same as when you do traditional roasting; removal of the giblets and neck, rinsing and drying the bird, and trimming any loose skin. However, don’t truss or tie the legs as this can make it harder to cook the bird completely through when smoking. You can use toothpicks to pin the wings in if they seem to be falling away from the bird. If you elect to brine your turkey, be sure to start this process at least a day ahead of smoking. Even brined birds will have more flavor if a dry rub is applied. So apply any combination of dry ingredients you prefer to the turkey, being sure to put some of the rubs under as well as on top of the skin. Refrigerate the rubbed turkey overnight.

Once you’re ready to smoke, remove the turkey from the refrigerator and rub a small amount of oil on the skin, especially the bottom portion that will be touching the grill grates. This will keep the bird from sticking. Don’t apply oil to the grates as that will not guarantee the bird won’t stick! Always place a cold turkey on the grill or smoker as cold will attract more smoke vapor. Plan about 30 minutes cooking time per pound.

Preparing the Grill or Smoker

Charcoal Grill/Smoker:

Charcoal base with Smokinlicious® wood chunks added

When using a traditional smoker, you can simply place the charcoal and wood chunks, as normally done, for a long smoking event. Usually, you position unlit charcoal in the firebox. Then lite a chimney starter full of charcoal and pour that next to the unlit charcoal. Then place a few wood chunks on the lite charcoal and some on the unlit areas so you will have wood flavor infusion during the entire cooking process. Place a disposable pan under the turkey that contains a few cups of water or mix of water and broth/stock. This will add moisture to the cooking environment and collect all the turkey drippings if you should want to make gravy. The goal is to maintain a cooking temperature of 225-275°F, though you can go as high as 300°F if desired.

When using a kettle-style charcoal grill, set up the drip pan and the turkey to one side of the grill, placing the hot coals on the opposite side. You can also set up some fire bricks in the charcoal area to retain more heat and stabilize the temperature.

Gas/Propane Grill:

Smoke coming from our wood chunks! Using a two zone cooking method

These grills need to be set up using an indirect method of cooking – heat on one side meaning burners on one side lite while the turkey and drip pan goes on the unlit side. Wood chunks will be placed on the heat shields of the lit burners. These will smolder/burn giving off true wood flavor. Additionally, smoker wood chunks last a lot longer than using wood chips in a smoker box or foil pouch. Still, maintain a temperature of 250-275°F which can be tricky. You will have to see how many burners need to stay lit to do this technique. Then check the level of heat those burners need to be set to for that temperature. Certainly, you can cook at a higher temperature if you like but you may need to replenish the wood chunks as they will likely combust faster.

Don’t Fuss over Smoke a Turkey

It’s important that you allow the turkey to cook on its own without fussing with the lid. Each time you open the lid, you release smoke vapor as well as heat. If you want the bird to cook in a reasonable amount of time, then leave the lid alone.

Never stuff a turkey that will be smoked as this causes the overall cooking time to extend and produce overcooked meat. Heat flow is blocked by anything put in the cavity as well so try to avoid stuffing herbs, citrus slices, etc. in there.

Always use a quality digital thermometer. You’re looking for the breast meat to register 160°F. You can remove from the grill/smoker at that point. Remember, if left sitting, the bird will continue to cook from all the radiant heat that has been trapped in the bones and meat.

Final Tips for How to Smoke a Turkey

If you need more than 18 lbs. of turkey, then consider smoking two smaller birds doing the same set up as above, just with two birds on the grill.

Feel free to mix some of your dry rubs with melted butter and a little oil and brush this mixture on the bird during the final hour of cooking. It will produce a fabulous color to the bird and help crisp the skin.

Remember, turkeys labeled as basted or enhanced contain a salt solution so be sure you season lightly so you don’t end up with a salty outcome.

You do not need to foil or tent the turkey when smoking. Let the air always circulate for the entire cooking process.

When cooking with charcoal, you will likely need less wood than with the gas/propane grill.

I hope I’ve inspired you to try smoke a turkey, so you can see just how unbelievably flavorful and easy this technique is. Remember to leave a comment and subscribe to our channel. Bringing you tips, techniques, recipes, and the science behind the fire and flavor – that’s Smokinlicious®!

The Culinary Crew wants you to know…

that whether it’s smoking a turkey or any meat/protein food item, our recommendation to “Don’t Peek and Let the Smoker Apparatus Do Its Trick” is very important and can’t be stressed enough! Be patient and keep the lid on! You’ll be rewarded with incredible coloring and awesome flavor! If you’re tempted to look, resist the urge by thinking of this in much the same light as many of us did when we saw that Christmas present under the tree days before Advent, all wrapped up nicely with a tag that beckons- ‘Don’t Open Until Christmas!’ Don’t ruin the joy by spoiling the element of surprise and satisfaction!

Thursday, January 7, 2021

THE BEST SMOKED BANANA BREAD

Smoked Banana Bread so much flavor beyond the regular recipe

 Banana is one of the best fruits to cook with as they are very flavorful and respond exceptionally well to smoke vapor due to the heavy water content in them.  In fact, bananas have roughly 75% water per 100 grams which is one of the reasons why they are popular to use in smoothies.

Since bananas don’t take a lot of time to infuse the natural essence of wood chips, I’ll be using my Nordic Ware stove-top smoker.  The golden, wood infused pieces of banana will then be added to sweet bread ingredients to make a banana loaf.

Our recipe will include a gluten-free flour and sour cream instead of oil which gives a great texture and lets the smoked banana stand out.  You’ll need just 4 smoked bananas for this recipe.  Let’s get started with the smoking process.

Tasting Notes: Remember, the most flavorful banana loaf is made using ripe or over-ripe bananas so be sure to shop your store’s “reduced for quick sale” rack, where over-ripened fruit normally is placed.

Got 15 Minutes?

You don’t need to own a stove top smoker like my Nordic Ware Kettle Smoker to do this technique.  Simply follow our previous posting on making your own stove top smoker using a standard pot.  Once your equipment is ready, take 4 ripe bananas, remove the peels and cut length-wise in half.  I place the bottom of my smoker on a medium heat burner and add one scoop of Minuto #8 wood chips to the center bottom of the pan.  The drip pan goes on next, followed by the smoker pan with the cut banana pieces.  The bananas will smoke about 15 minutes before turning golden in color.  Be sure you don’t over smoke the bananas or you could increase the chance for a bitter flavor or remove too much water.  Turn off the heat and carefully remove the smoker pan.

With the banana slices removed from the smoker pan, I place these in a bowl.  You’ll see water quickly start rendering from the fruit as they cool down.  If you prefer a thinner batter to your bread, then go ahead and use the bananas as is in this recipe.  If you prefer a firmer bread, drain the banana slices in a colander over a bowl to remove some of the water before mashing the slices.  You want your mash to contain somewhat consistent banana pieces when finished.  Then taking a standard 9×5 loaf pan, generously butter the pan on all sides and the bottom to ensure the bread will not stick.  Set the pan aside while we get ready to make the dough.

Time for the Dough!

I’ve decided to make a thicker loaf dough so I did drain my bananas in a colander for about 5 minutes before mashing.

Start by adding 1 cup of sugar to a large bowl followed by ½ cup of softened butter.  Cream the butter and sugar together using an electric mixer fit with a paddle attachment.  Once creamed, add 2 eggs, one at a time mixing well.   The outcome should be a smooth, thickened consistency.  Feel free to use sugar substitutes if you prefer.  Stevia substitution would be 24 packets or 1/3 cup.  Do not substitute the sugar with a liquid substitute as you must have a powder for the right bread consistency.

Now it’s time to bring in some dry ingredients to our dough.  Start with 1-1/2 cups of unbleached flour or a flour of your choice in a small bowl.  I’m using coconut flour today.  Add 1 teaspoon of baking powder and 1 teaspoon of kosher salt to the flour and whisk well.  Add the flour mixture to the butter mixture and combine well.  Add the mashed smoked banana which should be about 1 cup, plus ½ cup sour cream, and 1 teaspoon vanilla extract.  Mix well.  If you’ve used the banana without the rendered water, the dough will be quite thick.

Time to Bake Smoked Banana Bread

For the final ingredients to our dough, note these can be optional.  I’m adding ¼ cup shredded coconut and ½ cup of walnut and pecan pieces.  Mix with a spatula until blended.  Then place the dough into the prepared loaf pan spreading out so the dough is even.  I like to pound the filled pan on the counter before baking in order to ensure there are no air pockets.

Place the pan into a 350° F oven and bake until a tester inserted into the center of the loaf comes out clean.  This will take approximately 40-45 minutes depending on the thickness of your dough.  Remove the loaf pan from the oven and place on a cooling rack for 10 minutes.  Then carefully invert the loaf on a serving platter.  I’ve made a glaze to drizzle over the top of my loaf which is simply a ¼ cup of powdered sugar and 2 tablespoons of cream.  I add liquid in tiny amounts to get the consistency I prefer in the glaze, which is a slow drip from a spoon.  Now you’re ready to slice up this flavorful bread and impress all your guests.

What’s your favorite smoked banana recipe?  Leave us a comment to opine and subscribe to get all our postings on tips, techniques and recipes.  Bringing innovation to wood fired cooking with recipes, techniques and the science behind the fire, smoke, and flavor. That’s SmokinLicious®.