Friday, September 27, 2019

COAL-FIRED LEEKS TERRINE

COAL-FIRED LEEKS TERRINE begins by cooking the leeks over a bed of hot ember coals!

Considered one of the healthiest foods, leeks join onion and garlic as part of the allium vegetable family.  This seasonal delight is commonly used as a soup but I have something else in mind.  I’ll be putting these directly on the hot coals and charring them for tenderness and flavor.  Then I’ll be layering them in a terrine that includes goat cheese and crème Fraiche.  I’ll also provide a dip alternative using the same ingredients to give you two options for these great flavors.  Get shopping and pick out about 5 lbs. of vibrant green leeks, and let’s make an appetizer.
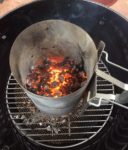
 

The Small Coal Bed

One of the benefits of having a cooking wood company is when we produce our charwood product, I can have the micro pieces saved for my cooking use.  By using these smaller pieces, it allows my fire to reduce faster to the hot coal stage.  I’m using a Weber kettle for this coal method and include a fine mesh screen on the charcoal grate to prevent the micro pieces from falling through.

our cooking bed of coalsI place a Firestarter on the screen, then place my chimney starter over the top.  I fill the chimney with my micro charwood pieces and light the base where the Firestarter is.  Leave this alone until the coals gray over and are hot.  Then pour in an even layer in the charcoal area to be ready for the leeks.

Tasting Notes: I recommend for the best char taste to the leeks that you use hardwood charcoal and not briquets.  This will allow you to break apart charcoal pieces easier and get an even coal bed.


Quick Leek Preparation

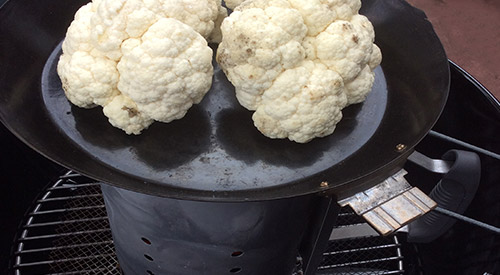
Leeks are one of those vegetables that are simple to prepare for cooking.  First thing, if you’ve purchased with the root ends intact, remove those roots.  Even if the roots are removed, still trim the root end to remove the hardened, dried end.  Then cut off the dark green tops.  Remember to save these parts to flavor soup stock! Wash the leeks to remove trapped dirt and pat dry.  Once dry, cut each leek lengthwise in half.  Now get a sheet pan and we’ll finish getting the leeks ready for the coals.

With the leeks cleaned and trimmed, it’s time to spread them out on a sheet pan and season with salt and fresh ground pepper.  Taking the pan to the grill, place the leeks on the hot coals trying not to overlap any.  Let them cook for about 10 minutes before turning to char the other side.  Be sure to move around any leeks that are lighter in char color than the others.  Total time on the coals will be about 20 minutes.  Remove and allow to cool briefly.


Terrine Filling

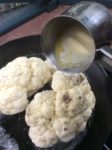
With the leeks charred and tenderized, it’s time to make the terrine filling.  Start by combining 4 ounces of softened goat cheese, 4 ounces of crème Fraiche, 1 teaspoon lemon or lime zest, kosher salt and fresh ground pepper to taste.    Mix these ingredients together well.   Line a standard 9×5 loaf pan with plastic wrap so that about 4-inches of wrap overhang the ends of the pan.  This will allow for ease in releasing our terrine once it is set.

The layering of the leeks in the pan and goat chees fillingWith the leeks, goat cheese mixture, and loaf pan ready, it’s time to assemble the terrine.  Start by adding leeks to the bottom of the loaf pan in a single layer.  Then add a layer of the goat cheese mixture.  Repeat until the pan is filled, being sure to start and end with a leek layer.  Fold the plastic wrap over the finished terrine and place a piece of cardboard cut to size on the covered terrine.  Apply canned goods to weigh down the terrine and refrigerate overnight.

Tasting Notes: If you prefer to not make a terrine, you can still use this basic recipe to make molded leek topping.  Simply chop the charred leeks into small pieces and add directly to the goat cheese mixture.  Combine well and then mold in small bowls, still refrigerating overnight.

After spending the night in the refrigerator, the coal-fired leek terrine is ready to be un-molded.  Start by unwrapping the terrine and inverting it onto a serving platter.  I like to cut 1-inch slices while the terrine is still firm.  Be sure to use a sharp, serrated knife to get through all the leek layers.  Then allow softening somewhat before serving with your selections of suitable accompaniments.  I am using a hearty pumpernickel bread as well as a crusty Italian bread.  Other good choices are radicchio leaves, water crackers, petite bread, and mini pepper halves.  This is an easy means of giving your guests a unique appetizer that is healthy too.

Do you have a favorite leek recipe?  Tell us in a comment.   Bringing innovation to wood-fired cooking with recipes, techniques and the science behind the fire, smoke, and flavor. That’s SmokinLicious®.

Thursday, September 19, 2019

COAL FIRE CAULIFLOWER RICE WITH TOMATO

Our finished Cauliflower rice with Tomato we fire roasted with just a chimney starter!

With my special chimney starter cooking technique, which you can view in a separate posting, a fresh head of cauliflower was wood fired for a charry flavor.  Now, it’s time to take this fabulous flavor and marry it to tomato and spice in a cauliflower rice dish that can be consumed as a main course or a fabulous side dish.  A simple recipe that’s full a flavor that you’ll want to enjoy again and again.  Plus, you’ll enjoy the added benefits of this super nutritious food due to its low saturated fat and cholesterol and high vitamin and mineral daily needs.


Making Rice


After tenderizing my fresh head of cauliflower on the hot coals of a charcoal fire, I’m going to turn this into a cauliflower rice dish that features tomato, feta cheese and just a hint of jalapeno pepper.
Our charred Cauliflower in the food processor ready to be "riced"
To start, cut your cooked cauliflower steaks into smaller florets and place half in a food processor with a standard blade.  Pulse the cauliflower until it is reduced to rice-like particles.  Remove from the processor bowl and add into a pot.  Continue to process the remaining cauliflower in the same manner.  You’ll see the tiny flecks of the charred goodness easily if you’ve prepared white cauliflower.  Keep in mind, that one head of cauliflower will produce nearly two quarts of rice before the other ingredients are added, so this can comfortably feed 6 as a side dish or 3-4 as a main entrée.

Tasting Notes: If you care for additional spicy notes, feel free to pulse in some fresh ground pepper or pepper flakes.  Just be sure to reduce the amount of fresh hot pepper in the cooking section.


Hearty Flavors


Adding the broth to the cauliflower rice!Once the cauliflower rice is made and in the pot, it’s time to add the other ingredients.  Start by adding 2 cups of diced tomato and one finely chopped jalapeno pepper.   Pour in ½ cup of broth – I’m using bone broth – and stir well.  You can adjust the moistness of the finished rice by adding more broth.   Add ¼ cup of feta cheese just before serving, allowing the cheese to be heated just a couple of minutes.

Once sampled, you’ll taste the meaty char flavor from the coal cooking technique that is balanced so well by the sweet tomato and slight kick of the spicy pepper.  This is hearty enough to eat as a main meal or the perfect accompaniment to your favorite animal protein.  Just think what the festive colors can do for this dish if you’re lucky enough to find yellow or purple varieties of cauliflower. [#cauliflowerrice]

Tasting Notes: There are so many variations to cauliflower rice.  Use seasonal ingredients to guide you.  Options: curry powder, honey, Dijon mustard, & butter; asparagus, mushroom, basil, & coconut milk; black beans, tomato, corn, onion & Verde sauce.

Thursday, September 12, 2019

COAL FIRE CAULIFLOWER BY COOKING ON A CHIMNEY STARTER

We are cooking on a chimney starter with a grill pan to nicely char our head of Cauliflower for this recipe!

A cousin to broccoli, #cauliflower is one of those vegetables that can be eaten raw or cooked and converted to so many different textures.  Best yet, cauliflower is one of those super cancer-fighting foods as it contains sulforaphane known to kill cancer stem cells.

I’ll be taking my head of cauliflower and introducing it to hot coals, first, direct heat using a #chimneystarter for the actual cooking and then directly on the hot coals to give it the perfect “meat” char.  No matter what color you enjoy – white, yellow, purple – grab a head and get your chimney starter ready, as I show you how to use a chimney starter as an actual grill.


Why a Chimney Starter


There are times when you really don’t need to fire up a full charcoal area of coals on the charcoal grill.  I have the perfect solution when you’re doing just a small quantity of a food, like our head of cauliflower. 
All our hot embers accumulated in the Chimney starter provides an excellent heat source for cooking
To start, I place a mesh screen on the charcoal grill grate to help retain the small, hot coals for cooking.  I have a collection of micro charcoal pieces that work perfectly for this type of cooking.

After lighting a Firestarter, I place the charcoal filled chimney starter on top of the Firestarter and allow the coals to burn down to hot embers.  Hot embers are what I will be using to cook my fresh cauliflower, first, directly on the chimney starter, then on the mesh screen once I dump the hot embers from the chimney starter.


Prep and Cook


Pouring the butter over the cauliflower resting on our grill planCauliflower is so simple to prepare for chimney starter coal cooking.  Just remove the thick stem and the green leaves, then cut in half.  I’ll be placing a griddle pan directly over the chimney starter for the start of the cooking.  I first drizzle a couple of tablespoons of a high heat tolerant oil over the cauliflower (I’m using avocado oil).  Allow that to cook while you melt butter which will be poured over the cauliflower.   I melt the butter directly on the grill while the cauliflower is cooking.  Allow this to char the cauliflower on the griddle for about 12 minutes.  We just want enough tenderness to allow the direct coal cooking to provide the flavor.


Embers Give Char Flavor


nicely charred Cauliflower ready for our recipe!After the cauliflower has produced some tenderness while direct cooking over the chimney starter, it’s time to remove the griddle pan and dump the hot coals onto the mesh.  You’ll see I’ve placed a large wood chunk just off the hot coals to produce some additional wood-fired flavor.  Now in goes the cauliflower steaks.  I position them right on the hot coals.  Don’t turn or disturb these pieces for a least 8 minutes at which time, flip the cauliflower to char the other side.  This is what produces the fabulous “meaty” char taste and why cauliflower is done on the grill is often referred to as a cauliflower steak.

If you will use the cauliflower in a recipe, then cooking about 12 minutes on the coals will be enough.  If enjoying as is, then cook slightly longer and enjoy.  This truly is the easiest method of cooking a single head of cauliflower for a true char flavor.  Which I will be taking to a cauliflower rice recipe that’s coming up!

Have you ever cooked directly on a chimney starter?  Leave us a comment to share.  Bringing innovation to wood-fired cooking with recipes, techniques and the science behind the fire, smoke, and flavor. That’s SmokinLicious®.

Thursday, September 5, 2019

SEASONAL SMOKEY BAKED APPLES WITH SWEET STUFFING

These finished apples get smoky are a wonderful fall treat!
These finished smokey baked apples are a wonderful fall treat! Easy to do on the gas grill with a two-zone cooking method with wood chunks.


Apple season is here and I’ve found some beauties to make a simple but super sweet and flavorful recipe.    And of course, I’m taking it to the grill to let the apple get a kiss of smoke while tenderizing.  With so many varieties of apples available, you can pick your favorite and use this filling for the perfect stuffed apple.

The apples we bought at the Farmers MarketIn my home state of New York, there are over 25 varieties of apples.  Since these can be cold stored, they are available year-round but there is nothing like the fresh harvest.  In fact, controlled atmosphere storage was pioneered in New York State.

Whether served as the dessert or a sweet side dish is up to you but either way, you’re going to love the ease of making this dish and consuming all its seasonal goodness.  Pick your favorite variety of apple and get ready to stuff them with goodness everyone is going to love!  Smokey baked apples done on the grill, cleanup is a breeze!


Apple Preparation

Smoke coming from our wood chunks! Using a two zone cooking method 
I’ll be using my gas grill for this recipe so I start by lighting only half the burners on my grill which I’ve added a smoker box that contains 3 hardwood chunks.  This will provide for the great smoke flavor to the apples.  While the grill heats up to about 375°F, I prepare the Macintosh apples.  First, wash and pat dry the apples.  You can use an apple corer to remove the core but note you do not want to produce a clean hole through the entire apple.  We want to produce an opening for adding the stuffing but we don’t want it to run out of the apples.  I like to use a small, sharp knife, cut into the apple stem end about ¾-inch from the stem making a circle.  Remove the core membrane and seeds leaving a firm base to the apple for filling.

Tasting Notes: Although I’ve selected Macintosh apples to know any variety will do.  Just note, if the apples are significantly larger, you will need to make an additional filling.


Sweet Stuffing


our sweet stuffing in the mixing bowlWith our apples cored, it’s time to make the sweet filling before heading to the grill.  First, know I like to use a disposable foil pan to make clean up a breeze.  In that pan, I place a roasting rack so the apples will be exposed to radiant heat all the way around the apple.  I’m making ten stuffed apple but I will give you the ingredients needed for making eight apples.

Place 1 stick of softened butter in a bowl.  Add 1 cup of light brown sugar, ½ cup chopped pecans, and 1-1/2 teaspoons of ground cinnamon.  I prefer to mix this with my hand to ensure good distribution of the ingredients.  Taking a small amount of the mixed filling, I form a log shape and insert into the apple opening, pressing down to make sure this is filled to the top of the apple.  Once all the apples are filled, I head to the grill with my pan.

Tasting Notes: The stuffing for this apple recipe can be easily modified.  Feel free to swap the pecan for another nut like walnut, hazelnut or almond.  For spices, consider adding ginger, allspice, and clove either in addition to or in place of the cinnamon.


No Fuss Grilling


Our Smoker box with wood chunks for smokey flavorOnce at the grill, I check to ensure my wood chunks are smoking well.  I place my pan of prepared apples on the unlit side of the grill and pour enough water into the pan to coat the bottom by about 1-inch.  This will allow moisture into the cooking area to get the apples very tender in a short amount of time.  I usually check the apples after 45 minutes and rotate the pan if needed.  When the apples are tender and the filling browned, these are ready and can be removed from the grill-#grilledapples.

Tasting Notes:  Note that if you elect to use a charcoal grill the smoke infusion produced will be stronger.  You are encouraged to still use a two-zone set up on the charcoal grill to keep the sugars from burning.

Serve ‘Em Up

our finished smokey stuffed apple!Once the apples are tender and the filling browned, it’s time to remove the apples and prepare to serve them.  There are many options for an accompaniment to the apples.  Today, I’m using a vanilla bean ice cream that I’ve sliced into wedges.  Certainly, the apples can be served with whipped topping, another flavor of ice cream, a vanilla custard or pudding, or even a slice of hard or rind cheese.    These are best if served warm.  Don’t forget, if any filling is left, add to a pureed squash for another great recipe.  That’s why I always make extra!
our finished smokey stuffed apple!