Thursday, October 28, 2021

DOES SIZE MATTER?

Our double filet wood chunks can fit where size matters for your smoker or cooker unit

I’m sure you’ve had the experience of going into a store and locating the limited supply of wood chips and/or chunks offered, then look closer at the clear plastic bag and ask: Is this it?

It’s always interesting to realize what we are willing to accept versus what we really want.

My Team has spent a lot of time examining the products available in the wood chip line. Boy, have we learned a lot!

For instance, there seem to be two divisions with chip suppliers: those that manufacture wood chips as a waste product to another product line say cleaning agents, animal bedding, or flooring products. Then there are those that offer a product with a brand name on it that may be associated with a specific equipment manufacturer. Generally, that type of supplier is not the manufacturer of the product just simply a re-seller under a brand name. Thus, you can’t be sure what portion of the tree is actually in the bag and where the wood is coming from!

We still hold ourselves to a higher standard believing that a true cooking wood manufacturer should offer different variations in product size to work with the abundance of equipment lines available. That’s why we pride ourselves on being able to offer over 6 chip sizes and 4 chunk sizes. Like other food ingredients, why would you settle for only ground pepper when you can have the whole peppercorn as an option.

We are a food ingredient, a food flavor. Most of all, we are a COOKING WOOD manufacturer!


Thursday, October 21, 2021

Wood Fired Cauliflower- Roasted on a LP/Gas Grill

Look at this great head of wood fired cauliflower over wood chunks!


It’s time to bring your vegetables into grilling season! Nothing beats the smell of a fresh garden vegetable roasting over wood even on an LP/gas grill. Make this the time of the year you’ll get great char wood flavour in your seasonal vegetables.

Ingredients:

  • An LP or gas grill – any brand or size will do.
  • “Double” Filet wood chunks from SmokinLicious®.
  • a couple of heads of cauliflower. Pick the color you like the best – white, yellow or even purple!

Grill Preparation

If you want to add special wood flavoring to your LP/Gas grill there are easy steps to follow:

  • Make sure your grill is clean from any significant grease build up.
  • Remove the grilling grates and determine how much space is between the diffuser and the grilling grate.
  • The diffuser is the plate covering the unit’s gas burner(s).
  • Don’t remove the cover.
[setting up the wood chunks on the heat Diffuser to develop hot spots for Charring]
[setting up the wood chunks on the heat Diffuser to develop hot spots for Charring]

Once you have the sizing computed, then select the SmokinLicious® wood chunk size that will fit – Single Filet which is ~4 inches or the Double Filet which is ~2 inches.


Wood Preparation

Now, let’s set up the wood on the grill. Remove the cooking grates from the grill then strategically place the wood chunks over the heat diffuser. This is the metal piece covering the actually gas burners. If the SmokinLicious® wood chunks are fresh, then you can add them directly to the unit without pre-soaking them. If not, you may want to consider a lite soaking of about 15 minutes. Because I’m cooking wood fired cauliflower, I am using the chunks in their natural state. However, feel free to consider a pre-soak in liquid with flavouring such as beer, wine or juice.


Now replace the grill grates back on the unit, over the SmokinLicious® wood chunks! Make sure the grates are securely seated back on the unit. If there is a lot of space on your unit between the diffuser and the grate you may want to consider a SmokinLicious® single filet or block item. Now light the unit, set the dials to a low heat setting and bring the unit up to temperature. Say around 180 degrees. Do not overheat the unit.

Wood Fired Cauliflower- Preparation

In preparing my wood fired cauliflower for this cook, I’ve elected not to reduce the cauliflower heads into pieces. I prefer to do the cutting towards the end of my grilling presentation.

After pre-heating the grill to around 180 degrees, I add the cauliflower heads to the grill grates. Let the wood infusion flavour begin!

[ Fresh heads added to the grill, note the wood has not ignited yet to develop a hot spot]
[ Fresh heads added to the grill, note the wood has not ignited yet to develop a hot spot]

Roasting Process for Wood Fired Cauliflower

I position the wood fired cauliflower head over the hot spots created by the SmokinLicious® “Double” filet wood pieces which are under the grilling grates. The wood will ignite and begin the charring stage of the heads of cauliflower. I recommend bunching the wood pieces together to produce a hot spot on the LP/gas grill to allow for a direct char technique. While I am not using the smoke from the wood, I am still infusing great natural grilling flavour with the wood.

[Now I have hot spots and look a the char we are putting on the wood fired cauliflower. The green is the Parsley I add at the end of the process]
[Now I have hot spots and look a the char we are putting on the wood fired cauliflower. The green is the Parsley I add at the end of the process]

My cooking is taking place with an open lid because I want to char not smoke! It’s important to keep turning the heads so the flavour will be even. In the final stage of charring, I add some fresh parsley to the wood fired cauliflower heads for final flavour and presentation. And, of course, I love to drizzle melted butter sometimes infused with paprika, to the finished product.

Remember this is a vegetable, not meat so there is no grease to flare up the LP/gas grill. This is another example of why using SmokinLicious® Wood Chunks on the diffuser and under the grill grates of your LP/gas unit can generate such exceptional wood-fired flavour. Now, get to those heads of your wood fired cauliflower and ENJOY!


Thursday, October 14, 2021

BBQ SMOKE COLOR

BBQ Smoke color, Black, Brown White or Blue is the key to successful Barbecue flavor

You smell it before you see it! The aroma of foods being cooked outdoors. When those foods involve cooking over wood – hardwood to be specific – well, it’s a flavor experience that is in a league of its own.

Today, instead of concentrating on the cooking technique of wood-fires, let’s examine the smoke vapor.

Does BBQ smoke color mean anything for flavor outcome?

The quick answer: absolutely! Let’s take a closer look at the finer points of smoke vapor colors.

From Black to Nearly Invisible, The Language of BBQ Smoke Color

There are four basic attributes to smoke when it leaves equipment: volume, velocity, density, and color. It is the combination of these attributes that reveal so much about the color of smoke vapor or gas produced from combusted wood.

Black Smoke = No Oxygen

Black smoke is unattractive, highly dense, consisting of large particles, and the key sign that the wood is starved of oxygen. When air intake is left uncorrected, this black smoke vapor can turn foods acrid, bitter, and sooty. Certainly, this is not the goal of wood-fired cooking! Don’t cook with smoke that is black in color. Learn how to control air intake and exhaust for proper air flow and the best smoke vapor infusion for great flavor.

Gray/Brown Smoke = Poor Wood Quality

You understand air flow, the balance needed between the air intake and outtake. Despite your optimal setting of air flow, you still find gray to brown smoke color occurring. What happened?

Often, this boils down to a case of poor wood choice. Gray or brown smoke occurs when there is a mixture of moisture and hydrocarbons. Bark on woods can stimulate brown smoke as this is the driest and most impure part of the wood. You can also see gray to brown smoke color when there are other stimulants on the wood. It may be that something dripped on the wood, was deliberately applied to the wood, or as part of the wood’s manufacturing process if the wood is a by-product from another process.

White Smoke = Initiation of Heat

Virtually all solid materials exposed to combustion emit white smoke. This means heat is being stimulated to the wood and drying it out. Remember, moisture is water and when heat finds water it has to induct it to produce steam. This takes energy from the fire or ignition and can stall full stages of combustion. Once moisture is evaporated you will observe white smoke to transition to a clearer color, hopefully, the infamous blue. For longer, lower temperature cooking, wait for the white smoke stage to pass before adding the food to the grates. For hotter temperature cooking like burgers, steaks, etc., go ahead and add to the grates even with the white smoke present. The abundance of aromatics at the white stage will allow for the flavor to permeate shorter cook items.

Blue Smoke (or nearly invisible) = Holy Grail of BBQ Smoke Color

Keeping in mind that you don’t always need an invisible or blue smoke to have a flavorful wood-fired cooking event, this is still the goal when cooking with wood for many hours. Blue or invisible smoke means that full combustion has occurred to the wood and the lignin compound is releasing the smoky aromatic that will stick to moist food surfaces. Take advantage of this pristine stage and get cooking for the best wood-fired flavors.

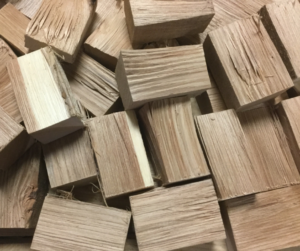
Finding the Perfect Wood with the Perfect Moisture Level for the Ideal BBQ Smoke Color

As a final note, don’t be fooled into thinking that using dry wood will save time on waiting for the fire’s heat to evaporate excess water and get to the flavoring. There is extensive research demonstrating that the ideal smoke composition containing flavor stimulating compounds called carbonyls and phenols is in hardwoods that have a higher moisture rating not the 10% or less that is considered seasoned wood. Use caution when making the wood purchase. Knowing key details about the wood prior to purchasing will help to achieve the smoke color that produces maximum flavor.

Was this posting helpful? Leave a comment or suggestion. We’d love to hear what you’d like to learn more about in wood-fired cooking methods and techniques. Don’t forget, follow us and subscribe so you don’t miss out on anything.


Thursday, October 7, 2021

SNAPPER GETS WRAPPED IN CORN HUSK & COAL FIRED

Snapper Gets Wrapped in Corn Husk and is now ready to rest on our bed of coals to get roasted!

When fresh fish comes in season, whether you catch it yourself or find your perfect catch at the seafood market or store, there is no better way to release the flavor than on the charcoal grill. I found some splendid snapper fillets that I plan to marinate, wrap in a corn husk, and cook on the coals of my charcoal grill. Let’s get started!

The Perfect Marinade

The final blended ingredients for this tasty marinade!


Fish does not require a lot of marination time so know in the time it takes the fish to absorb the marinade’s great flavors, you can set up the charcoal grill. I like to lite the chimney starters while I make the marinade. For that, you’ll need:

  • 6 white fish fillets (tilapia, branzino, snapper)
  • ½ cup finely chopped scallion
  • 10 garlic cloves, minced
  • 1 cup oil
  • ¼ cup lime juice
  • 1 teaspoon paprika
  • 1 teaspoon curry powder
  • Salt – 1 teaspoon
  • ½ teaspoon black pepper
  • 12 pieces of soaked corn husks

Mix together the scallion, minced garlic, oil, lime juice, paprika, curry powder, salt and black pepper. Place the fish in a baking dish or in a sealable storage bag and top with the marinade mixture. Marinate the fish in the refrigerator for a minimum of 1 hour.

Wrapping the Snapper

It’s time to take our marinated fish and encase it in the corn husk. If you have fish fillets that will fit in a single corn husk, then one will do. However, if you are doing larger pieces of fish, usually over a few ounces in weight, you will need to place 2 corn husks on a work surface overlapping the husks. Place one piece of fish on a pre-soaked corn husk wrapping the husk around the fish. Tie the ends of the husk with meat twine noting that most of the fish is enclosed in the corn husk. Repeat with the remaining pieces of fish. You’ll see that what has been made is a steam packet for the fish. The corn husk is strong enough to allow the extra marinade to stay within the husk and simply tenderize the fish.

Grill Setup

The grill has the Smokinlicious Smoker Wood Chunks around the brick and the snapper wrapped in corn husk on the grill

I’m using a kettle grill with a wire mesh placed in the charcoal area to retain more of my hot coals. Since I started the chimney starters while preparing the marinade, I pour these into the charcoal area that also holds some unlit charcoal. On top of the hot coals, I place a couple of wood chunks which will add great flavor. I’ve also included a foil-covered brick to act as a heat conductor and retention device. This is a two-zone setup. I’ll keep the hot coals and wood going on one side of the brick and place my corn husked fish on the other side of the brick. In less than 20 minutes, these will be ready to go, fully cooked, and full of moisture.

Coal Fired to Perfection

Our finished Snapper wrapped in corn husk opened to show this wonderful method of cooking fish

Know that when you coal or ember cook foods, the temperature even from these small embers is high. The grill will average between 300-350° F for the cooking. There is no need to turn the corn husks, just simply monitor to ensure they don’t catch fire. A spray bottle of water on hand is helpful at this stage. In the end, the char flavor will penetrate the husk and produce the most fantastic flavor to the fish. Simply cut the ties from the corn husk ends and enjoy the fish with your favorite sides. There is nothing like natural fire cooking for fish.