Thursday, November 26, 2020

ADDING A SMOKE COMPONENT TO SMOKEY SWEET POTATOES

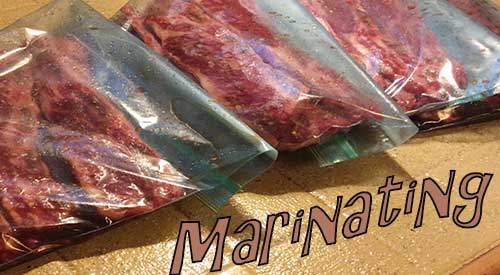
Try our technique on Smokey Sweet Potatoes for a great addition to your BBQ!


We introduced you to smoked potatoes some time ago giving you an easy method of smoking cubed potatoes .  Now, we look at sweet potato, a very popular root vegetable that does particularly well on the grill.  This time, we’ll smoke the potatoes whole to allow for versatility for recipes.

Get 5 or 6 sweet potatoes selected, preferably of equal size, and let’s get to the grill!

Choose Your Equipment

I’m going to use two pieces of equipment today to demonstrate how easily it is to work with what you own to add a smoke component

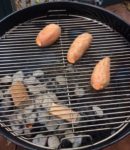
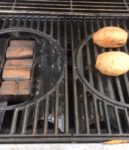
For my gas grill, I’ll be using a smoker box equipped with 3-4 wood chunks in double filet size.  For the charcoal grill, I’m incorporating both lump charcoal and briquet for the fuel and adding double filet wood chunks for flavor.  My charcoal grill is a traditional kettle grill.  Both these units are set up for two-zone cooking which means the fuel is on one side – in the case of the gas grill, burners are lit on one side only, for the charcoal grill, charcoal is banked to one side of the grill, using both lit and unlit coals to sustain the heat level.  All cooking will be done on the side that does not have any direct heat.

Our Smokinlicious wood chunks on the coals providing great smokey flavor for these smokey Sweet Potatoes
#woodchunks

With a target cooking temperature of 325-350°F, these sweet potatoes will cook up and get smoky in no time!

Tasting Notes: Preparation of the sweet potatoes prior to smoking is simple.  Wash the potatoes well, pat dry, and then trim off the two ends.  Using a knife, pierce the ends one time and the sides several times to provide injection areas for the smoke vapor.  This will ensure an even smoke flavor.

No Work Grilling & Smoking Smokey Sweet Potatoes

Once the grill of your choice is set up, it’s just a matter of placing the whole potatoes on the grill grate, indirect side, and allowing them to tenderize.  This will take about 75 minutes total.  There is no need to do any rotation of the potatoes; just allow to infuse with flavor. 

Our double filet wood chunks in the smoker box on the gas grill providing the flavor for our smokey sweet potatoes
#twozonecooking

If you’ve followed our recommendation for the charcoal grill – placing unlit charcoal/briquets on the direct side of the grill, lighting a chimney starter of charcoal, and pouring over the unlit coals when glowing hot, then adding the wood chunks – you’ll have plenty of fuel for the entire cook time.

Once tender, remove from the grill and set aside to use in your favorite sweet potato recipe.  I’ll be making a smoked sweet potato and chipotle soup with mine, which we will post the recipe soon.

One important point is to know that the boldness of the smoke will be much greater from a charcoal grill than a gas/LP unit.  You can see the difference on the skin of the potatoes that I’ve grilled today.  Nevertheless, grilled and smoked sweet potatoes are full of sweet, smoky flavor you’ll want to enjoy all year long.

What’s your favorite sweet potato recipe?  Leave us a comment to opine and subscribe to get all our postings on tips, techniques and recipes.  Bringing innovation to wood fired cooking with recipes, techniques and the science behind the fire, smoke, and flavor. That’s SmokinLicious®.


Thursday, November 19, 2020

GRAPE FLATBREAD SAVORY MEETS SWEET WITH A TOUCH OF LIVE FIRE

Our Delicious Smoked Grape Flatbread with Brie and a little fresh Rosemary

Smoked Grape Flatbread-  Even if you aren’t the biggest fan of Concord Grapes, this recipe completely changes the flavor of this variety of grape to produce a very pleasing outcome.  I’ve gone to my own personal grapevines and selected grapes at their peak for a flatbread recipe that is super easy and scrumptious.  It all starts with the grapes so go to your own vines, a neighbor’s, a farmer’s market or fresh market, and pick up a quart or two to bring to the grill for wood flavor infusion to make the ultimate in flatbread.  Remember, any grape you find will work for this recipe, so go ahead and pick your favorite.

Grape Prep & Wood Infusion

The first steps to our recipe are related to the grapes.  I’ve visited my grapevines and selected grapes that our deep purple and firm.  Bringing them to the kitchen, I remove them from the vine, ensuring all stems are out, rinse under cold water and pat dry with a paper towel.  I’ve started my grill by lighting only one burner.  To that side, I’ve prepared a metal smoker box with wood chunks.  My grill needs to heat up to 250-275°F.  While it’s heating, I prepare a sheet pan with a single layer of clean grapes.  Then we’re ready to add wood flavor.

Two zone cooking on a grill or smoker is the easiest since the temperature will remain steady and you won’t need to constantly watch the grill.  After achieving a 250°F temperature, I place the sheet pan of prepared grapes on the unlit side of the grates.  The smoker box of chunks should be releasing a consistent smoke at this stage. Put the lid down and allow the grapes to infuse for about 20 minutes.  I then return to the grill and rotate the pan, lid down again, and allow to smoke for an additional 10-15 minutes.

Tasting Notes: There is no rule regarding the type of wood you should use for the smoking.  Just be sure it is only hardwood and not a completely dried out piece of wood or you’ll find it will burn up almost immediately.  Remember, you want smoke not flames from the wood.  Positioning as close to the burner as you can get is best for the placement of the smoker box.

Dough Time

With the grapes smoking on the grill, I’m going to starting the dough for the flatbread.

Taking 2 cups of unbleached bread flour, I add it to a stand mixer bowl with a ½ teaspoon of kosher salt, whisking together.  In a measuring cup, I place 1 cup of warm water that is between 110-115°F.  I sprinkle into the water 1-1/2 teaspoons active dry yeast and wait 5 minutes for it to bloom.  Fitting my stand mixer with a dough hook, I start the mixer on low speed and gradually add in the bloomed water/yeast mixture from the measuring cup.  Turning up the speed on the mixer, I continue to knead the dough until it begins to ride up the dough hook, pulling away from sides of the bowl.

Taking a large bowl, I add 1 tablespoon of olive oil to the bottom and place some bread flour on a clean work surface to roll the dough out.

Removing the flatbread dough from the mixer bowl, I place the dough on the floured surface and begin to hand knead the dough into a ball.  I place the ball of dough into the oiled bowl, rolling the dough in the oil and up the sides of the bowl to ensure everything is nonstick.  Place the dough in the bottom of the oiled bowl, cover with a towel and place in a warm place to rise until double in size which will take about an hour.  Once risen, prepare a sheet pan with two tablespoons of oil, coating the pan’s surface with the oil using your fingers.  The oil will ensure the bottom of the flatbread crisps while cooking.

Simple Fresh Ingredients

Punch the dough down and place on the oiled sheet pan, stretching the dough out on the pan until it almost touches the sides.  Time for the fresh ingredients.  Start by slicing then tearing into pieces Brie cheese, placing over the top of the flatbread dough.  Sprinkle with fresh rosemary leaves.  Press the smoked grapes into the dough’s surface until all three ingredients cover most every spot of the dough.  Cover the dough with a cloth and allow the flatbread to rise a second time for another 20 minutes.  Then bake at 400°F until the cheese is bubbly and the bread surface is golden brown.  Remember, the grill works great for the flatbread cooking as well and for additional wood-fired flavor, use wood chunks at this stage as well.

Tasting Notes: Feel free to use other seasonal fruits and even vegetables from the wood-fired grill for this recipe.  Swap out the herb and cheese based on the main ingredient and you’ll have a versatile recipe for any seasonal food.

What’s your favorite flatbread recipe and featured flatbread item?  Leave us a comment to opine and subscribe to get all our postings on tips, techniques and recipes.  Bringing innovation to wood fired cooking with recipes, techniques and the science behind the fire, smoke, and flavor. That’s SmokinLicious®.

Love this post?  Then please share!


Thursday, November 12, 2020

SMOKED PEACH RELISH-PERFECT FOR SEAFOOD

Our perfect Smoked Peach Relish which is perfectly paired with Shrimp for a tasty dish!

Peach season!  One that lends so many different options to your food experience.  Whether consumed raw or used in entrees or desserts, I aim to bring another flavor level to this much anticipated seasonal fruit by adding wood-fired flavoring.  Then I’ll take these flavorful peach halves and introduce you to a peach relish that is perfect for topping fish and seafood.

Visit your favorite farm stand, fresh market, or your own peach tree and pick three firm, fresh peaches and bring them to the kitchen for preparation before hitting the wood-fired grill.  Oh, and we have plans for additional recipes with smoked peaches so do some extras while you have the grill or smoker going.

Easy Prep for the Grill or Smoker

Skinning our freshly harvested peaches

Although yellow is the most common peach available, know that there is a white variety as well.  Both have easy to remove pits that make them easy to prepare for your favorite recipes.

Start by peeling the skin from the peaches, you’ll need 3 for this recipe, though I’m doing a full sheet pan for additional recipes.  Once peeled, using a paring knife, slice thru the center of the peach along the pit.  Gently separate into two halves then remove the pit.  Place the pitted and peeled peach half cut side down on a sheet pan.  Continue with the remaining peaches.  I’ll be using my gas grill set up with a smoker box of wood chunks to bring a smoky flavor to the fruit.  I’ve placed my smoker box directly on my heat diffuser to get the wood hot and smoldering quickly.  My pan of peach halves is placed on the unlit side of the grill.  Lid down on the grill and allow these peaches to tenderize slightly and infuse the smoke flavor.  I’ll check on them in about 15 minutes.

our tray of smoked peaches on the gas grill using a two zone cooking method to add wood smoke flavor.

  Tasting Notes: Keep in mind, flavors from wood on a gas grill will not be as intense as those on a charcoal unit.  Keep this in mind when you select the equipment to infuse the smoke flavor into the peaches.

Relish Ingredients for Smoked Peach Relish

Adding our wet ingredients to the pepper mix

While the peaches are absorbing all that great hardwood flavor on the grill, let’s get started on the base for our peach relish.  To begin, I’ll get my mortar although you can also use a mini food processor.  Place one minced garlic clove into the mortar.  Add one chili pepper (serrano, jalapeno, & Hungarian make good choices) that has been seeded and minced.  To that, add 2 tablespoons of light brown sugar.  Using your pestle or the processor, pound or pulse until a paste is formed.  Remember, fresh ingredients will make for the best relish flavors.

With the base paste made to our peach relish, it’s time to add the liquids to balance the spicy and sweet flavors.  Start by adding 2 tablespoons of water, 2 tablespoons of lime juice and 3 tablespoons of oyster sauce.  Transfer the relish base to a large bowl.  Now return to the grill and remove the peach halves.  These should be browned from the smoke infusion.  Remove 6 halves and dice each.  Add them to the bowl with the base.  Let’s get ready for the final flavors.

The Ultimate Relish Flavors

Adding fresh herbs added to our rice

The final flavors are the fresh herbs that need to be added right before serving.  This includes ¼ cup of fresh, chopped cilantro and 2 tablespoons of fresh mint.  As peaches tends to be a delicate fruit meat, it’s important to gently mix everything together; don’t over combine.  Serve immediately with your favorite fish or seafood.   In fact, this is even great with just some toasted bread.  I’ve served mine today with brown rice and simple seasoned shrimp with a side of yellow waxed beans. Delicate yet full of balanced flavors that will surprise you coming from a smoked fruit.

What’s your favorite recipe using smoked or grill peaches?  Leave us a comment to opine and subscribe to get all our postings on tips, techniques and recipes.  Bringing innovation to wood fired cooking with recipes, techniques and the science behind the fire, smoke, and flavor. That’s SmokinLicious®.


Thursday, November 5, 2020

MARINATING: THE MYTHS AND TRUTHS TO GUIDE YOU

Marinating our Riblets
Marinating our Riblets in Zip Lock bag

 Marinating-At one time or another, I’m sure you’ve either purchased a prepared marinade or constructed your own to use with some type of animal protein.  Likely, your goal was to either add flavor or to tenderize or both.  But, let me ask you: do you really know what marinades do for specific foods and do you know how to use them?

My intention is to debunk the myths, get at the truth of what marinades can do and provide a guide on marinade amounts and ideal marinating times for specific foods.

Let’s get started!

PART I: Myth to Truth

How Deep Do Marinades Go?

One of my favorite myths is that of the depth that marinades penetrate in meat.  The tale is that once a meat is exposed to a marinade, it will get completely thru but this is far from the truth.

Marinades are a surface to few millimeters below surface benefit no matter what the content of the soaking liquid.  The oil, herbs, seasonings and spices only add flavor to the exterior of the food with no ingredient ever penetrating to the center of the meat.

Are Bottled Dressings a Marinade?

We all look for ways to cut corners and one of the myths out there is that bottled dressings work just fine as a substitute marinade.  The truth, however, is bottled dressings have high levels of acidity which when exposed to meat protein tend to break down the meat molecules too far resulting in a mushy texture.  Additionally, bottled dressings are loaded with unwanted ingredients like sweeteners (sugar), gums, and stabilizers and lack ingredients that give any real flavor.

How Long Should You Marinate Meat?

As mentioned above, since marinades don’t penetrate deeply into meat, a longer marinating time doesn’t mean more tender or flavorful meat.  In fact, the opposite becomes true.  Marinating too long will allow the protein bonds in the meat to weaken resulting in a mushy exterior which can prevent the meat from holding on to moisture.  That means you end up with a dry piece of meat.

Doesn’t the Acid in a Marinade Tenderize Meat?

When you’re looking to tenderize meat what you are really doing is breaking down connective tissue in the meat which is what produces tough cuts. Connective tissue is made up of collagen and fiber which can be weakened by an acidic ingredient like vinegar, wine, citrus juice, etc.  The problem again is this affect is surface only and cannot penetrate to the core of the meat.  Best advise is to use these ingredients sparingly and for shorter marinating times.

Can You Use a Marinade on Any Meat?

Since you’ve learned that marinades benefit the surface of the meat only, it is best for them to be used with thinner cuts of meat, like chicken breasts, cutlets, chunked meats, steak, and chops.  Larger cuts of meat do best with a wet rub or spice paste.

PART II: Marinating Tips for High Flavor and Juiciness

Tip #1 Flavorings and Seasonings: Use a lot of these ingredients in marinades and be sure to watch the salt or it will inhibit the absorption of other herbs, spices, and seasonings.

Tip #2 Score the Meat: To achieve as much penetration as possible, score the meat’s surface with a knife or prick the surface with a fork.

Tip #3 Reactivating the Marinade: I personally like to marinate in a storage bag but you can use chaffing dishes or other similar large baking dishes covered with plastic wrap.  When using a storage bag, ensure that all the air is out of the bag before sealing.  Halfway through the marinating time, flip the storage bag or stir the meat in a dish to ensure everything is getting even soaking time.

Tip #4 Refrigeration: One risk with marinating is the development of microorganisms since you are dealing with raw meat.  You can reduce this risk but getting your marinated meat in the refrigerator as quickly as possible to avoid the temperature danger zone of 40-140°F when bacteria can spread rapidly.

Tip #5 Wipe Off Excess and Discard Leftover: Remember, you’ve just marinated raw meat so never keep used marinade.  It needs to be discarded immediately.  If you feel you want to offer some of the marinade to go on the cooked food, simply keep a small amount separate from the marinating meat.  Also, so you don’t get excessive flare-up on the grill, wipe off excess marinade from the meat before grilling.

PART III: Can you Marinate too long?

Guide to Marinating Foods

This guide is intended to provide a starting point for specific foods on the quantity of marinade needed and the timing of the marinating process.

Smokinlicious marinating table, providing marinating time by food tryupe
Smokinlicious marinating table

By following these tips and guidelines, you’ll be sure to keep your foods moist, flavorful and promote a great mouth-food experience texture-wise.

Do you have favorite marinade ingredients?  Leave us a comment to opine.  Making you an informed consumer through valuable articles like this one.   Leave us a comment and follow us or subscribe for more great recipes, techniques, tips, and the science behind the flavor and fire.  That’s SmokinLicious®.