Showing posts with label vegetables. Show all posts

Thursday, November 26, 2020

ADDING A SMOKE COMPONENT TO SMOKEY SWEET POTATOES

Try our technique on Smokey Sweet Potatoes for a great addition to your BBQ!


We introduced you to smoked potatoes some time ago giving you an easy method of smoking cubed potatoes .  Now, we look at sweet potato, a very popular root vegetable that does particularly well on the grill.  This time, we’ll smoke the potatoes whole to allow for versatility for recipes.

Get 5 or 6 sweet potatoes selected, preferably of equal size, and let’s get to the grill!

Choose Your Equipment

I’m going to use two pieces of equipment today to demonstrate how easily it is to work with what you own to add a smoke component

For my gas grill, I’ll be using a smoker box equipped with 3-4 wood chunks in double filet size.  For the charcoal grill, I’m incorporating both lump charcoal and briquet for the fuel and adding double filet wood chunks for flavor.  My charcoal grill is a traditional kettle grill.  Both these units are set up for two-zone cooking which means the fuel is on one side – in the case of the gas grill, burners are lit on one side only, for the charcoal grill, charcoal is banked to one side of the grill, using both lit and unlit coals to sustain the heat level.  All cooking will be done on the side that does not have any direct heat.
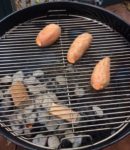
Our Smokinlicious wood chunks on the coals providing great smokey flavor for these smokey Sweet Potatoes
#woodchunks

With a target cooking temperature of 325-350°F, these sweet potatoes will cook up and get smoky in no time!

Tasting Notes: Preparation of the sweet potatoes prior to smoking is simple.  Wash the potatoes well, pat dry, and then trim off the two ends.  Using a knife, pierce the ends one time and the sides several times to provide injection areas for the smoke vapor.  This will ensure an even smoke flavor.

No Work Grilling & Smoking Smokey Sweet Potatoes

Once the grill of your choice is set up, it’s just a matter of placing the whole potatoes on the grill grate, indirect side, and allowing them to tenderize.  This will take about 75 minutes total.  There is no need to do any rotation of the potatoes; just allow to infuse with flavor. 
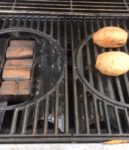
Our double filet wood chunks in the smoker box on the gas grill providing the flavor for our smokey sweet potatoes
#twozonecooking

If you’ve followed our recommendation for the charcoal grill – placing unlit charcoal/briquets on the direct side of the grill, lighting a chimney starter of charcoal, and pouring over the unlit coals when glowing hot, then adding the wood chunks – you’ll have plenty of fuel for the entire cook time.

Once tender, remove from the grill and set aside to use in your favorite sweet potato recipe.  I’ll be making a smoked sweet potato and chipotle soup with mine, which we will post the recipe soon.

One important point is to know that the boldness of the smoke will be much greater from a charcoal grill than a gas/LP unit.  You can see the difference on the skin of the potatoes that I’ve grilled today.  Nevertheless, grilled and smoked sweet potatoes are full of sweet, smoky flavor you’ll want to enjoy all year long.

What’s your favorite sweet potato recipe?  Leave us a comment to opine and subscribe to get all our postings on tips, techniques and recipes.  Bringing innovation to wood fired cooking with recipes, techniques and the science behind the fire, smoke, and flavor. That’s SmokinLicious®.

 

Thursday, July 9, 2020

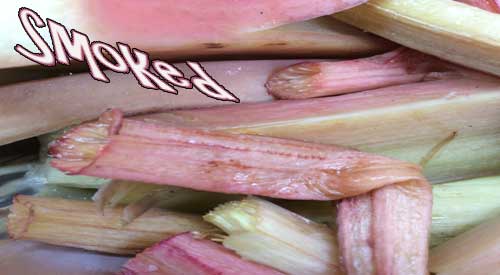
TAKE TART TO THE SMOKEY SIDE WITH FRESH RHUBARB (SMOKED)!

Our finished Smoked Rhubarb
Our Finished Rhubarb (Smoked)

Rhubarb (Smoked) – I will make a confession: I don’t like rhubarb, a spring to early summer perennial vegetable, on its own, likely due to the very tart flavor.  I do, however, enjoy this vegetable smoked and then blended with a sweet fruit.

This is likely why you may not have realized that rhubarb is a perennial vegetable since this is so widely used for dessert items. The rhubarb stalks are suitable to eat but the leaves are poisonous meaning they should never be eaten or added to a smoothie.  Since this is a tart vegetable, I am going to first smoke it to change the balance of that tartness.  Later, I plan to use these smoked stalks in combination with some smoked strawberry to make a strawberry-rhubarb fool, a delicious treat or dessert.

For now, let’s get about a pound of fresh rhubarb, hopefully from a garden or a fresh market, and meet at the smoker for an easy method of infusing wood flavoring to this tart stalk vegetable.

Selecting and Preparing

Our fresh Rhubarb picked from the garden- or buy at the Farmers Market
Rhubarb is a perennial vegetable that prefers cold conditions to thrive.  When first planted, you won’t be able to harvest any of the stalks until the second year, similar to growing asparagus.  When ready to harvest, you’re looking for stalks 12 to 18-inches in length with good girth to them.  If the stalks are too thin, that means the plant does not have enough nutrients.

Once harvested, clean well under water and pat dry.  Trim all the leave ends from the stalks as these are poisonous, and discard. Note you can compost the leaves as the poisonous oxalic acid breaks down quickly when decomposition begins.

I prefer to cut my stalks into 3-4-inch lengths.  That’s it!  Likely one of the easiest vegetables to prepare for the smoker.  Speaking of the smoker, time to prepare ours.  I’ll be using an electric smoker today since smoking rhubarb takes very little time.

Tasting Notes: Whether to cut the stalks is dependent on what you plan to do with the rhubarb so adjust this step according to your planned recipe.

Fire Up the Smoker!


I’ll be using a standard vertical electric smoker that uses lava rocks as the radiator of the heat as well as an electric element as the fuel/heat source.  My electric smoker allows me to use wood chunks so I have an assortment of small sizes that total about 6 ounces of hardwood.  The double filet wood chunk size is ideal and as a tip, if you note to SmokinLicious® the need for thin chunks, these can be provided.
The Electric Smoker for our Rhubarb (smoked) technique
My set up is simple: I wrap one of my grill grates in aluminum foil, place my element on the lava rocks and insert wood chunks between the element’s spaces.  I’m using a combination of maple and cherry hardwood.  I add my water pan with about 2-inches of hot water so energy from the unit isn’t wasted heating up the water.  On goes my tray of pre-cut rhubarb that are spaced to allow the smoke to penetrate all around.  Leave these untouched on the smoker for about 20-25 minutes or until the thickest stalks are fork tender.

The best part about rhubarb on the smoker is it takes very little effort.  Trim, clean, and cut to size then place on the grate and smoke.  In about 15 minutes time, you’ll see a golden hue come out of the rhubarb pieces.  That means the smoke has penetrated its great flavor.  Using a fork or the tip of a paring knife, I check the thickest stalk to be sure I can easily pass the metal tip thru.  If so, then the rhubarb is tender and ready to come off the smoker.
Cut up Rhubarb pieces in the smoker
If your plans are to prepare this for rhubarb pie, then just continue with your favorite recipe.  This step is simply to provide another flavor level and begin the cooking process. Check in with us soon as we release our version of the strawberry-rhubarb fool featuring this smoked rhubarb and smoked strawberry.

What’s your favorite method of cooking rhubarb?  Leave us a comment to opine and subscribe to get all our postings on tips, techniques and recipes.  Bringing innovation to wood fired cooking with recipes, techniques and the science behind the fire, smoke, and flavor. That’s SmokinLicious®.
Thursday, September 19, 2019

COAL FIRE CAULIFLOWER RICE WITH TOMATO

Our finished Cauliflower rice with Tomato we fire roasted with just a chimney starter!

With my special chimney starter cooking technique, which you can view in a separate posting, a fresh head of cauliflower was wood fired for a charry flavor.  Now, it’s time to take this fabulous flavor and marry it to tomato and spice in a cauliflower rice dish that can be consumed as a main course or a fabulous side dish.  A simple recipe that’s full a flavor that you’ll want to enjoy again and again.  Plus, you’ll enjoy the added benefits of this super nutritious food due to its low saturated fat and cholesterol and high vitamin and mineral daily needs.


Making Rice


After tenderizing my fresh head of cauliflower on the hot coals of a charcoal fire, I’m going to turn this into a cauliflower rice dish that features tomato, feta cheese and just a hint of jalapeno pepper.
Our charred Cauliflower in the food processor ready to be "riced"
To start, cut your cooked cauliflower steaks into smaller florets and place half in a food processor with a standard blade.  Pulse the cauliflower until it is reduced to rice-like particles.  Remove from the processor bowl and add into a pot.  Continue to process the remaining cauliflower in the same manner.  You’ll see the tiny flecks of the charred goodness easily if you’ve prepared white cauliflower.  Keep in mind, that one head of cauliflower will produce nearly two quarts of rice before the other ingredients are added, so this can comfortably feed 6 as a side dish or 3-4 as a main entrĂ©e.

Tasting Notes: If you care for additional spicy notes, feel free to pulse in some fresh ground pepper or pepper flakes.  Just be sure to reduce the amount of fresh hot pepper in the cooking section.


Hearty Flavors


Adding the broth to the cauliflower rice!Once the cauliflower rice is made and in the pot, it’s time to add the other ingredients.  Start by adding 2 cups of diced tomato and one finely chopped jalapeno pepper.   Pour in ½ cup of broth – I’m using bone broth – and stir well.  You can adjust the moistness of the finished rice by adding more broth.   Add ¼ cup of feta cheese just before serving, allowing the cheese to be heated just a couple of minutes.

Once sampled, you’ll taste the meaty char flavor from the coal cooking technique that is balanced so well by the sweet tomato and slight kick of the spicy pepper.  This is hearty enough to eat as a main meal or the perfect accompaniment to your favorite animal protein.  Just think what the festive colors can do for this dish if you’re lucky enough to find yellow or purple varieties of cauliflower. [#cauliflowerrice]

Tasting Notes: There are so many variations to cauliflower rice.  Use seasonal ingredients to guide you.  Options: curry powder, honey, Dijon mustard, & butter; asparagus, mushroom, basil, & coconut milk; black beans, tomato, corn, onion & Verde sauce.

Thursday, March 28, 2019

PAN COOK ZUCCHINI ON THE GRILL WITH WOOD FLAVOR

Try our pan cook zucchini on the gas grill with wood chunks for a flavoring twist


I’ve got a one pan dish that is easy to construct with the best part being you can do the entire recipe on your LP/Gas grill.

Grab your prized zucchini and get to the grill and I’ll show you how easy this technique and recipe are for a great meal.


Zucchini Prep


Preparing the zucchini is very simple for this recipe as we want all the nutritional value of the skin as well.  After washing, patting dry, and trimming off the ends, cut 1-inch thick rounds and then cut each round into smaller pieces.  For the smaller rounds, you should get 4 pieces and the larger 9.  Place all the cut zucchini pieces into a disposable foil pan.  There’s no need to spray the pan or add any liquid as zucchini has a 95% water content and when cooked, produces 6 oz. of water per every cup.  This will naturally steam away while in our grill pan while tenderizing the zucchini for our dish.  Plus, the high-water level will attract the smoke vapor for great flavor.
Diced zucchini in a disposable pan ready for the two zone cooking method
The grill set up is the easiest part.  Simply lite the burners on only half the grill.  Place wood chunks either directly on the heat shields located under the grill grate or in a smoker box placed on top of the grill grate of the lit burners.  Allow to heat up for about 10 minutes.  Then place the pan of cut zucchini on the unlit side of the grill and close the lid.

Tasting Notes: You do have an option to slice your zucchini lengthwise into quarters and grill directly on the grate.  Know this will produce stronger wood flavoring to the finished product and you will still need to cut the zucchini down into bite-size pieces.


Ragout Ingredients

Although ragout in Italian traditional means a sauce made from root vegetables and fruits, I felt it was a suitable term for our tomato-jalapeno based sauce.  In addition to your zucchini, you’ll need the following ingredients:
  • 3 large tomatoes, diced
  • 1 jalapeno, diced
  • 1-1/2 cups pasta sauce
  • Basil- 2 tablespoons
  • 2 tablespoons oregano
  • 2 tablespoons parsley
  • 1 tablespoon garlic powder
  • Fresh ground pepper
  • 10 oz. tortellini
  • ¼ cup shaved Parmesan and Asiago cheese
After the zucchini has cooked for about 30 minutes, add the diced tomato and jalapeno.  Let that cook for 15 minutes and then add the pasta sauce, basil, oregano, parsley and garlic powder.

Tasting Notes: This can be a spicy dish so if you only like a mild kick add ¾ cup of ricotta cheese when the pasta sauce and herbs are added.


Finale

All this made in one pan!
all our spices added to the panThe final step to our grilled zucchini with tomato pepper ragout is to add the tortellini.  You may wonder how tortellini will cook without any water.  Essentially, you only need a little liquid with heat to produce enough steam to cook the tortellini.  The best part is you won’t have any pasta that is soggy and unable to hold its form.

After adding about 10 ounces of tortellini – mine happens to be filled with spinach – the ¼ cup of shaved asiago and parmesan cheese are added.  Everything is mixed well and left on the grill until the tortellini are tender.  That’s it!  Everything completely made on the grill and absorbing the great wood flavor from our SmokinLicious® chunks.  This is a great starter recipe that you can easily modify to fit your taste.

Now you need to try to Pan Cook Zucchini on the gas grill with wood!

Thursday, July 12, 2018

NO, IT’S NOT SLAW JUST SMOKED CABBAGE!

Smoked Cabbage on the gas grill using SmokinLicious® filet wood chunk is a wonderful way to add flavor to the vegetable!


Smoked Cabbage

Bringing you another vegetable to take to the grill and smoke with wood for exceptional flavor.  This time we focus on cabbage, a fiber-rich leafy vegetable that has been known to help with so many conditions.  We will take wedges of cabbage, paint them with a spicy Dijon sauce and wood-fire them for about an hour using an indirect cooking method.  Get your gas grill or charcoal grill ready for our version of smoked cabbage that you’ll want to make again and again.


It’s All in The Sauce


Just a few simple ingredientsTo bring a super flavorful taste to our wood-fired cabbage, we’ll first make the spicy sauce that will be brushed on each cabbage wedge.  Start by gathering the following ingredients:
  • 2 tablespoons extra-virgin olive oil
  • Sea salt or kosher salt- ½ teaspoon
  • Fresh ground pepper- ½ teaspoon
  • ¼ teaspoon red pepper flakes
  • ¼ teaspoon garlic powder
  • 1 tablespoon Dijon mustard
  • 2 tablespoons chopped sun-dried tomatoes
  • 1 tablespoon chopped cilantro
This will be a paste-like consistency once all the ingredients are combined.

For the cabbage preparation, simply cut off the hard root end, cut in half, then cut each half in half.  In the end, you will cut 8 wedges for the grill.


One Hour of Smoky Goodness


Cabbage on the grillAfter pre-heating the grill it’s time to setup the two-zone cooking using single or double filet wood chunks from SmokinLicious®.  Once heated, turn all but one burner off and place the wood chunks on the heat shield of the lit burner.  If cooking on a charcoal grill, place the charcoal and wood to one side of the grill.  Brush on the spicy Dijon sauce on each cabbage wedge.  I’m cooking the wedges on a sheet pan placed on the unlit side of the grill.  Let these cook for at least an hour.  You’ll know they are ready when I knife inserted through the wedge passes through easily.


A Sauce to Finish It Off


Ingredients on the stove top, ready to make a perfect sauce for smoked cabbageWhile the spicy cabbage wedges smoke and cook on the grill, it’s time to get the ingredients ready for the finishing sauce.  Start by gathering:
  • 3 tablespoons butter
  • 2 tablespoons minced scallion
  • 1 tablespoon Dijon mustard
  • ½ teaspoon minced garlic
  • Pinch of salt and pepper
Combine all the ingredients in a saucepan and cook over medium heat until well combined.  Keep the sauce warm until the cabbage is ready, making sure that the butter does not separate from the other ingredients.

Once the cabbage is tender and lightly charred, it’s time to remove it from the grill, plate, and spoon on the finishing sauce.  With the tang of Dijon, the sweetness of the sun-dried tomato and scallion, and smokiness from hickory wood, this is cabbage like you’ve never had before.  This is filling enough to eat as a meal or makes the perfect side to beef, pork, and chicken.  One of the best things about this recipe is it needs very little attention while on the grill.  Enjoy not only the flavor benefits of this dish but the health benefits as well.

Thursday, May 10, 2018

MUSHROOMS GO SMOKY-WOOD FIRED

Mushrooms Go Smoky- baby bellas, cremini and shiitake mushrooms are stove top smoked and served over toast with a dolop of ricotta cheese.
Mushrooms Go Smoky with Ricotta cheese on toast


Looking for a great smoky appetizer or snack but don’t want to go to the trouble of firing up the charcoal or gas grill?  Then think stove top smoker and prepare to bring the best out of mushrooms when they get wood fired for full flavor.  I’ll bring you the easy stove top smoker technique that takes less than 30 minutes and then offer up a super easy but full of flavor smoked mushroom toast with kale and ricotta.


Stove Top Smoking

Stove top smokers are a great way to get authentic wood fired flavors into foods in an easy, quick method.  There are many options for read-made units though you certainly can use what’s available in your kitchen (see our blog on “The Kitchen Find“).  I’ll be using the unit made by Nordic Ware® that has everything included expect the wood chip product.  For that item, just visit SmokinLicious® and select your favorite hardwood in the Minuto® wood chip product line.  I’m using about 35 grams of my own custom mix of both species and chip sizing.  Equal parts of Red Oak #8, Sugar Maple #6, and Wild Cherry #6 will bring the perfect balance to my fungi selections.

After placing the base of my smoker on the burner, I add the 35 grams of wood chip custom mix.  I line the drip pan with foil to make clean up easier since the mushrooms will render some of their water.  This is placed on top of the wood chip pile.  Then into the grill pan go my favorite gourmet mushrooms – oyster, cremini, baby bella, shiitaki, porcini.  In just 20 minutes, these will be tender and full of smoky flavor that I can use in my toast recipe.

Savory Ingredient Prep

While the mushrooms are smoking on the stove top, it’s time to prepare the other ingredients for the recipe that will follow.   First, I’ve purchased a hearty country bread that just needs to be sliced and placed on a sheet pan for toasting.  Once the bread is ready for the oven, I wash and dry about 2 cups of kale leaves and then tear them into bite size pieces.  Next, I season 1-1/4 cups of ricotta cheese with kosher salt and fresh ground pepper.  Other ingredients that are at the ready include one garlic clove minced, 2 tablespoons of white wine vinegar, and 1 dry Arbol chili that I reduce almost to powder to add that hot undertone.  You can also use a Fresno chili or other similar hot chili.  For cooking the toast topping, you’ll also need 2 tablespoons of olive oil and a skillet.


Making Toast Topping

With our mushrooms perfectly smoked, I remove them from the smoker pan and set aside.  Into a skillet I place the 2 tablespoons of olive oil and allow to heat.  Once hot, I add the minced garlic and allow to brown for a few minutes.  Next, the smoked mushrooms go in the pan.   Allow these flavors to blend for about 6 minutes, breaking up the larger mushroom pieces.  Finally, add the cleaned kale and chili pepper.  Toss to mix.  In goes the salt, fresh ground pepper, and white wine vinegar.  While that is sitting on low temperature, toast the previously prepared bread slices.  When the toast is done, it will be time to assemble this highly flavorful mushroom toast.


The Ultimate Toast Comes Together

With our bread toasted, mushroom-kale mixture infused with garlic and chili, and the ricotta seasoned, it’s time to assemble the toast.  First, take a generous spoonful of the ricotta and spread on the toast.  Then spoon on the mushroom-kale mixture on top of the ricotta.  That’s it!  Don’t let the simplicity of the assembly fool you.  This is one super flavorful appetizer or snack for those of us who go beyond chips and popcorn.  Pick your favorite gourmet mushrooms, favorite country bread, and let the fun begin.  Wood Fired Mushroom Toast with Kale and Ricotta.  This is soon to be your go to appetizer or gourmet snack.

We hope this recipe inspires you to try smoking more ingredients to add a balance of flavor. We’d love to hear what you think of our recipe so leave us a comment and subscribe to get all our postings on techniques, tips and recipes.  Bringing innovation to wood fired cooking with recipes, techniques and the science behind the fire, that’s SmokinLicious®. Hope you enjoyed our Mushrooms Go Smoky blog!

Thursday, April 12, 2018

GIVING AN EDGE TO SMOKY COCKTAIL SAUCE

Smoky Cocktail Sauce is very easy to do by simply smoking the Tomatoes for the recipe!
You’ve seen me use the Orion Cooker before for cooking and smoking more traditional items.  Now, see how I produced a great hot smoked tomato using a blend of Sugar Maple and Wild Cherry wood chips to bring subtle smoke flavor.   Once smoked, I take the smoked tomato and produce a smoked tomato cocktail sauce that has so many uses.


Easy Hot Smoking

I like to smoke food items that take 40 minutes or less on the Orion Cooker that has been used first for a longer protein cook.  Remember, this cooker is a convection cooker so the heat retention can’t be beat.  It’s just perfect for our plum tomatoes which can be smoked in 30 minutes or less.

Simply take plum or on the vine tomatoes, and cut in half.  Place directly on the grill grate.  Use the residual wood chips and briquettes already in the Orion Cooker to smoke the tomatoes.  Once smoked, remove and use in your favorite recipe or store in the refrigerator for later use.


Cocktail Sauce Ingredients

With the tomato halves smoked, it’s time to gather the other ingredients needed for our Smoked Tomato Cocktail Sauce.  In addition to these ingredients, you’ll also need a food processor.
  • Olive oil – about 1 tablespoon
  • Salt and fresh ground pepper
  • 1 teaspoon honey
  • 1 chipotle in adobo or 1 tablespoon chipotle hot sauce
  • 3 heaping tablespoons prepared horseradish
  • Dash of Worcestershire sauce
  • Juice of ½ lime
  • Chopped cilantro leaves – about 2 tablespoons worth
  • 12 smoked tomato halves


Processing for Flavor Outcome

Using a food processor, you will add all the ingredients for our smoky, spicy cocktail sauce.

Tomatoes, honey, prepared horseradish, chipotle in adobe sauce, Worcestershire sauce, lime juice, cilantro leaves, salt, and fresh ground pepper.  Add just a touch of olive oil.  Process all the ingredients until slightly smooth in consistency.  Remove, and place in a serving bowl or you can store in an air tight container in the refrigerator for up to 2 weeks.


So Many Uses

There are two distinct flavors that work so well in this unique cocktail sauce: spicy chipotle and smoky tomato.  Combined with the freshness of cilantro and lime juice, a beautiful balance of flavor develops that makes this perfect as a dipping sauce for calamari, shrimp or used as a sauce on your favorite fish.  I’ve had guests who simply want to treat it like a salsa and scoop up some sauce with tortilla chips.

Whatever you decide to use this smoky cocktail sauce with, you sure won’t be disappointed with the flavors.  Remember too, you can smoke the tomatoes in the Orion Cooker, on a charcoal grill, on a gas grill with wood chunks, in a stove top smoker pan, or even with a handheld food smoker.  The choice is yours for the same easy, great flavor.

Thursday, December 7, 2017

SMOKED POTATO CURRY SMOKINLICIOUS® STYLE!

This smoked potato curry smells and tastes awesome! Try this around a holiday to just add a small smoky flavor to a favorite vegetable.
Whenever we reach the transition between Winter and Spring, I like to start transitioning my meals from hearty comfort foods to a bit more health conscious to prepare for the “less clothes” season coming.  Since I’m in the southwestern portion of New York State, our warmer temperatures can be a long way away from the calendar date of the first day of Spring.

That’s when I love to do dishes like Indian curries!

Hearty and filling, but loaded with healthy vegetables, I’m taking the traditional potato curry to a new level with my smoked potato!

Despite the many ingredients, this is still a very simple dish.

Ingredient List:

Gather together the following ingredients:
  • 2 cups smoked potato (see are previous posting on how to smoke the potatoes)
  • 1 cinnamon stick
  • Clove, cardamom, fennel seeds, curry, turmeric, chili powder, coriander, cumin
  • 1 large red onion
  • 4 garlic cloves
  • 1 green chili
  • 2 tablespoons tomato paste
  • 1 can butter beans
  • 2 medium tomatoes
  • 2 tablespoons butter
  • 1 cup water
  • 1 teaspoon kosher salt
  • 2 tablespoons high heat oil

Building Flavors

The first ingredients to incorporate will be the cinnamon stick and fennel seeds.  fennel seeds.  Heat the 2 tablespoons of high heat oil – I’m using coconut oil –  in a pan.  I’m using cast iron for the even heat distribution and retention of heat.  Once hot, add the cinnamon stick and fennel seeds and stir to keep the seeds from burning.  While infusing these flavors, mix together 2 teaspoons of curry, 2 teaspoons of cardamom, and 1 teaspoon of cumin.  Add these dry ingredients to the oil mixture and stir well.

You’ll start to smell the wonderful aromatics of these spices.

Vegetables and Spice Are Always Nice

Continuing to build on our flavors, I chop 4 garlic cloves and add to the spiced oil as well as 3 green chili slices, mixing well.  Allow these ingredients to tenderize for a few minutes then add your diced red onion.  But be sure you stir well to allow everything to incorporate.  Allow this mixture to cook on medium heat until the onion has become very tender and begins to darken in color, meaning it is sweating.  Now, get ready to add even more spice flavors.

Kicking Up The Flavors

Once the garlic, chili, onion mixture has tenderized, it’s time to add more spice.  Then, mix 1 teaspoon each of coriander, turmeric, clove, and chili powder together.  Add to the onion mixture in the pan stirring well.  Now we are ready for the 2 cups of the previously smoked potatoes.  Mix everything together well.  As the potatoes tenderize, you can break them apart into smaller pieces if desired.  Then add 1 cup of water and allow the mixture to simmer.  At this point I turn my heat down to medium-low.

Getting A Meaty Texture

Let’s add some additional meatiness to this dish by first incorporating 2 tablespoons of tomato paste.  Next, 2 diced tomatoes and the can of butter beans which if you don’t know, are white Lima beans, a great cholesterol lowering legume and rich in fiber!  Mix well and allow to simmer.  At this stage, you will see the ingredients thicken.  If you would rather more of a thick soup consistency rather than gravy consistency, feel free to add additional water.

After simmering for about 8 minutes on medium-low temperature, I add 2 tablespoons of butter to the mix.  If you’re dairy free, feel free to eliminate the butter and you’ll still have a wonderful dish.
I like to serve my smoked potato curry with chopped fresh green onion on top and brown rice on the side.  Taziki or Greek yogurt adds a nice touch as well for those looking for a “cooling” affect to the dish.

Now, dig in and see how versatile this dish can become.  Think about changing the smoked potato for a grilled or smoked eggplant, zucchini or yellow squash.  All wonderful options for this vegetable hearty dish.

Thursday, November 16, 2017

ACORN SQUASH- SWEET & SMOKY

The three stages of preparing acorn squash on the grill-propped-cooking over wood-finished product!
The stages of cooking acorn squash on the grill-stuffing with brown sugar-cooking over wood on the gas grill-finished product!
cherry wood placed on the diffuser of the gas grill to add a smokey flavorOne of the most popular winter squash that can be found pretty much anytime of the year, acorn squash is rich in fiber and potassium.  Time to take this squash favorite and smoke it on the gas grill with cherry wood chunks.  But first, we’ll give it some flavorful stuffing to make this exceptionally sweet.

Clean the Acorn Squash

cut off the top and then scoop out the seeds to provide a great vessal for the sugar and spicesMost acorn squash weigh between 1-2 pounds.  After cleaning the outside under running water, cut off the pointed end and ensure the bottom is flat so the squash won’t tip while cooking.  Now, scoop out the seeds and membrane until clean, just like you would do with a pumpkin.  The seed-free squash is going to be our ingredient vessel that will make the acorn squash so sweet and full of goodness.

Sweeten Things Up

into the cavity of the squash add 3/4 stick of butterOnce the acorn squash is clean of seeds and membrane, it’s time to stuff it.  The ingredients are simple: brown sugar mixed with cinnamon and butter.  That’s it!
First put approximately ¾ stick of softened butter into the acorn squash center.  Then pack in the brown sugar-cinnamon mix.  And I mean pack it in!  Be sure to press down so the butter and brown sugar mix combine.  Once filled, I sprinkle a bit extra of the sugar mixture on the cut top.  Now place the acorns in a pan that will be heat safe on the gas grill.  Time to prepare the gas grill.

Smoking on the Gas Grill

the pan with the squash is placed on the non heated side of the grill, while the heated side has the double filet cherry wood chunksI’ve turned two burners to “on” of my 4-burner grill.  I add two SmokinLicious® Single Filet Cherry Wood Chunks to one of the heat shields on my grill.   Next, I add the acorn squash to a roasting pan and set it on the grate of the grill that has the burners turned “off”.   This is known as an indirect method of cooking.  The squash will cook until tender all the way through.  Depending on the size of the squash, this will take between 1-1/2 to 3 hours.  Then get ready for the sweet, buttery smooth squash meat!

A Side Dish or Dessert

Even though the butter was placed to the bottom of our squash and the brown sugar mix on top, the lighter weight of the butter will rise to the surface while the brown sugar mix sinks to the base.  These ingredients will mix during cooking to sweeten the squash meat.  Once tenderized, remove and allow to cool before handling.  Then scrap out the squash meat with the cooked butter-brown sugar mix, combine, and enjoy.  This is sweet so you can enjoy it as a side dish or as a dessert – a spoonful on pound cake or puffed pastry is define.

Thursday, August 17, 2017

The Breakfast Potato Takes on Smoke!

The smoky deliciousness of breakfast potatoes!


Give It A Smoky Start

As with most breakfast potato recipes, this one has just a handful ingredients to make it oh so memorable at the breakfast table.  It starts with a key ingredient – smoked potato – which you can find the technique for on our previous posting.  This is a recipe that can certainly accommodate your specific preferences so alter it as you please.  For my rendition, you’ll need the following:


Gather These Ingredients:

  • 2 cups smoked potato cut into pieces no larger than 1 inch
  • 2 cups of chopped sweet pepper – I’m using red, yellow and orange for a pop of color
  • 1 Jalapeno pepper diced
  • 1 cup of rough cut onion
  • 1 Tablespoon oil – I’m using coconut oil for its high heat level
  • 1 tablespoon of olive oil or flavored olive oil – I’m using a Tuscan flavor
  • 1 cup of ricotta cheese
  • 1 red tomato sliced into ¼ inch thick slices
  • Oven safe skillet


One Hot Skillet Makes It Easy

Be sure you’ve readied all the ingredients as this recipe can be completed quite fast.  Place your oven safe skillet over medium-high heat and allow to heat.  Add the tablespoon of high heat oil and move the pan around to ensure the oil coats the entire bottom surface.  Add the cup of chopped onion and allow to cook for 3-4 minutes.  You’ll know you’re ready for the next step when the onion becomes translucent.  Add the 2 cups of chopped sweet pepper and mix well.  Allow the vegetable mixture to cook until tender, about 8 minutes.


Adding Heat and Smoke

Once you see the vegetables take on a shine and tenderness, it’s time to add the diced jalapeno pepper, mixing well.  After just a couple of minutes, go ahead and add the 2 cups of smoked potato to the mixture.  Mix well and allow to absorb some of the existing cooking oil and moisture.  The colors will begin to blend as well as the flavors getting us close to the finished dish.


Mellowing Out the Boldness

To add another level of flavor, a tablespoon of flavored olive oil, I’m using a Tuscan blend, is incorporated to the vegetable mixture.  Once this has cooked for a few minutes, I add the cup of ricotta cheese in dollops to the skillet.  Using my spatula, I break this down with the heat to provide a creamy consistency.  The creaminess of the ricotta will help balance the boldness of the smoke and aide all the flavors to mellow.  After 5 minutes of medium heat, this pan will be ready for a quick trip to the oven to finish everything off.


The Spectacular Finish

After taking the skillet from the stove top, I place it in a pr-heated 350°F oven to finish.   This will only take about 10 minutes.  Remember, if using cast iron, this material will hold a lot of heat, so once the pan is removed from the oven allow the dish to sit untouched for about 5 minutes.  Then plate to your favorite platter.

I like to add sliced fresh tomato and a sprinkle of fresh parsley to the top.  This is a perfect dish for any type of eggs or served an accompaniment to sausage.  Of course, it can stand alone as well so feel free to treat is as its own meal.

Smoked potato from the charcoal grill with a medley of vegetables gets you to the perfect Smoked Breakfast Potato!

Thursday, July 20, 2017

TOP 10 VEGETABLES TO COOK IN HOT EMBERS

Ember cooking can be done in a cask iron plan, fire box and even in a Hibachi! Try this unique cooking method to add a flare and unique tastes to your outdoor grilling and cooking!
I want to be perfectly clear – this is not cooking over hot flame or direct flame.  This is cooking after the wood and/or charcoal has burned down in to very hot coals; when the coals develop a white-gray ash coating. THIS is the time to ember or coal cook these select vegetables.


The Rules of Ember and Ash Cooking

The essence of using all that the wood can give for cooking. That it was ember or coal cooking is.   I want to be sure there is no misunderstanding on what is needed to do this type of cooking safely and effectively.

Rule #1: If going with all wood for the coals, only use hardwood and clean hardwood at that.  You’re going to lay foods into this material so I believe it should be clean and mold free with moisture level 15-20%.  If higher, it will simply take longer to get to the coal stage.

Rule #2: Again, if using all hardwood, try to limit the bark or go bark-free if possible to reduce the potential for mold spores that can be released into the air.

Rule #3: Have everything ready before you start.   You’ll need an ash-coal hoe, fire gloves, and small coal shovel at the ready.  I would also have tongs for those times when you don’t bury your foods completely in the coals but rather lay them which requires turning of the vegetables.

Rule #4: Equipment wise, you can use a charcoal grill that has fire brick added for insulation, a clean fireplace (I prefer an outdoor unit), a clean fire pit, or an open pit built in a safe area with brick or gravel as the base to protect the fire from spreading.


Hot Embers Birthed in One Hour

On average, it will take about an hour to move a small fire from flame to hot ember.  Depending on whether you elect to use charcoal or wood will determine the amount of time the fire needs to burn down – an all charcoal fire will be 30-45 minutes; all hardwood fire about 45-60 minutes.  Remember, charcoal produces heat and little smoke, whereas hardwood, produces heat, smoke and specific aromatics and flavorings in that smoke.  At the ember-coal level, both have equal carbonization and act similar for this method of cooking.

Using approximately 8 lbs. of charcoal or 10 lbs. of hardwood, or any combination of the two, light a fire in the equipment of your choice.  Let the fire completely burn down until only hot coals remain.  Rake the coals to produce a thick even bed.  Then select your favorite vegetables from the ones listed below, and you’re on your way!  Always keep a small fire going for additional hot coals if doing large amounts of vegetables.


Vegetables That Love Hot Coals

Here are the top 10 vegetables to introduce to the hot embers for fantastic flavor:

Asparagus         Broccoli          Cauliflower        Eggplant

Garlic        Leeks         Gourds (squash, pumpkin)

Onion       Peppers       Potato

If you want minimal monitoring to the actual cooking process, then place the selected vegetables into the bed of coals and then shovel hot coals and ash over the top so that the entire vegetable surface is covered in embers.  Leave untouched until tenderized, which will be 45-60 minutes depending on the vegetable selected.   Otherwise, you can set vegetables within the coal bed and turn them during the cooking process to ensure even char.