Showing posts with label charcoal. Show all posts

Thursday, September 9, 2021

THE ULTIMATE WOOD-FIRED CLAMS CASINO

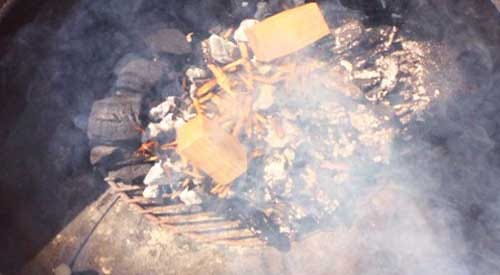
Our wood-fired clams casino on the offset grill with brick and the finished product

Have you ever noticed how many ingredients go with clams?  This low fat, high protein seafood also has many beneficial minerals.  They are also one of the most sustainable seafood resources.

I thought I would provide an easy wood-fired cooking method that can be done on your charcoal grill (you certainly can modify a few setup items and do this on the gas grill as well using wood) and produce the most flavorful clams casino out there.

Go find some similarly sized clams, fire up the grill, and get ready for this recipe and technique to become your favorite.

our ingredient table with everything ready for the stuffing!

Hot Coal Grilling

Our recipe is quite simple: gather together

  • 1 tablespoon olive oil
  • 2 oz. sliced pancetta or bacon, finely chopped
  • 1 cup finely diced red bell pepper
  • 1/3 cup chopped shallots
  • 2 large garlic cloves, minced (you can use pre-minced garlic)
  • ¼ teaspoon dried parsley
  • 1/3 cup dry white wine
  • 4 tablespoons freshly grated Parmesan
  • 2 tablespoons panko breadcrumbs
  • salt & fresh ground pepper
  • 18 medium clams, shucked, bottom shells reserved


Before starting on the casino filling, it’s important that you get the grill ready.  First, you’ll want to get a chimney starter of charcoal going.  I’m using SmokinLicious® charwood in place of traditional charcoal as this is a partially charred product that will also provide for some hardwood flavor infusion.  Once lit, the chimney starter needs to burn down the charwood to hot coals – no flame should be visible when you dump this into the grill.

our wire mesh on the charcoal rack to retain all the small and hot pieces

For my charcoal grill, I’ve set a mesh screen at the base of my kettle grill to allow me to retain as many hot coals as possible.  The screen helps to prevent small coals from falling through the charcoal area.   I’ve also covered brick with heavy-duty foil to act as a heat conductor and radiator.  This will help to keep a constant temperature during the actual cooking process.  The brick will also separate the cooking area from the fuel area.  A bit of unlit charwood is also added to the charcoal half of the grill so these bits can ignite from the hot coals and sustain the heat level more evenly.

Casino Mixture

With the charwood burning in the chimney starter, I can now start on the casino filling.  After adding a tablespoon of oil and cooking the pancetta or bacon in a skillet, I’ve put that aside on a paper towel lined dish and added the diced red pepper to the fat drippings in my pan.  After cooking a few minutes, I had the shallots, garlic, and parsley to the same skillet and sauté until the shallots are tender and translucent, which is about 5 minutes.  Add the white wine and simmer until it is almost evaporated.  Remove the skillet from the heat and cool completely.

our ingredients in the mixing bowl with cheese added

Assembling the Casinos

While the casino mixture is cooling, I prepare my clams.  Here you have a couple of options depending on your skill level and time management.  You can shuck the clams as normal and reserve the bottom shell with the clam, or you can steam the clams until just open, separate the top from the bottom shell, reserving the bottom shell.  I loosen the clam from the shell so it’s easier to consume with the casino mixture.  After the clams are readied, I take the cooled casino mixture and add the previously cooked pancetta or bacon, 2 tablespoons of grated Parmesan, and fresh pepper mixing well.  I then take a tablespoon of the mixture and mound it over the clam in the shell.  The finished clams are placed in a grill-proof pan.

Wood Firing Brings Depth of Flavor

Chef Bert explains the indirect cooking method.

#chefbertandtom

With all my top neck clams stuffed with casino filling, I sprinkle the remaining Parmesan and the 2 tablespoons of panko bread crumbs over each clam.  I am now ready to place the tray on the grill.  Since I’m using a two-zone cooking method, I can safely put the lid on the grill without concern for charring these clams too far.  With a steady temperature of about 300°F, these will take between 15-20 minutes.  You can rotate the tray if you feel the heat level in your grill is not even or steady.  For those that like a crunchy outside to the clam feel free to place these under the broiler for a few minutes.  The clams pick up the wood flavor in a very balanced way, giving just hints of charry goodness with each bit.  Super easy, super flavorful, and super fun to make.  Take your clams to the wood fire for your next event.

The Culinary Crew wants you to know…

… about the great results had from indirect cooking or the two-zone grilling technique, as referenced in this recipe blog.  When it comes to this particular recipe, you will find that wood fired clams done on a charcoal grill with indirect heat and a simple brick heat conductor will add a distinctive smoky flavor twist to your clams casino.  This appetizer promises to be a fan favorite for any seasonal or football party!


Thursday, April 15, 2021

HOW TO TURN YOUR CHARCOAL GRILL INTO A SMOKER

How to turn your charcoal grill into a smoker

 Let’s be honest.  When you bought that charcoal grill you were likely thinking that you could both grill and smoke without needing to add anything.  Soon, you realized, that just wasn’t the case.  Now, you’re contemplating whether you need to purchase a smoker.  Well, hold on the shopping trip until you read this.

  You can turn your charcoal grill into a smoker with these simple steps!

 Any Charcoal Unit Will Smoke

 Obviously, if you own a little tailgate model of a charcoal grill, you won’t be doing multiple slabs of ribs or a full packer cut brisket on that unit.  But you can smoke on any charcoal grill if you follow some simple steps and afford yourself enough time to do it right.

 How To Add Smoking Woods to the Charcoal Grill

Essentially, when you smoke on a charcoal grill you are roasting outdoors like you do in your conventional oven.  If you use a good quality hardwood charcoal, you will get some flavor from that product but not like true smoked foods you may have experienced in your favorite barbecue restaurant.  That bolder flavor only comes from unprocessed hardwoods.

 Picking Your Fuel and Smoke Flavor

There are three primary fuel types you can use in your charcoal grill: briquettes with instant lite, briquettes, and lump hardwood charcoal.  Right off the bat, I’m going to tell you to eliminate the briquettes with instant lite.  That is a product that contains an accelerant or petroleum product to make it quick lighting.  Unfortunately, it adds a very distinct, unpleasant component to the cooking process that can transfer off-flavors to your foods.  Stick with plain briquettes or lump hardwood charcoal.  Just note, that you likely will find a bit more ash developing faster with lump hardwood charcoals than you would with briquettes.

 Picking the wood for smoke flavor has a few rules you should adhere to: only use hardwoods, try to limit the bark on the wood or go bark-free for the best temperature control, find woods that have some measurable moisture level so they smolder – around the 20% level is ideal, and use chunks of wood versus chips.

 Indirect Cooking Method

What truly makes for barbecue and not just grilling is using the indirect method of cooking.  There are many ways to set up a two-zone cooking method which is also referred to as indirect cooking.  Often, what you are cooking and the quantity will determine the setup of the fuel.

 There are two popular methods that work the best: banking the charcoal to one side of the unit with the food going on the unlit side and putting the charcoal on each side of the unit with the food going in the middle where no charcoal is present.

For those that need a bit more help keeping everything where it’s supposed to go, there is an accessory called the Slow “N Sear that works well with kettle grills and includes a trough that holds water.  This allows you to place foods on the upper grates as well as below on the opposite side of the charcoal.  It certainly will give you ample room to cook many pounds of meat.

Water Keeps Everything Moist

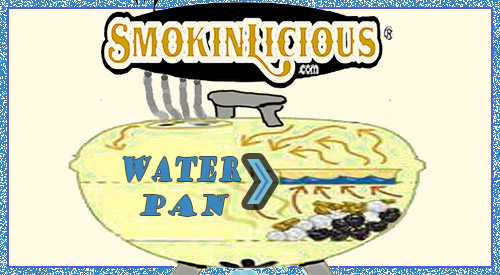
To ensure that any protein cooked on the grill remains moist and tender, include a water pan in your set up.  This is easily done by purchasing readily available disposable foil pans from the discount store.  The shape and size will be dependent on your actual grill.  I like to add warm water to the water pan so the grill does not have to exert energy to heat up the water, which takes heat away from the unit.  Remember, the water will be evaporating during the cooking process so have additional water available if it depletes before the cooking is complete.  Water pans are set in the base of the unit on the charcoal free side, directly under the food.  This will also act as a drip pan, catching all those juices as well.

Chimney Starter for Easy Lighting

Once you have your charcoal set up, the water pan laying in the charcoal free section, it’s time to light the charcoal.  The easiest way to do this and ensure that the grill gets hot pretty fast is to light a chimney starter.  These are portable containers made of metal that allow you to pour a couple of pounds of charcoal into and light from vent openings at the base.  Usually these devices require you to place newspaper at the base which is then lit with a lighter to ignite the cold charcoal.  I skip the newspaper step and simply use a MAP gas canister with easy operating torch head to lite the charcoal.  The best part is I can leave the torch under the chimney starter on a safe surface such as concrete, while I finish the grill set up.  Once the charcoal at the bottom of the chimney starter is lit, I remove the torch and allow it to burn up through the rest of the charcoal.  Once the pieces are grayed over and showing hot embers, it’s ready to pour into the grill’s charcoal area.  I carefully pour the hot coals on top of the unlit coals.  This will ensure plenty of fuel during the cooking process.  Next, 3-4 wood chunks are placed on the hot coal area.  I usually disperse these with a couple of inches between pieces.

Moist Cold Surfaces Attract Smoke Vapor

With the grill set up complete, the hot coals going and the wood chunks beginning to smolder, it’s time for the meat.  Always take the prepared meat directly from the refrigerator to the grill COLD!  Cold foods will attract smoke vapor faster, allowing the vapor to condense on the food’s surface.  The water pan will ensure that moisture remains within the grill which also will ensure attraction of the smoke vapor.

Vent Settings Guarantee Temperature Control!

Although charcoal as a fuel also aides in temperature control, I’m going to speak about air control.   To sustain fire or combustion, you need oxygen flowing into the grill, stimulating the hot coals.  This is the intake damper.  Close it completely, and you’ll put the fire out and lose all temperature.  Open it wide and you’ll increase the temperature as the coals get stimulated for more heat.

On the opposing end is the exhaust damper also called a vent or flue/chimney.  This vent is what pulls in the oxygen through the lower intake damper.  Yes, smoke is expelled through the exhaust vent but heat as well as the gases that are derived from the combustion of the fuel material including the hardwood chunks are also vented.  The exhaust vent needs to be partially open all the time.  If the temperature starts to fall, open the intake damper wider.  If the temperature is too high, reduce the oxygen to the fire by closing the intake damper.

 Now, make your shopping list for your favorite foods to smoke and set up that charcoal grill for a fabulous flavorful day.  It’s really that simple!

 Did we get you motivated with this article?  If so, leave a comment as we’d love to hear from you.  Don’t forget to let us know what other questions you have, as we always design our postings after the needs of our followers.  As always, subscribe and follow us, so you don’t miss a thing!


Thursday, March 7, 2019

TEMPERATURE CONTROL IS ALL IN THE AIR FLOW

Your Temperature control is all in the air flow for smoking and grilling with equipment!

How do you keep a charcoal grill at 200°F? How do you cool down a charcoal grill?  Do you keep the vents open all the time?

These are some of the common questions posed when it comes to learning how to control the temperature of a grill or smoker.  This can be a challenge specifically for charcoal/wood units as they rely on the human hand to determine when to add fuel as opposed to a gas/LP unit that has continual, regulated flow.

You might assume that the only combustible material used in these units is charcoal or wood but there is another one.  Oxygen.

I’m going to provide my top tips on gaining control of temperature by instructing you on airflow or oxygen regulation in specific styles of charcoal/wood burning equipment.


Intake and Outtake


For many of the charcoal/wood using units, they are built with an intake and an outtake vent.  Let’s make sure you understand what these vents are and what the purpose of each is.

Intake Vent: It has one job – bring in oxygen to control the heat of the fire.  If you need to raise the temperature of your unit, open the intake vent.  Too much heat, close the intake vent which starves the fire for oxygen.  Note: if you close the intake vent entirely while keeping the outtake open, you will still starve the fire and put it out.

Here’s the trick – each unit will have a “sweet spot” for the perfect balance of oxygen flow.  Find that spot, and you can maintain a temperature easily in your equipment.  But, I’m getting a little ahead of myself.  Let’s discuss the opposing vent.

Outtake Vent:  This goes by different names (chimney, flue, outtake, vent) but has the same purpose regardless of what you call it; vent out the gases from the combustible material and pull in oxygen from the intake vent which is commonly know as draft.  Remember a charcoal/wood fire produces gases which need to be vented.  If they aren’t properly vented, they will smother the fire.

When learning how to regulate your equipment for the desired temperature setting, always start with the outtake vent fully open.  This allows you to manipulate only the intake vent until you reach the desired temperature.  That will help you learn where the sweet spot is on your equipment.


When You Never Find the Sweet Spot


There are times when no matter how you play with the intake vent, you never seem to get the temperature to hold.  What now?

Time to look for leaks in your equipment.  If an access door or lid are bleeding smoke, then you know where the extra oxygen is coming from.  That will affect the draft between the intake and outtake vent and result in fluctuating temperature that cannot be controlled.  Best course of action is to try to seal the leaks with food grade silicone or other materials suitable for high heat appliances.


The Shape of the Equipment


In my opinion, the vertical-style equipment models tend to be much easier to get airflow/temperature control.  Horizontal units also referred to as off-set smokers and grills, specifically the inexpensive models, tend to have poor design in the vent placements as well as poor insulation that results in heavy leakage.

If you insist on purchasing a horizontal unit, read reviews and ask questions about how the unit is insulated.  Get specific with the materials used, quality of the metal parts, etc.


Other Tips


Always try to light your initial fuel product, whether briquets, lump hardwood charcoal, or charcoal in a chimney starter so you can control the quantity with every cook.  Use the chimney to add hot coals to the unit when you need to increase temperature.  Although you can have unlit charcoal in your charcoal area so it will ignite as the lit produce makes contact, this isn’t always a guarantee that you won’t produce some temperature variance.  The best chance of getting the temperature regulated is by adding hot coals as needed, even if this may be every hour or so.

To summarize, learn to control temperature by using the same quantity and type of material for the fuel, lit it with a chimney starter, only add hot coals to increase the temperature, and always have the exhaust vent open at least ½ way when cooking.  Remember the number one thing is Temperature control is all in the air flow and you will have tasty grilling results!

Thursday, January 24, 2019

THE WATER PAN EXPLAINED FOR GRILLING & SMOKING

The Water Pan explained for grilling and smoking techniques!

If you’ve purchased a smoker, you’re likely familiar with the term “water pan”.  If, however, you’re more of an LP/Gas Grill person, than this term is likely one that escapes your knowledge.

Water pans are a means of introducing valuable moisture into the cooking environment which has immense value when grilling and smoking.  Let me explain each of the pros of learning and using a water pan for your outdoor cooking, no matter the type of equipment you’re cooking on.

Water Pan Pro #1

Temperature control.  This is the ultimate need when you grill or smoker, especially when you smoke.  Maintaining a stable temperature that you’ve predetermined.  When the day is scorching hot and the equipment is made of metal, you will experience a challenge with temperature control.  Introduce a water pan, and your battle can be won.

A water pan goes above the heat source.  If using a charcoal grill or charcoal/wood smoker, this pan would be placed above the coal area.  Have an electric unit and you’ll find the pan over the electric heating element.  If you want to introduce a water pan on an LP/Gas Grill, this would be placed over the lit burners.  Many vertical smokers come with a water pan.

Water Pan Pro #2

Water cannot go above the boiling point which is 212°F.  Additionally, evaporative cooling also takes place as the water is exposed to heat.

Water Pan Pro #3

A water pan can become the number one tool when doing direct heat cooking over an open flame.  Why?  It acts as a repellent for the flame giving your foods a chance to survive without becoming a blackened, dried out, former piece of food.

Water Pan Pro #4

Are you having trouble with hot spots in your equipment?  Well, a water pan will even them out.  Now, the temperature you desire can essentially be locked in just by using a water pan.

Water Pan Pro #5

Humidity that develops from the use of a water pan keeps the surface of the meat moist, which in turn, attracts smoke vapor, which in turn, produces great flavor.  The water vapor mixes with the combustible gases which are emitted from the burning material and add to the overall flavor.  Yes, water is a passageway to all things flavorful!

What Goes in the Water Pan

It’s called a water pan for a reason.  It is designed to hold water, specifically hot water to keep the cooker from wasting energy on heating cold water put in the pan.  Here’s a tip when you fill the water pan: use a teapot to fill the pan while it’s in place so you don’t take the chance of spilling hot water on surfaces or you.  Remember, water evaporates while other liquids don’t evaporate.

Don’t Make the Water Pan a Drip Pan

Here’s the thing with a drip pan.  Due to its location directly over the heat source, when used on vertical units it often serves double duty as a drip pan.  Don’t do that!  Here’s why.  The rendered fat drippings can produce an oil slick on the surface of the water which will prevent water evaporation.

Make Cleaning a Snap

Here’s a couple of tips when using a water pan.  If your unit comes with a water pan, line it in aluminum foil which will allow you to simply pull the foil off and preserve the condition of the original pan.

If you’re using a unit that has no water pan but want to introduce one, simply purchase a disposable foil pan.  You will want to purchase one that is compatible in size to the unit your using, that will fit comfortably over the heat source, and that can hold enough water to prevent you from having to make refill trips every 15 minutes.

Thursday, November 15, 2018

WHY CHAR-WOOD IS THE BETTER OPTION OVER CHARCOAL

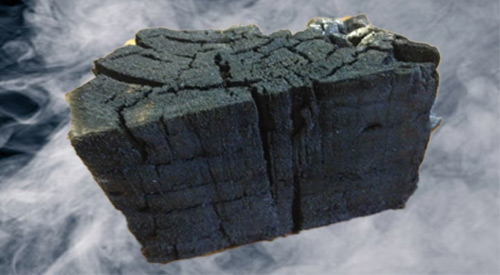
Our Char-wood is produced by Direct firing our North American hardwood blocks until the right amount of Carbonization is achieved!

Frankly, the term “charwood” may be a new one for you.  Although its function is like charcoal, the benefits clearly outweigh those of charcoal.  Let’s examine the key reasons why charwood may be the better option for outdoor cooking over standard charcoal.


Carbonization

Hopefully, if you’ve been engaging in outdoor grilling and/or smoking for some time. You’ve understood the need for a fuel material that burns evenly and hot.  You’ve likely also heard the controversy that’s brewed for years about what is the best product to use for the fuel.  Products range from briquets, lump hardwood charcoal, specialty wood charcoal, and compressed woods like pellets and compressed wood blocks.  The key is to understand that some of these products could contain binding agents as well as accelerants to make for easy lighting.

Carbonization is the conversion of an organic matter into carbon.  Carbon is an element that forms when the organic matter is heated to a high level without oxygen, burning off the volatile gases, leaving the pure carbon behind.   Although commercial material production, whether briquet, hardwood charcoal, or standard charcoal have different percentages of carbonization in the outcome, most are above 90%.  That high level of carbonization is what allows for heat to be produced for outdoor cooking.


Flavor

When you use straight charcoal briquets, you are getting heat only with no flavor as that is a fully carbonized or charred product.  Many prefer to use briquets because they are uniform in size and give the same outcome every time they are used.  Fill a chimney starter with briquets, and you’ll have the same number of briquets fit in the chimney every time.

When you use lump hardwood charcoal, you will get variation in sizing from small, chip-like pieces to half-log size pieces.  Here’s information you need to know.  Although the label may read “hardwood”, there is no information on where that hardwood derived from.  Often, manufacturers of lump hardwood charcoal produce their product from recycled materials such as old pallets, lumber scraps from flooring, cabinet, and furniture makers.  They may take in scraps from lumber mills. 

When this material is carbonized, it will do so at various levels due to the variation in material sizing.
That means when you cook with it or for that matter when you lite it, expect great variation from use to use due to all the inconsistency in sizing.  The inconsistency will produce a lower percentage of carbonized material than briquets.  So know you may get some minimal flavor from lump hardwood due to poorly carbonized larger pieces of product.  This is the reason there is more ash production with lump hardwood charcoals.

Specialty charcoals, generally made in other countries, are a particularly hard substance, light in weight product, that can be a challenge to lite.  Once they are ignited, however, they produce a lot of heat – often more than the standard briquet.  Very little ash is produced and there is no flavor from this product.


Benefits of SmokinLicious® Charwood

When SmokinLicious® made the decision to manufacture a charwood product, we researched extensively why the Japanese binchotan charcoal, also called white charcoal, was so popular and expensive.  We found that though it could be a challenge to lite, it burned extremely hot, clean, leaving little to no ash, produced no smoke and no flavor.  We produced a similar set up to the Japanese direct-fire method with our charwood production.  Instead of using miniature branches, we use consistently sized wood blocks.  Unlike the binchotan, we do not do a complete carbonization.  The result is you get the ease of lighting like a lump hardwood charcoal, the flavor of premium hardwood.  Plus, the reduced ash production of a briquet, and reduced smoke output than burning wood alone.  We see this as the best of all the options out there.

Now, instead of viewing your charcoal as just a heat generator, when you use SmokinLicious® charwood you have one product that can be used as fuel for temperature while the reduced carbonized center portion produces the flavor.  A premium product that gives premium results!