Thursday, September 15, 2022

Outdoor kitchen location tips


Outdoor kitchen location tips

Wonderful article on Outdoor kitchen location tips

Guest Blog – Brown Jordan Outdoor Kitchens

Outdoor Kitchen Location Tips

by Phil Zaleon

When you are going through the steps of installing an outdoor kitchen, you’ll quickly find that deciding where to set it up is one of the most difficult and impactful decisions of the process. Since you have multiple options, it can be hard to figure out exactly where to put it. We’ve come up with a list of things to consider to help you decide!

Be Conscious of Sun and Shade

Summer is prime time for outdoor kitchen use. So, when planning your outdoor kitchen, bank on warm temperatures and lots of sun, and take reactive measures. Placing your outdoor kitchen under existing shade, or planning to add new sources of shade will provide you and your guest’s comfort year-round.

Natural shade from trees and vines is best because they ventilate easily. As an added bonus vines and trees “transpire,” evaporate moisture to cool themselves, creating their own natural misting system.

There are plenty of man-made shade options as well, such as pergolas, or trellises. The growing popularity of transition rooms provides an even more permanent and durable option for your outdoor kitchen.

Leverage Your Natural Space

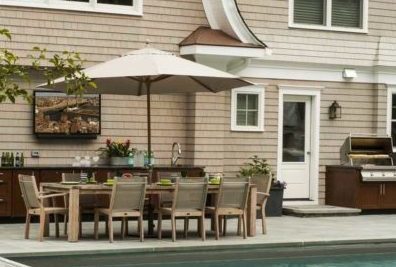
Do you have a pool or hot tub in your yard? A beautiful garden? When choosing where to add your outdoor kitchen, take note of any existing structures or features that you want to complement. Also be wary of design overlap. The last thing you want is for your outdoor kitchen covering to inadvertently shade your vegetable garden.

In addition, when planning the placement of your outdoor kitchen, it’s important to consider the relationship between the indoor and outdoor versions, and how they will be used together when cooking or entertaining. If you have a large outdoor space to work with, it may prove prudent to place your outdoor kitchen in closer proximity to your indoor kitchen to create a seamless transition between indoors and outdoors.

Consider the View

Another crucial element to consider when you’re placing your outdoor kitchen is your views and sight lines. You can have the most beautiful outdoor kitchen in the world, but when your guests sit down to eat at the table, if they’re facing a brick wall or the old shed in your backyard, that’s what they’re going to remember. So, be sure to consider the view when you’re trying to find the perfect location for your stainless steel outdoor kitchen.

Another key consideration is the location that will provide the most privacy from neighbors. Screening views with trees and shrubbery will provide privacy while also providing a noise buffer for your close neighbors.

Don’t Forget Utilities

When planning your outdoor kitchen layouts, keep in mind the best practical placement or installation of the necessary gas, water, and electrical supply. Note where your water, gas and electric lines are, and design your kitchen accordingly.

Furthermore, when placing your grill or smoker, think about the natural flow of wind – make sure that smoke from the grill will be carried away from dining and living areas. You should also think about making sure the kitchen area is located a safe distance from doors and entryways to keep foot traffic away from potential hazards.

Additionally, make sure to place all outdoor cooking appliances away from areas where children play or where people play sports. You’ll want to avoid basketballs or soccer balls bouncing over onto a hot grill.

Don’t Shy Away From the Roof

When one thinks “outdoor kitchen,” the tendency is to think of backyards – but that doesn’t have to always be the case. Especially if you have a small or nonexistent lawn space, building your stainless outdoor kitchen on the roof can prove a very viable design option.

If you are choosing this option though, pay special attention to restrictions and codes. They vary by municipality, so check with your town’s building department to find out rules about setbacks, fire safety, and what kind of permits you’ll need to file. We recommend working with a general contractor so you are up to code and all safety requirements are included.

Fit Your Needs

The right spot to place an outdoor kitchen will vary from homeowner to homeowner. You may like the idea of an outdoor cooking area just outside the back door of your house or a freestanding pavilion near your pool area.

At the end of the day, there’s no one “right” spot for your outdoor kitchen. But by using these outdoor kitchen location tips, you’ll ensure you make an excellent choice.

Are you ready to build your dream luxury outdoor kitchen?

 Call Brown Jordan Outdoor Kitchens on 203-871-3804 today to get started!

Related Reading:

-Electric Smoker Guy-HOW TO CHOOSE THE BEST ELECTRIC SMOKER

-Does Outdoor Kitchen Stainless Steel Rust

Thursday, September 8, 2022

STUFFED TOMATO WOOD FIRED!

Posted by Donna Grant
Read other related stories:
indirect cooking , Side Dish , Tomato , Vegetables
No Comments 

For more reading related to
Our wood fired stuffed tomato filled with tuna salad and melted cheese over the top!

Our wood fired stuffed tomato filled with tuna salad and melted cheese is ‘over the top’ in taste!

Wood fired-stuffed tomato–With tomatoes readily available most any time of the year, I’ve got a great recipe for a stuffed tomato that is healthy on the body and waistline. But before stuffing these tomatoes, I’m going to introduce them to smoke on my gas grill equipped with wood chunks in cherry and maple, for an added depth of flavor that works so well with acidic tomato.

Get to the farmer’s market, grocery store or your own garden, and pick out some large tomatoes. Then meet me at the grill kitchen for this great recipe.

No Time at All Prep Then Grill for Stuffed Tomato

Two zone cooking smoker box on the right side and stuffed tomato s on the NON heat side

#smokerbox

For this recipe, you want to be sure you pick or purchase firm tomatoes so they can hold up to the heat when being wood fired. I’ve selected (6) tomatoes of about equal size to ensure that these will be ready at the same time.

Pre-heat your grill and include a smoker box of wood chunks – mine holds (3) double filet chunks sourced from SmokinLicious®– using a two-zone grilling set up. Place the smoker box on the side of the grill that is lit. While the grill is heating up and the chunks have a chance to start smoldering, return to the kitchen and cut the top off each tomato. Using the knife blade, scrap the membranes and seeds free. Then using a spoon, scoop out the inside of the tomato. I like to save the inside for adding to sauces or even a rice dish. Once all tomatoes are clean, place on a tray with equal spacing and add the tray to the unlit side of the grill. You should see the wood chunks smoking steadily at this point.

Tasting Notes: There is no rule regarding the type of wood you should use for the smoking. Just be sure it is only hardwood and not a completely dried out piece of wood or you’ll find it will burn up almost immediately. Remember, you want smoke not flames from the wood.

Bringing Health to Stuffed Tomato

With the tomatoes cleaned and de-seeded, they now will tenderize on the gas grill equipped with the smoker box of wood chunks. I prefer to use wood chunks in my smoker box to produce a more steady and longer duration of smoke vapor. While the tomatoes are grilling, I begin on the tuna pesto filling.

ouir albacore tuna in a bowl with spices and peas added ready to mix 

Taking three cans of all white albacore tuna, I drain these and place the tuna in a bowl. To that I add ¼ cup thawed peas, ¼ cup medium grated Swiss cheese, 1/3 cup pesto, and fresh ground pepper. Mix all this together until it just binds. If needed, add additional pesto. Now, we’re ready to stuff the tomatoes so back to the grill.

After the tomatoes show some curling in of the cut top and the inside begins to dry a bit, it’s time to remove the tomatoes from the grill and stuff them with our tuna pesto mixture. I like to mound these tomatoes high with filling and then add two thin slices of Swiss cheese to the tops. Back on the grill using the unlit side, grill lid down, to allow the cheese to melt fully. Now you’re ready to serve.

Today, mine our served up with a curry-ginger chicken drumstick. A simple recipe using a simple grilling technique that lets you enjoy the benefits of fresh tomato. Just think of all the other stuffing recipes you can use with these wood-fired tomato beauties!

Our pan of wood fired stuffed tomato coming off the grill!

Tasting Notes: I’ve used pesto in this recipe but you certainly can make a traditional tuna salad using mayonnaise, onions, pickle, etc. Essentially, whatever you like with your tuna. And of course, you can design other fillings other than tuna.

What’s your favorite stuffed tomato recipe? Leave us a comment to opine and subscribe to get all our postings on tips, techniques and recipes. Bringing innovation to wood fired cooking with recipes, techniques and the science behind the fire, smoke, and flavor. That’s SmokinLicious®.

SmokinLicious® products used in this recipe:

Wood Chunks- Double Filet

For more reading related to wood fired veggies like our stuffed tomato, check out these blogs:

For more reading related to wood fired veggies like our stuffed tomato, check out these blogs:

-SUCCULENT WOOD FIRED STUFFED TOMATO WITH HERB RICE

-GIVING AN EDGE TO SMOKY COCKTAIL SAUCE

-COAL FIRE CAULIFLOWER RICE WITH TOMATO

-SEASONAL SMOKEY BAKED APPLES WITH SWEET STUFFING

Dr. Smoke

Dr. Smoke- “Sure, we wood fire a lot of foods but this one is special- a stuffed tomato with Tuna salad!”


Thursday, September 1, 2022

CUTS OF MEAT THAT GRILL & SMOKE

 Posted by DonnaG
Read other related stories:
MEAT , Meat Science , Smoking Tips
No Comments 

Chef Burt and Tom visit the butcher for weekend supply of large cuts of meat that grill & smoke well!

For many who have been spending additional time with family, new levels of communication and closeness have resulted, that simply put, want to be continued. Given that nicer weather also contributes to family time scheduling, I thought I would cover how you can maximize time to spend with family rather than be cooking inside. Or, worse yet, forfeiting money on takeout food purchases.

Time to cover the cuts of meats that are not only ideal for grilling and smoking but will produce enough meat to provide for more than one meal. I will also make my recommendations on hardwoods to use for optimal flavor balance.

Cuts of Meat that Grill & Smoke Well:

Beef beef image

Chuck Roast: Cut from the beef shoulder just above the short rib, chuck roast becomes increasingly tender when roasted on the grill using a two-zone cooking method. You may know chuck roast as the cut of meat used when you want to do a one-pot-meal. This concept can easily be done on the grill or smoker as well, by placing the meat and favorite vegetables in the same cooking pan or on a sheet pan. By placing the food pan on the unlit side of the grill, you can treat this just like using an oven.

Rib-Eye Roast: Also known as prime rib roast, rib roast, and standing rib roast, this is one of the more tender cuts of beef and on the higher price end. This roast cut is situated under the front end of the backbone. Often the best means of cooking this meat is with seasoning and a bit of herb. Be sure to visit our previous article on wood-fired cooking prime rib for specific tips

Eye of Round Roast: This cut of beef is the typical one that grocery delis produce their roast beef from. This is an inexpensive cut from the rump and hind legs of the cow and is perfect for a slow grilling/smoking method.

Bottom Round Roast: Also known as Rump Roast, this too is an inexpensive cut that is ideal for slower cooking on the grill or smoker.

Brisket: Derived from the lower front of the cow, near the front legs, brisket is from a muscle that bears 60 percent of the animal’s weight making it ideal for low temperature cooking.

Beef Ribs: Do not confuse these ribs with the meaty quality of pork ribs, as there tends to not be quite as much. However, they are still delicious and worth grilling. I prefer to have the butcher cut the length of ribs I want when it comes to the short rib variety, as you don’t have to purchase small cuts.

Flank Steak: One of my favorites for marinating and then grilling two-zone method.

Hardwood Recommendations for Beef: A combination of hardwoods is best so selecting 2 or 3 from these tried and true hardwoods: Beech, Hickory, Red oak, Sugar Maple, White Oak, Cherry.

Chef Burt and Tom discussing how large cuts of meat are cheaper and provide more value to their budget

Pork pig or pork image

 Pork Loin Roast: Containing just a small amount of fat, the loin roast comes from the area between the shoulder and the start of the leg and usually are sold between 2-5 pounds. This is a perfect cut for the grill, though you may be told to cook it direct fire method, I still prefer to set up a two-zone cooking method.

Pork Shoulder/Butt: From the front of the pig behind the neck, shoulder/butt cuts are full of fat that work very well for long, lower temperature cooking. Generally, this cut is cooked on the grill or smoker using a temperature of about 225°F and takes 8-10 hours depending on the size, which range from 6-14 pounds.

Baby Back Ribs: A very tender rib cut that comes from the pork loin off the back of the pig. This is the most popular pork rib cut for the grill.

Spare Ribs: These ribs are cut from the belly of the pig. Most popular cut is St. Louis style.

Country Style Ribs: These ribs are derived from the end of the loin closest to the rump. The meat can dry out quick so marinating is highly recommended.

Picnic Ham: As the lower portion of the shoulder, it can be tough and fatty if not subjected to a slow, lower temperature cooking method. Do this right, with a simple rub then glazing the last hour or so, and you will have a result that is tender and juicy for many meals.

Hardwood Recommendations for Pork: Pork allows for greater variation in hardwood flavors. Using alone or combination, perfect woods include: Ash, Beech, Hickory, Sugar Maple, White Oak, and Cherry.

Chef Burt and Tom arrive home from the butcher just in time to meet Fed Ex delivering there wood from Smokinlicious® Culinary wood products.

Chicken and Turkeypoultry image

 Breast: This portion of the chicken or turkey can easily become dry if cooked over direct fire. That is why I recommend you always cook on the cold side of the grill. If you prefer a char flavoring, you can move the pieces to the direct fire side for just a few minutes to finish them off, especially if you are glazing or saucing.

Leg Quarters and Drumsticks: As with the breast meat, although these pieces will stay tender and juicier over a direct fire, I still prefer to cook in the cold side of the grill. This ensures even cooking as the darker meat of poultry does take longer to cook then white.

Whole Chicken and Turkey: Although you certainly can cook these on a rotisserie, I prefer to spatchcock them which includes removal of the backbone and flatten the meat for more even cooking. You can find our method for spatchcocking chicken here:

Hardwood Recommendations for Poultry: I particularly lean toward using two or three hardwood combinations for poultry in order to balance the lighter meat flavor with wood. Here are some great combinations to consider: #1 ash, maple, cherry #2 hickory, maple, cherry #3 maple & cherry #4 white oak & cherry. Experiment and find your perfect balance.

As you see, two-zone cooking is the best method to ensure you don’t have to be tied to the grill for hours at a time and instead, can continue to do more with family. Larger cuts of meat will not only save you money but extend your animal protein supply for multi meals. Oh, and don’t forget, live fire cooked meats freeze well and the smoked component preserve them for even longer use dates.

What cut of meat is your favorite for the grill or smoker? Leave us a comment and subscribe to get our latest tips, techniques, recipes and the science behind the fire and smoke, for all live fire cooking methods. That’s SmokinLicious!

SmokinLicious® Products:

Charwood

Wood Chunks- Double & Single Filet

Wood Chips- Grande Sapore®, Minuto® & Piccolo®

More Related reading on this subject about large cuts of meat that grill & smoke well over a long period. Use our guide on your next visit to the butcher shoppe.

Related readings:

-3 METHODS OF SMOKING BOSTON BUTT FOR AUTHENTIC BARBECUE FLAVOR

-WHY IS MY BARBECUE MEAT DRY??

-Great Sustainable Wines To Pair With Your Smoked Meat

Dr. Smoke- don't be a slave to the grill by doing large cuts of meat that grill & smoke while you entertain or just do your chores around the house Then you have a wonderful meal! Dr. Smoke the tools make the Chef- hope you enjoyed our Top tools to own for Charcoal Grilling!
Dr. Smoke- don’t be a slave to the grill by doing large cuts of meat that grill & smoke while you entertain or just do your chores around the house Then you have a wonderful meal!


Thursday, August 25, 2022

CHEF WATERS’ GOAT CHEESE SALAD

 Posted by Donna Grant
Read other related stories:
Cheese , Gas Grill Techniques , indirect cooking , Salad
No Comments 

Print Now!
The finished- WOOD GRILLED VERSION OF CHEF WATERS’ GOAT CHEESE SALAD

listen to this blog
listen to- A WOOD GRILLED VERSION OF CHEF WATERS’ GOAT CHEESE SALAD
 
 Audio Player
00:00
00:00

Taking a page from Chef Alice Waters, we are making our version of the baked goat cheese salad by wood baking the goat cheese rounds on the grill using a two-zone cooking method and wood chunks for smoky flavor. Then making garlic crostini for the croutons on the charcoal grill to serve alongside this fabulous salad dish. A recipe that can be a salad course or an entrée on its own, we also give you an easy way to make this into an appetizer. Purchase 12 ounces of quality goat cheese in log form and let’s get grilling.

Goat Cheese

Chef Waters’ Goat Cheese Salad- Marinate to Start

This dish requires at least 8 hours of marinade time though I like to do mine overnight. It’s the marinade of oil and fresh herbs that give the goat cheese great flavor. Cut the goat cheese log into ½-inch rounds. In the bottom of a glass dish, sprinkle chopped fresh herbs of your choice; today I’m using oregano but most any fresh herb will do. Place the goat cheese rounds into the dish and pour over a ¼ cup of olive oil. Turn the cheese rounds over to coat both sides. Place fresh herb sprigs over the top of the rounds, cover with wrap and marinate in the refrigerator.

Fresh herbs

Tasting Notes: Other fresh herbs work great with this recipe but note that stronger herbs like thyme and rosemary likely don’t need the layers of chopped herbs at the bottom of the dish. Simply lay the fresh herb springs on top of the goat cheese rounds and marinate in the refrigerator.

Chef Waters’ Goat Cheese Salad- Grilling with Wood Chunks

Trays of goat cheese on the grill!

Once the goat cheese has marinated, it’s time to coat it in a mixture of ½ cup plain breadcrumbs and two teaspoons dried herb of your choice. I’ll be using oregano but other good options include thyme, basil, marjoram, rosemary. Once coated on both sides, place the cheese rounds on a lightly greased shallow pan. I’m using mini sheet pans as they work well on the grill, even for a two-zone cooking method.

As this is a cheese dish it is important that a two-zone cooking method is used which means the cheese will be going on the unlit side of the grill. I’m using a smoker box with three hardwood chunks to provide the smoke flavor to the cheese, with the box placed on the hot side of the grill. Total time to cook will be about 20 minutes. You’ll know the cheese rounds are ready once browned and bubbly.

While the cheese is on the grill, prepare the vinaigrette by combining ¼ cup red wine vinegar, salt, and fresh ground pepper. Whisk in ½ cup of olive oil and set aside.

Chef Waters’ Goat Cheese Salad- Greens and Garlic Crostini

Crostini with garlic butter

To go with the goat cheese rounds and salad vinaigrette, I’m making garlic crostini on the charcoal grill. Using ½-inch slices of a day-old baguette, brush both sides of each slice with melted butter. Place on a high heat tolerant sheet over hot coals only, no active flames. Allow the slices to brown and slightly char before turning over. Once browned on both sides, remove from the grill and brush with the cut side of a garlic clove. I cut these crostini slices in half at the diagonal to go with the salad.

Tasting Notes: An assortment of fresh greens can be used for the salad though I like to use a combination of bitters with more savory greens.

Chef Waters’ Goat Cheese Salad- Assembling to Enjoy

With all the components made its time to assemble our salad. Start by mixing the vinaigrette with the greens. I like to place the garlic crostini on the outside of the salad and the wood-baked cheese rounds in the center of the greens. This is best served while the cheese is warm. Here’s another suggestion: this can make for the perfect appetizer if you cut each round in half so they fit on a garlic crostini. For that recipe, prepare the same but place a few leaves of salad on the garlic crostini and top with a wood baked goat cheese half round. There you have it! A super easy salad or appetizer with that signature wood flavor that takes Chef Waters’ recipe to a new level.

SmokinLicious® products used in this recipe:

Wood Chunks: Double & Single Filet

For more reading related toRelated recipes:

-FIRE ROASTED PEPPER MAKE THE PERFECT SALAD

-THE EASY METHOD TO COLD SMOKED CHEESE

-RASPBERRIES GO TO THE GRILL– FOR THE ULTIMATE MINI TART APPETIZER

-SMOKED CHEESE & BACON QUICHE FEATURING COLD SMOKED CHEESES

Dr. Smoke- try this-WOOD GRILLED VERSION OF CHEF WATERS’ GOAT CHEESE SALAD on your next party!

Thursday, August 18, 2022

FROM FOREST TO SMOKE GENERATOR: TRACEABILITY PROTECTS YOUR INVESTMENT

 Posted by DrSmoke
Read other related stories:
General Smoking Information , Smokinlicious Products , Wood Science
No Comments 

 Our forest Fresh products to your smoke Generator

Our traceability of forest fresh products to your smoke generator

listen to our blog
Listen to our blog

 Audio Player

00:00
00:00

Our view of wood – it is not simply what produces vapor or being a smoke generator. It is THE ingredient that provides for colour, aroma, flavour and even texture to food.

Just like the other ingredients used in your operation, you need peace of mind knowing that if questions arise, you can produce the documentation to show where the wood came from and how it was handled.

Tracing from Mill to You- A Key Factor for Wood to Be a Smoke Generator

First, when you partner with SmokinLicious®, you’ll be using fresh forest hardwoods from Western New York and Northwestern Pennsylvania. Second, all our hardwoods arrive at our facility de-barked. Third, we only use pure heartwood for the log. This is considered the purest part of the tree and one that is resistant to decay, pests, and fungi.


Hardwood Growth Rings

We trace every piece of wood we manufacture and have information on:

  • the harvest date
  • what mill processed the raw wood
  • our heat treatment date and data
  • ship date

That is forest to oven.

Why is Traceability Important?

Without it, your operation could be interrupted.

Any time your company’s standards are reviewed, we have the data on the wood. That means, it’s at your fingertips. Plus, our commitment to a higher heat treatment level (75°C for a minimum of 75 minutes) ensures Thermal Death Time. Potentially dangerous organisms like fungi spore, mold spores and listeria can’t survive with our heat level!

75 degrees C for 75 minues

This extra step ensures potentially fatal bacterium cannot enter the food chain. Plus, research shows that E. coli and E. faecium can be eliminated or substantially reduced in risk through this higher heat treatment level.

Join Us!

It’s time to work with a friction log manufacturer that understands what part of the tree is the most stable and beneficial to your food process. We know what it takes to gain the perfect essence from the wood. Learn why SmokinLicious® is the perfect partner for your food process and explore the world of hardwood as an ingredient!

Products discussed in this Blog:

Wood Chunks- Double & Single Filet

Wood Chips- Grande Sapore®

Smoker Logs

More Related reading on "What Wood for Smoking" and other great smoking and grilling tips and techniques
For more related reading on this topic, check out these articles

Forest Grown Hardwoods

Cooking Wood Purchasing- Are You Getting What You Paid For?

Why Forest Hardwoods Make a Difference

Dr. Smoke try minuto® and Piccolo® chips for your smoke generator
Dr. Smoke says, "Try Minuto® and Piccolo® chips for your smoke generator!"


Tuesday, August 9, 2022

SWORDFISH A LA PLANCHA

Posted by Donna Grant
Read other related stories:
Fish , Plancha cooking , Seafood
[2] Comments 

Print Now!
Discover a great taste with wood chips by cooking Swordfish Al A Plancha

Discover a great taste with wood chips by cooking Swordfish A LA Plancha!

SWORDFISH A LA PLANCHA

Listen to our blog

Audio Player
00:00
00:00

Colder weather can often end your outdoor cooking but it doesn’t have to take away your desire for wood fired foods. I’m going to show you an easy method of keeping wood fired flavors going even in the coldest, snowiest weather by taking the indoor plancha to my stove top. I’ll prepare a tasty swordfish using wood chips for flavoring to the fish and finishing with a ginger-garlic butter sauce. Purchase some fresh swordfish and let’s bring authentic wood flavoring to this great cut of fish.

Swordfish A La Plancha- Preparing the Plancha

Adding wood chips to the plancha

#plancha #minutowoodchips

I love my stove top plancha pan but you can easily use a standard griddle with a heat safe pot lid.

To start, get a supply of Minuto® wood chips and prepare your plancha or griddle by first placing a ¼ cup of chips in the center of the griddle, then placing the grilling racks on the surface. Turn a medium-high heat on and place the cover on the unit to allow it to reach temperature. We want a high temperature of about 375-400° F. Once the plancha is hot, you will smell the wood chips combusting and releasing aromatic flavor. That tells you it’s time to add the fish.

Swordfish A La Plancha- Cooking & Sauce Making

making the sauce in the pan

#sauces # fishsauces

Place the fish fillets on the grill racks of your plancha griddle. Cover and allow to cook and infuse with wood flavor for 4-5 minutes on one side.

With the fish on the plancha, you can start to prepare the butter sauce that will go on the finished fish. You’ll need:

  • 3 tablespoons butter at room temperature
  • 1-1/2 cloves garlic minced
  • ¾ teaspoon grated fresh ginger
  • ¼ teaspoon crushed red pepper
  • lemon peel- ¾ teaspoon
  • 1 teaspoon olive oil
  • 1 tablespoon citrus balsamic vinegar

Place all these ingredients in a small saucepan and bring together over low heat.

After 4-5 minutes of cooking, turn the swordfish fillets and cooked for another 4 minutes. Then remove the fillets to a plate and clean out the combusted chips to a heat safe container. Place the hot plancha back on the heat but reduce it the heat to low and leave the grill racks off.

Put the fillets back on the hot surface of the plancha to sear the outside. It will only take a minute per each side. Once seared, remove to a serving plate and pour the hot butter sauce over the top. That’s it! Great wood-fired flavor done on the stove top with a hot plancha or griddle.

What’s your favorite fish to add wood flavoring to? Leave us a comment to opine and subscribe to get all our postings on techniques and recipes. Bringing innovation to wood fired cooking with recipes, techniques and the science behind the fire, smoke, and flavor. That’s SmokinLicious®.

SmokinLicious® products used in this recipe:

Wood Chips- Minuto®

For more reading related to

For more reading related on Swordfish Al A Plancha and other plancha cooking from Smokinlicious.

Related reading:

-HOT SEARED SCALLOPS!

-WOOD FIRED LOBSTER TAILS CHILI

-STUFFED SQUID COOKED ON THE PLANCHA WITH SMOKINLICIOUS®

Dr. Smoke- Swordfish Al A Plancha with wood chips adds a great smoky taste to this wonderful fish!

Dr. Smoke- Swordfish Al A Plancha with wood chips adds a great smoky taste to this wonderful fish!

  1. What great timing! Just today I was out purchasing fruitwood chips and hickory chips. (I already have mesquite chips and am an avid fan of tea smoking in a wok with tea, rice and brown sugar.
  2.  I grew up learning how to smoke eels and everything else! Your post suits me to a tee although I don’t use swordfish very often(too expensive. here….Like crayfish tails and yabbies it tends to be exported to foreign markets in much the same way as orange ruffy and abalone in New Zealand.[Economists would cite the balance of trade agreements that exist regarding trade on the international markets]

Thursday, August 4, 2022

EMBER FIRED FRESH ZUCCHINI

Zucchini is a great vegetable to not only grill but ember cook. It has the density to hold up over the high heat. Add a distinct char taste to this abundant vegetable either as a side dish or an ingredient by making ember fired fresh zucchini.

I love thick-skinned vegetables that come in season during Summer. They are the perfect items to light a fire and make some hot coals to ember fire flavor into them.

We’re getting ready to coal roast one of my favorite vegetables – zucchini! This is so simple to do and produces an extraordinary flavor for zucchini to be eaten on its own or to be used in your favorite recipe. Clean out the fire pit, charcoal grill or outdoor fireplace and prepare to roastember fired fresh zucchini” directly on the hot coals.

Building A Small Fire

Starting the fire to burn down the wood into coals

Know this from the start – You do not need a large fire! A small fire is best to accomplish your cooking in about an hour’s time. For my fire, I am using ten SmokinLicious Single Filet Wood Chunks in Ash with a couple of pieces of charwood that were left over from a previous cook. Why Ash hardwood? Because it is hands down, the best hardwood to produce an even bed of coals which is what you want when you coal roast.

I stack the wood so there is quite a bit of air space between the pieces. This ensures I have good oxygen flow to produce combustion quickly. My technique is to stand the wood pieces on their end and make a circle. I try to have a couple of pieces in the center kind of tipped on to each other. Remember, you want to produce hot embers quickly so it only requires a little wood and a lot of oxygen to burn things down. I light my wood using a small butane torch. Leave the torch in place until I’m sure the wood has ignited. I keep the lid off my charcoal grill so I can push the combustion process through completion and get those ash covered, hot embers.

Red Means Hot

Red Hot coals is the goal before adding the zucchini

You will know when the coals or embers are ready for cooking when you have uniform coals and they are glowing red from the bottom and gray on top. I keep a couple of larger coals banked to the side to maintain heat and for reserved hot coals. Just in case I need to rake more to the cooking side. I like to nestle a high heat metal cooking rack on the hot coals and then place my whole zucchini on the rack. This allows for little ash to accumulate on the skin. Remember, those coals are very hot so the zucchini will take less than 20 minutes to tenderize and char.

Turn For Full Char

Zucchini on the grilling rack over the hot fire coals

With the zucchini and coal rack in place, I give the embers about 8 minutes to char and cook the first side of the zucchini. After that time, I gently turn the zucchini so that each side gets an even char. Once the first 8 minutes are done, there will be less time needed for each of the other sides as the zucchini will hold heat. I’ve added one additional wood piece to my banked fire just to be sure I have enough heat in the coal area. I will not put the lid on the unit during the entire cooking process as this is open fire cooking. My total coal cooking time is approximately 16 minutes.

Perfection In Smoke & Char on Ember Fired Fresh Zucchini

Dr. Smoke's clock for the cooking time required

After placing my ember fired fresh zucchini on hot coals for about 16 minutes total, turning several times to get an even char, this spectacular vegetable is ready for eating. You will see, there is very little coal bed left following this technique so remember, if you are cooking more than a couple of zucchini, you will need a larger coal bed.

For those of you thinking that the black, charred skin will be bitter and not appealing to eat, think again. Most of the char will rub right off but the flavor will be infused throughout the ember fired fresh zucchini. I’ve sliced mine about ¼-inch thick as I plan to make a galette of ricotta, garlic oil, and basil.

The Culinary Crew wants you to know

… that ember roasting is ideal to boost up the bland, delicately flavored zucchini and will add a rich, wood-fired taste dimension to any dish featuring this exquisite summer squash. So, be prepared to enjoy a rich, char-smoked variation of your ratatouille, quesadillas, stuffed zucchini or soups from ember cooked zucchini!

Check in soon for our post on that recipe. Did you love this wood-fired technique? Leave a comment and subscribe as we continue to bring you new ideas, tips, techniques and recipes for all things wood-fired, smoked, and charred!