Showing posts with label roasted vegetables. Show all posts

Thursday, August 4, 2022

EMBER FIRED FRESH ZUCCHINI

Zucchini is a great vegetable to not only grill but ember cook. It has the density to hold up over the high heat. Add a distinct char taste to this abundant vegetable either as a side dish or an ingredient by making ember fired fresh zucchini.

I love thick-skinned vegetables that come in season during Summer. They are the perfect items to light a fire and make some hot coals to ember fire flavor into them.

We’re getting ready to coal roast one of my favorite vegetables – zucchini! This is so simple to do and produces an extraordinary flavor for zucchini to be eaten on its own or to be used in your favorite recipe. Clean out the fire pit, charcoal grill or outdoor fireplace and prepare to roast “ember fired fresh zucchini” directly on the hot coals.

Building A Small Fire
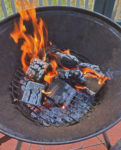
Starting the fire to burn down the wood into coals

Know this from the start – You do not need a large fire! A small fire is best to accomplish your cooking in about an hour’s time. For my fire, I am using ten SmokinLicious Single Filet Wood Chunks in Ash with a couple of pieces of charwood that were left over from a previous cook. Why Ash hardwood? Because it is hands down, the best hardwood to produce an even bed of coals which is what you want when you coal roast.

I stack the wood so there is quite a bit of air space between the pieces. This ensures I have good oxygen flow to produce combustion quickly. My technique is to stand the wood pieces on their end and make a circle. I try to have a couple of pieces in the center kind of tipped on to each other. Remember, you want to produce hot embers quickly so it only requires a little wood and a lot of oxygen to burn things down. I light my wood using a small butane torch. Leave the torch in place until I’m sure the wood has ignited. I keep the lid off my charcoal grill so I can push the combustion process through completion and get those ash covered, hot embers.

Red Means Hot
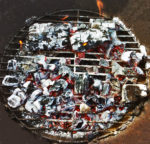
Red Hot coals is the goal before adding the zucchini

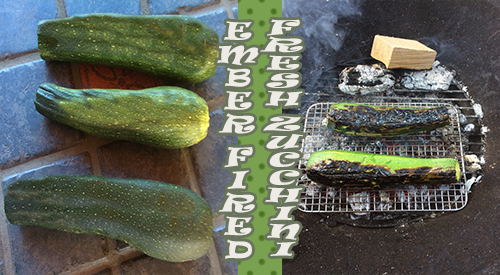
You will know when the coals or embers are ready for cooking when you have uniform coals and they are glowing red from the bottom and gray on top. I keep a couple of larger coals banked to the side to maintain heat and for reserved hot coals. Just in case I need to rake more to the cooking side. I like to nestle a high heat metal cooking rack on the hot coals and then place my whole zucchini on the rack. This allows for little ash to accumulate on the skin. Remember, those coals are very hot so the zucchini will take less than 20 minutes to tenderize and char.

Turn For Full Char
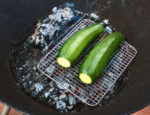
Zucchini on the grilling rack over the hot fire coals

With the zucchini and coal rack in place, I give the embers about 8 minutes to char and cook the first side of the zucchini. After that time, I gently turn the zucchini so that each side gets an even char. Once the first 8 minutes are done, there will be less time needed for each of the other sides as the zucchini will hold heat. I’ve added one additional wood piece to my banked fire just to be sure I have enough heat in the coal area. I will not put the lid on the unit during the entire cooking process as this is open fire cooking. My total coal cooking time is approximately 16 minutes.

Perfection In Smoke & Char on Ember Fired Fresh Zucchini

Dr. Smoke's clock for the cooking time required

After placing my ember fired fresh zucchini on hot coals for about 16 minutes total, turning several times to get an even char, this spectacular vegetable is ready for eating. You will see, there is very little coal bed left following this technique so remember, if you are cooking more than a couple of zucchini, you will need a larger coal bed.

For those of you thinking that the black, charred skin will be bitter and not appealing to eat, think again. Most of the char will rub right off but the flavor will be infused throughout the ember fired fresh zucchini. I’ve sliced mine about ¼-inch thick as I plan to make a galette of ricotta, garlic oil, and basil.

The Culinary Crew wants you to know…

… that ember roasting is ideal to boost up the bland, delicately flavored zucchini and will add a rich, wood-fired taste dimension to any dish featuring this exquisite summer squash. So, be prepared to enjoy a rich, char-smoked variation of your ratatouille, quesadillas, stuffed zucchini or soups from ember cooked zucchini!

Check in soon for our post on that recipe. Did you love this wood-fired technique? Leave a comment and subscribe as we continue to bring you new ideas, tips, techniques and recipes for all things wood-fired, smoked, and charred!

Thursday, July 18, 2019

WINTER SQUASH WITH CUMIN WOOD GRILLED

Our winter squash sliced and seasoned with Cumin and ready for the grill!

Full of color, flavor and packed with nutrients, winter squash makes for exceptional seasonal dishes, whether soups, casseroles, or desserts.  Harvested in the approaching Fall, they are available all winter long due to their firm shells.  With varieties such as sugar pumpkins, acorn squash, butternut squash, spaghetti squash, buttercup, and red kuri, sweetness level is always present.

Naturally low in fat and calories, yet rich in vitamins A, B6, C, and E, you can’t go wrong with any variety you select.

Today, I’ve elected to make cumin squash on the grill using confetti squash, so called due to the beautiful multi-skin coloring.  Note, you may substitute any rounded winter squash available near you for this recipe.


Two-Zone Cooking


Smoke coming from our wood chunks! Using a two zone cooking methodTo allow for slow roasting on the grill, I recommend a two-zone cooking set up.  Lite half the burners on your gas grill – if an odd number of burners, decide how many you need for the cooking temperature. The lit burners should be set to medium to obtain a cooking temperature of about 375°F.  Add wood chunks to the lit burner side either directly on the heat shields or in a smoker box.  My smoker box accommodates three double filet wood chunks easily.  The prepared squash will go on the unlit side of the grill.

Tasting Notes: Your choice of hardwood will determine the boldness of the smoke infusion.  I find that the skin of the squash will take most of the smoke vapor so really any hardwood or combination of hardwoods will do.  Be sure to keep extra pieces in case you need to replace halfway through the roasting process.


Seasoning the Squash


Our mixture of seasoning and spices.To start our recipe, first wash and dry off your squash.  Then cut in half and remove the seeds.  Slice the squash into 1-inch slices and place in a high heat tolerant pan.  Once sliced, prepare to toast 3 tablespoons of sesame seeds in a skillet over medium-high heat until golden brown.  If you’re able to locate cumin seeds, toast 1-1/2 teaspoons of cumin seeds with the browned sesame seeds.  Transfer the seeds to a bowl and allow to cool.

Now prepare the squash seasoning by combining 1 teaspoon ground cinnamon, 1 teaspoon ground coriander, 1 teaspoon ground nutmeg, 1-1/2 teaspoons coarse salt, and ¼ teaspoon fresh ground pepper.  If you didn’t have cumin seeds, then include 1-1/2 teaspoons ground cumin.  Drizzle 3 tablespoons of extra virgin olive oil on the squash slices and sprinkle with squash seasoning.  Toss to coat all the way around the slices.


Grill-Roasting with Wood

With the grill preheated, the wood chunks smoking, and the temperature gauge reading close to 375°F, I place the trays of prepared squash on the grill grates and close the lid.  I allow this to roast for 30 minutes, then I return to the grill, check the wood chunks and add more wood if needed. Briefly toss the squash to ensure even cooking and close the lid again.
Our pan of squash roasting on the gas grill
Once tender and bronze in color, I remove the squash from the grill and plate to a serving platter.  Total cooking time is about one hour though this is dependent on the thickness of your slices and quantity of squash you’ve added to the pan. Remember, the rind of squash is loaded with nutritional value as well and will be very tender so there is no need to discard it. Consume the entire slice.

Roasting winter squash on the grill with wood is the perfect way to usher in the cooler weather and enjoy all this great flavor.

Tasting Notes:  You can serve this as is or feel free to process the slices into a puree for use in soups or as a filler to pasta or even desserts.  There are many options with grill roasted winter squash.

Thursday, July 11, 2019

WOOD ROASTED ONIONS TO DIE FOR!

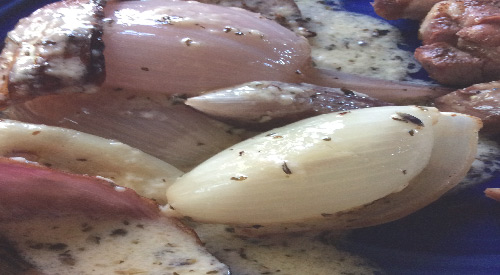
Our finished wood roasted onions!

One vegetable that is available throughout the year is the onion.  Although you’re likely accustomed to using this in recipes as an added natural flavor when you wood-fire the onion, something magical happens to its cell structure that turns these into the buttery, melt-in-your-mouth gems that you’ll want to use in even more recipes.

Onions are high in vitamin C, can aid in weight loss, and have reduced certain cancer risks, especially those associated with the digestive tract.

Our onion assortment, White, Sweet and Shallots 
Whether you elect to do the standard yellow onion, the sweet red onion, or shallots, you will love how smoke vapor works to bring out the best in any variety.


Preparing for the Grill

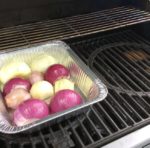
Before preparing the onions for the grill, let’s get the grill started by lighting the burners on only half the grill.  This is referred to as two zone cooking.  On the lit burner side, I place 2 wood chunks – I’m using the Single Filet size from SmokinLicious® – directly on the heat shields of my hot burners.  This will provide the wood flavoring to the onions.  My burners are set to medium-low which usually produces a cooking temperature of about 300°F.  Simply adjust your burner setting to reach this temperature.

For the onions, I simply cut the tops of, slice in half and remove the skins.  I place the halves cut side down in a roasting pan and add about ¼ cup of oil to the pan.   With my pan ready, I place it on the unlit side of the grill and close the lid.  In about 75 minutes, these will slightly charred, tender, and juicy.

Tasting Notes:  Although I used avocado oil since you are not grilling over direct heat, you can use other oils such as olive, almond, walnut, grapeseed, coconut, sesame, canola, etc.  Remember, some varieties of onion are considered herbs so doing an assortment of types will give you an abundance of flavors.


The Longer the Wood Roast the More Flavor


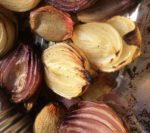
Onions on the grill with wood chunk over the flavor barYou’ll find as these onions cook and absorb both the smoke vapor and oil, the scales of the onions will separate and caramelize.  The results are tender, juicy and flavorful with a hint of woodsy from the charred edges.

I decided to make a simple sauce of butter, cheese, parsley, and pepper for my onion mix and served these alongside a pork steak, also cooked on the grill with a two-zone method.

The best part is onions are available year-round so I can do this method even in the dead of winter, as remember, the gas grill still functions even in the cold!  For those who like to freeze produce, this freezes very well so grill a lot keep them so they’re ready for the winter days you don’t feel like lighting the grill.   Just think what an onion soup will taste like when you wood-fire the onions first!

Finished wood roasted onions ready for serving 
Tasting Notes:  If using a charcoal grill, still use a two-zone cooking set up meaning charcoal on only one side of the grill.  Be sure you only cook with hot coals, no flames.  This type of grilling can have more challenges to steady temperature so make sure you check the onion pan more frequently.