Thursday, March 28, 2019

PAN COOK ZUCCHINI ON THE GRILL WITH WOOD FLAVOR

Try our pan cook zucchini on the gas grill with wood chunks for a flavoring twist


I’ve got a one pan dish that is easy to construct with the best part being you can do the entire recipe on your LP/Gas grill.

Grab your prized zucchini and get to the grill and I’ll show you how easy this technique and recipe are for a great meal.


Zucchini Prep


Preparing the zucchini is very simple for this recipe as we want all the nutritional value of the skin as well.  After washing, patting dry, and trimming off the ends, cut 1-inch thick rounds and then cut each round into smaller pieces.  For the smaller rounds, you should get 4 pieces and the larger 9.  Place all the cut zucchini pieces into a disposable foil pan.  There’s no need to spray the pan or add any liquid as zucchini has a 95% water content and when cooked, produces 6 oz. of water per every cup.  This will naturally steam away while in our grill pan while tenderizing the zucchini for our dish.  Plus, the high-water level will attract the smoke vapor for great flavor.
Diced zucchini in a disposable pan ready for the two zone cooking method
The grill set up is the easiest part.  Simply lite the burners on only half the grill.  Place wood chunks either directly on the heat shields located under the grill grate or in a smoker box placed on top of the grill grate of the lit burners.  Allow to heat up for about 10 minutes.  Then place the pan of cut zucchini on the unlit side of the grill and close the lid.

Tasting Notes: You do have an option to slice your zucchini lengthwise into quarters and grill directly on the grate.  Know this will produce stronger wood flavoring to the finished product and you will still need to cut the zucchini down into bite-size pieces.


Ragout Ingredients

Although ragout in Italian traditional means a sauce made from root vegetables and fruits, I felt it was a suitable term for our tomato-jalapeno based sauce.  In addition to your zucchini, you’ll need the following ingredients:
  • 3 large tomatoes, diced
  • 1 jalapeno, diced
  • 1-1/2 cups pasta sauce
  • Basil- 2 tablespoons
  • 2 tablespoons oregano
  • 2 tablespoons parsley
  • 1 tablespoon garlic powder
  • Fresh ground pepper
  • 10 oz. tortellini
  • ¼ cup shaved Parmesan and Asiago cheese
After the zucchini has cooked for about 30 minutes, add the diced tomato and jalapeno.  Let that cook for 15 minutes and then add the pasta sauce, basil, oregano, parsley and garlic powder.

Tasting Notes: This can be a spicy dish so if you only like a mild kick add ¾ cup of ricotta cheese when the pasta sauce and herbs are added.


Finale

All this made in one pan!
all our spices added to the panThe final step to our grilled zucchini with tomato pepper ragout is to add the tortellini.  You may wonder how tortellini will cook without any water.  Essentially, you only need a little liquid with heat to produce enough steam to cook the tortellini.  The best part is you won’t have any pasta that is soggy and unable to hold its form.

After adding about 10 ounces of tortellini – mine happens to be filled with spinach – the ¼ cup of shaved asiago and parmesan cheese are added.  Everything is mixed well and left on the grill until the tortellini are tender.  That’s it!  Everything completely made on the grill and absorbing the great wood flavor from our SmokinLicious® chunks.  This is a great starter recipe that you can easily modify to fit your taste.

Now you need to try to Pan Cook Zucchini on the gas grill with wood!
Thursday, March 21, 2019

TOP TOOLS TO OWN FOR CHARCOAL GRILLING

Our take on the Top Tools to Own for Charcoal Grilling
Our take on the Top Tools to Own for Charcoal Grilling – some may surprise you!

When I get the chance to visit a brick-and-mortar barbecue specialty store, I am always amazed at the number of accessory items currently offered for grilling and smoking.  The options are staggering!  I certainly can see why an individual might end up purchasing too many items, thinking that it’s a necessity when it comes to the grill or smoker.

My intent is to guide you on the bare basics tools that are needed when you own a charcoal grill.  Of course, I may slip in there a couple of “next in line” purchases that may not be necessities but sure come in handy.  Let’s get started!


Tool #1

We demonstrate a lite chimney starter!Chimney Starter: Honestly, I don’t know a safer, easier method of lighting the fuel for your grill than with a chimney starter.  Are they pretty much the same?  Pretty much but here’s my recommendations on what to look for: one that is made of plain steel meaning no paint; one that has a heat-safe handle that is placed far enough away from the chimney body to prevent you from receiving burns and includes a heat shield;  large enough to hold enough charcoal for the size of your grill; well vented at the base to get things hot within 15 minutes.


Tool #2

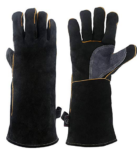
insulated long sleved gloves protect from heat and burnsWe just talked about the chimney starter which emits very high-heat so this next item is going to keep you fire safe.  High-temperature resistant gloves.  Personally, I use welding gloves as I appreciate that I can purchase a longer length glove, plus, these gloves tend to have great flexibility to them since most are made from cow leather.   Best of all, they last forever!


Tool #3

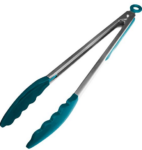
The long handle tonges are great for putting and turning food on the grillLong-handled tongs.  Your standard tong length for the traditional kitchen just won’t work at the grill, as you need to keep some arm distance from those hot coals.  I like the 20-inch length with silicone grips as well as silicone tips as silicone can tolerate extremely high heat.


Tool #4

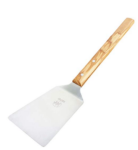
Spatula with long handle to turn the food on the grillLike the tongs, a must have is long-handled spatula for those food items that need to be flipped.  I prefer one that is made of solid steel and has a bit of a beveling to the edge.  Again, the longer the handle to better for keeping away from intense heat.  Of course, you’ll be wearing your high-temperature resistant gloves as well!


Tool #5

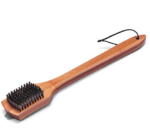
Wire brush to clean the grates of residual food.Even if you don’t grill every day you’re still going to need a good brush to clean up the residual food bits and grease.  There’s been a lot of controversy over the use of metal bristles but most of these brushes are made well.  You simply forget that like your toothbrush, they need to be replaced periodically before the bristles start to come loose and have the potential to be transported to your foods.  I prefer a brush with metal bristles, with a long handle to keep my arm away from the heat, as often you want to clean the grill when it’s still hot.  Remember, most of these brushes are under $10 so think about purchasing one a couple times per season to ensure the bristles stay put.


Tool #6

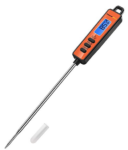
Probe thermometerAn easy to read, digital thermometer.  It is a must when you grill or smoke.  Look for one that has a longer probe for when your grilling larger roasts and thicker cuts of meats and poultry.  Be sure the readout is easy to see and if you grill a lot at night, get one that has a backlight to see more clearly.  If you cook a lot of different animal proteins at the same time, try to have a thermometer dedicated to each food so you don’t cross-contaminate while bacteria may still be an issue.  Most of the digital thermometers on the market today are under $18 with even more under $10.


Other Recommended Tools:

These are additional items I love to have on hand to use with my charcoal grilling and smoking.

Aluminum disposible pans are grillers best friendThe Disposable Foil Pan: Perfect to use as a water pan, cooking pan with a roasting rack insert, grease collection pan, and warming pan.


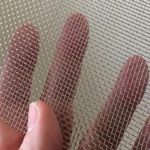
Wire mesh to hold the coals from falling thru the larger grates. especially for ember cooking.Fine Wire Mesh: Cut to size to fit my charcoal area, I prefer to use fine wire mesh when I want to ensure I can retain every small hot coal for my cooking.  This works particularly well when you plan to ember cook foods like peppers, onions, eggplant, and garlic.


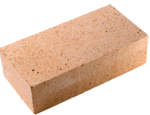
Brick for ember cooking- heat retention and separation for delicate foods such as fish!Fire Brick:  I use one or two fire bricks to set up my two-zone cooking area.  The bricks also work great for positioning a pan on to allow for elevation in the cooking area.


There you have it!  My top choices for the tools that will bring ease to your charcoal grilling and smoking.  Just remember to include some clean, bark-free hardwood on the charcoal for an even better flavor to your foods.

There you have it our take on the Top Tools to own for Charcoal Grilling!

Thursday, March 14, 2019

POTATO SALAD GETS SMOKE INFUSION

Serving bowl of Our Potato salad gets smoke infusion recipe!
Looking to add some smoky flavor to your BBQ try this Potato salad gets smoke infusion recipe and please your guests taste buds!


Without question, potatoes are my favorite vegetable to expose to smoke vapor.   For one, it is so easy to do whether you select a gas/LP grill, charcoal grill, convection grill, or electric unit.  Additionally, it takes such a short amount of time to cook them this way.

I’ll give you my preparation for the potatoes and then my take on the traditional potato salad made with our awesome smoked potatoes.


Preparing for the Grill


The potatoes inside the Orion CookerHonestly, you can use any of your favorite potatoes for this technique and recipe.  I’ll tell you that I’m firing up my Orion Cooker as the high heat of this unit will allow my potatoes to become tender in about 60 minutes and I don’t need to do more than turn the potatoes one time.  Of course, I’m using the custom blend wood chips sold by Orion to ensure that the smoke infusion is perfectly balanced.  When using the Orion Cooker, a chimney starter of briquets should be started and the fuel pan of the unit filled with unlit briquets.  Personally, I like to use long-handled tongs and place my hot coals from the chimney started to the inner edge of the fuel pan.  That ensures that I direct the heat very quickly to the metal cylinder of the unit.


Tasting Notes:

If you’re using a traditional charcoal grill, try to do the cooking on hot coals only, with no flame. Start a chimney or two of hot coals and allow these to burn down until they are just hot coals.  Then pour into the charcoal area.  I often use a fine wire mesh in my charcoal area so I can retain even the smallest hot coal for my cooking.

On a gas grill, use a two-zone cooking method with wood chunks placed on the hot side of the grill, potatoes on the unlit side, and the lit burners set to low-to-medium. 

Before placing the potatoes on the grill grate of any of these units, clean them, pat dry, and pierce with a fork on both sides so the water in the potatoes can steam out during the cooking process.


No Work

As I said, potatoes are the perfect vegetable to put on the grill or smoker as their skin acts like a mini cooker and cooks them tender.  You’ll simply need to turn the potatoes just one time during the hour they grill.  While they are cooking, you can prepare the dressing to be ready to put everything together.

Tasting Notes: Always grill and smoke the potatoes with the skins on to keep the smoke vapor from getting too strong.  Remember, potatoes have a lot of water which will be an attractant to smoke vapor.


Creamy Dressing

For our creamy dressing, you’ll need the following ingredients:
  • 1-1/2 cups of mayonnaise
  • Rice or cider vinegar- 2 tablespoons
  • 2 tablespoons of sugar
  • 2 tablespoons of yellow mustard
  • 1 teaspoon salt
  • 1 teaspoon garlic powder
  • ½ teaspoon pepper
  • 2 celery ribs, sliced
  • 1 cup of onion, minced
  • 5 hard-boiled eggs, coarsely chopped
  • paprika
The ingredients for our recipe! 
Start by combining the mayonnaise, mustard, vinegar, garlic powder, salt, pepper, and sugar.  Be sure everything is mixed in well.  Taste to be sure everything is balanced and adjust as needed.  Usually, adjustments are made to the vinegar or mustard levels.   The texture will be very creamy.

Once the potatoes are tender, you can remove them from the grill and allow to cool.  Once cool enough to handle, cut into bite-size pieces.  Now add the chopped smoked potatoes to the dressing bowl and mix until all the potatoes are covered in dressing.  Give it just a few minutes to absorb.


Final Salad Touches


The ingredients mixed with our Hardboiled Eggs on top!Now that the dressing has been added to the smoked potato pieces, it’s time to add the remaining ingredients.  First in, the celery and onion.  Mix this well to ensure a single bite doesn’t get all onion! 

Next, the chopped egg is added.  Gently mix this into the salad to keep the larger pieces from crumbling too far.  Finally, the sprinkle of paprika over the top of the salad.  I prefer a Spanish or Hungarian paprika.   That’s it!  Now chill until ready to serve and enjoy this super flavorful take on the non-traditional potato salad gets smoke infusion!


Tasting Notes

You can use a smoked paprika if you want even more kick of smoke but most of the time, a traditional paprika is suitable. 

Thursday, March 7, 2019

TEMPERATURE CONTROL IS ALL IN THE AIR FLOW

Your Temperature control is all in the air flow for smoking and grilling with equipment!

How do you keep a charcoal grill at 200°F? How do you cool down a charcoal grill?  Do you keep the vents open all the time?

These are some of the common questions posed when it comes to learning how to control the temperature of a grill or smoker.  This can be a challenge specifically for charcoal/wood units as they rely on the human hand to determine when to add fuel as opposed to a gas/LP unit that has continual, regulated flow.

You might assume that the only combustible material used in these units is charcoal or wood but there is another one.  Oxygen.

I’m going to provide my top tips on gaining control of temperature by instructing you on airflow or oxygen regulation in specific styles of charcoal/wood burning equipment.


Intake and Outtake


For many of the charcoal/wood using units, they are built with an intake and an outtake vent.  Let’s make sure you understand what these vents are and what the purpose of each is.

Intake Vent: It has one job – bring in oxygen to control the heat of the fire.  If you need to raise the temperature of your unit, open the intake vent.  Too much heat, close the intake vent which starves the fire for oxygen.  Note: if you close the intake vent entirely while keeping the outtake open, you will still starve the fire and put it out.

Here’s the trick – each unit will have a “sweet spot” for the perfect balance of oxygen flow.  Find that spot, and you can maintain a temperature easily in your equipment.  But, I’m getting a little ahead of myself.  Let’s discuss the opposing vent.

Outtake Vent:  This goes by different names (chimney, flue, outtake, vent) but has the same purpose regardless of what you call it; vent out the gases from the combustible material and pull in oxygen from the intake vent which is commonly know as draft.  Remember a charcoal/wood fire produces gases which need to be vented.  If they aren’t properly vented, they will smother the fire.

When learning how to regulate your equipment for the desired temperature setting, always start with the outtake vent fully open.  This allows you to manipulate only the intake vent until you reach the desired temperature.  That will help you learn where the sweet spot is on your equipment.


When You Never Find the Sweet Spot


There are times when no matter how you play with the intake vent, you never seem to get the temperature to hold.  What now?

Time to look for leaks in your equipment.  If an access door or lid are bleeding smoke, then you know where the extra oxygen is coming from.  That will affect the draft between the intake and outtake vent and result in fluctuating temperature that cannot be controlled.  Best course of action is to try to seal the leaks with food grade silicone or other materials suitable for high heat appliances.


The Shape of the Equipment


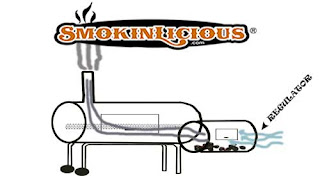
In my opinion, the vertical-style equipment models tend to be much easier to get airflow/temperature control.  Horizontal units also referred to as off-set smokers and grills, specifically the inexpensive models, tend to have poor design in the vent placements as well as poor insulation that results in heavy leakage.

If you insist on purchasing a horizontal unit, read reviews and ask questions about how the unit is insulated.  Get specific with the materials used, quality of the metal parts, etc.


Other Tips


Always try to light your initial fuel product, whether briquets, lump hardwood charcoal, or charcoal in a chimney starter so you can control the quantity with every cook.  Use the chimney to add hot coals to the unit when you need to increase temperature.  Although you can have unlit charcoal in your charcoal area so it will ignite as the lit produce makes contact, this isn’t always a guarantee that you won’t produce some temperature variance.  The best chance of getting the temperature regulated is by adding hot coals as needed, even if this may be every hour or so.

To summarize, learn to control temperature by using the same quantity and type of material for the fuel, lit it with a chimney starter, only add hot coals to increase the temperature, and always have the exhaust vent open at least ½ way when cooking.  Remember the number one thing is Temperature control is all in the air flow and you will have tasty grilling results!