Showing posts with label lp grill. Show all posts

Thursday, May 2, 2019

TOP TOOLS NEEDED FOR GAS GRILLING

Smokinlicious teams top tools needed for gas grilling
Smokinlicious® teams top tools needed for gas grilling

There is no question that LP/Gas grills have changed tremendously over the past 10 years and now include some features standard that for many years, were options.  Then there is the development of dual or multi-fuel options on a grill so you can have one unit that performs as a gas grill, charcoal grill, wood grill, and even electric or pellet grill, all in one unit.

Today, I’m focusing on the standard LP/Gas grill, independent of any other fuel source.  This guide will focus on the basic tools that will provide for a better grilling experience and make you more efficient at the grill.

Tool #1

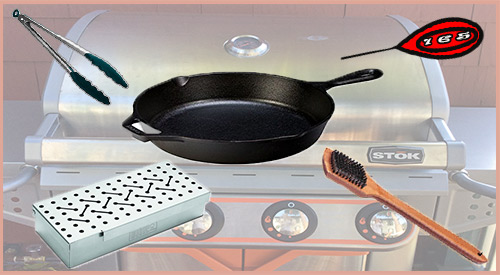
I’m starting with a grill brush since most of us have the habit of thinking about cleaning off the grill grates when we start the grill for cooking, not when we finish.  This tool is to ensure clean up the residual food bits and grease left from your previous grilled foods.

Now I’m aware of the controversy over the use of metal bristles but most of these brushes are made well.  Simple inspection of the brush bristles each time you use it will allow you to identify if the bristles have come loose and have the potential to be transported to your foods.  I prefer a brush with metal bristles, with a long handle to keep my arm away from the heat, as often you want to clean the grill when it’s hot.  Remember, most of these brushes are under $10 so think about purchasing one a couple times per season to ensure the bristles stay put.

Tool #2

There are times when the grill grates and lid will become super coated in grease and pieces of food. 
You’ll need to break out the cleaning agents to ensure these surfaces are ready to go for the next grilling event.  Two of my favorites are CLR BBQ Grill Cleaner and Mr. Clean MagicEraser.  As a non-toxic, non-flammable, biodegradable product, CLR BBQ Grill Cleaner is not something you have to leave on for hours at a time.  It quickly breaks through the issues and allows you to wipe clean to an almost new state.  Keep in mind, the CLR brand also makes a stainless steel cleaner for the outside as well.

Tool #3

Long-handled tongs.  Your standard tong length for the traditional kitchen just won’t work at the grill, as you need to keep some arm distance from the hot grill surfaces.  I like the 20-inch length with silicone grips as well as silicone tips, as silicone can tolerate extremely high heat.  If you grill multiple food items at the same time, think about purchasing tongs with different colored tips and/or handles as that will ensure use of one color for a specific food so there’s no transfer of flavors.

Tool #4

Like the tongs, a must have is long-handled spatula for those food items that need to be flipped.  I prefer one that is made of solid steel and has a bit of a beveling to the edge.  Again, the longer the handle the better for keeping away from high heat.

Tool #5

An easy to read, digital thermometer.  It is a must when you grill or smoke.  Look for one that has a longer probe for when your grilling larger roasts and thicker cuts of meats and poultry.  Be sure the readout is easy to see and if you grill a lot at night, get one that has a back-lite to see more clearly.  If you cook a lot of different animal proteins at the same time, try to have a thermometer dedicated to each food so you don’t cross-contaminate while bacteria may still be an issue.  There are assorted colors available making it easy to dedicate one to red meat, pork, poultry, and fish.   Most of the digital thermometers on the market today are under $18 with even more under $10.

Tool #6

 If you’ve always been a person that cooks directly on the grill grates and only does the standard fare – hamburgers, sausage, chicken, perhaps ribs – you need to get out of that rut and learn to do more with your grill.  Start by investing in one piece of quality cast iron.  Able to withstand intense heat, cast iron can take you from the average griller to someone with skill.  Now, you can enjoy recipes normally done on the indoor stove outside in the fresh air, with your cast iron skillet.  Remember, there’s a whole line of cast iron cookware so as you expand your skills, you can add to your outdoor cookware.

Tool #7

Although I am a fan of the standard steam table disposable foil pan, any size, shape foil pan will do.  These are perfect for use as a drip pan to prevent render juices from spiking flames and as water pans for a two-zone cooking set up.  I won’t deny, that I also use these to cook in especially fragile items like fruit and specific vegetables.  You certainly can invest in a grill pan but clean up becomes a snap with the disposable pan.

Tool #8

Although the smoker box was originally intended for use with wood chips on the grill, I always use small wood chunks in mine.  I prefer a box made from high-grade stainless steel and one that has a hinged lid.  My smoker box holds three Double Filet Wood Chunks from SmokinLicious® perfectly and provides for extended smoke vapor as compared with wood chips.  Used directly on the grill grate or set under the grill grate on the heat shield, it produces smoke for hours.  Although you can place wood chunks directly on the heat shields, as I’m known to do myself sometimes, they will become permanently marked from the wood ash and eventually need replacing.  The smoker box allows you to avoid this.

There you have it!  My TOP TOOLS NEEDED FOR GAS GRILLING for better results and help in extending the life of your investment!

Thursday, June 8, 2017

GRILLING: THE WOMAN'S GUIDE

Woman ‘Man’-ing the Grill- Tools are Essential

It’s long been the equipment associated with the guys.  Perhaps it’s due to the primal start of cooking over live fire which initially was a man’s skill.  Hunt the animal and cook it on fire and hot coals.
Recently, the trend has begun to turn around in favor of more women grilling components of a meal on the grill.  In fact, it’s not just the traditional LP/gas grill but charcoal grills as well, as women take their new recipe and technique finds out of the traditional indoor kitchen and to the outdoors.

Just Because It’s Outside Doesn’t Change The Purpose

There is no question that outdoor grilling equipment has evolved into something of fantasy.  We now have choices beyond the standard LP, natural gas, charcoal, and electric grills.  Many brands are now featuring dual fuel cooking, meaning they may have gas or electric assist but use wood and/or charcoal for heat and flavor!

What does this mean for the ladies who want to do more outdoor cooking on the grill?

Versatility!  It is so easy to cook an entire meal on the grill without it taking several hours or more.

Accessorize!

The key to ensuring that an entire meal can be cooked on the grill is to have the right tools and that includes some accessory items.  Let’s look at each recommended item and answer the question why it’s important to the woman’s full meal grill event.

#1 Grill Grate Accessories:

First up, the grill pan, grill basket or grill topper.  These are perfect for vegetables and fruits making it so easy to ensure that the food doesn’t stick to the grill grates and that every piece gets cooked evenly.  Plus, since many grills are now sold with a side burner, you can always steam or par boil tougher vegetables first, then transfer to the grill pan/basket/topper.  Or, use that side burner to make rice for a healthy starch side.  Don’t have a side burner on your grill or are using a charcoal grill?  Then buy a butane burner!  These are so inexpensive yet give you another cooking option to get everything ready at the same time.

#2 Easy Charcoal Lighting:

If you don’t know what a chimney starter is, time to learn.  The charcoal chimney starter is the best way to light a charcoal fire.  Although these traditionally use newspaper at the bottom (for ignition) and load charcoal chunks (can be briquettes or lump) into the body of the unit, I take a simple method of lighting my chimney.  I load with my favorite charcoal and use a butane torch under the unit to light – no newspaper needed.  This allows me to leave the butane on auto fire for a few minutes to ensure the lower coals are lit.  Simply pull the torch out, shake the chimney while wearing fire gloves, and return to a heat safe surface until the top coals turn white-gray.  Oh, and you can always light the chimney off that side burner too!

#3 Purchase 2 Thermometers

Stop guessing at when things are done!  You need to invest in 2 quality thermometers; one for the grill/smoker and one instant-read for the food.  Be sure the thermometers you invest in can take a reading in 5 seconds or less, have at least a 4-inch probe for thicker cuts of meat, and have cables that are durable (if you don’t go with a wireless), especially for equipment thermometers that are placed through venting holes or under lids.

#4 Silicone

Anything made from silicone will become a lifesaver at the grill.  Silicone pot handle covers, spatulas, heat resistant tongs – you get the idea.  This material can handle the high heat of grills so stock up on those items you’ll need and use the most.  Suggestions? Tongs, pot handle covers, spatulas, spoons, mat.

Diversify!

Grilling does not necessarily mean you must put all foods on the grill grates.  Use high heat cookware to help you out.  Think cast iron or high heat clay and enamels meant for the grill.  These are perfect for starting one pot wonders like legumes, pasta dishes, even sauces.  With a roomy enough grill, you can fit many different items – grill pan/basket, Dutch oven, and rib racks.  Don’t forget most grills come equipped with a lower and upper grill rack so more fragile items that need less heat can go to the top.  Here’s some tips on food to cooking equipment match:

Tip #1: Cast Iron and Charcoal

Cast iron is, without question, the best material for cooking directly in the coals.  Here’s a tip – if you have an outdoor fireplace or even a fire pit that uses wood, you can do this method of cooking by placing your cast iron skillet or Dutch oven directly in the coals.  Keep in mind, I said coals, not flame.  Coals have a very high BTU rating and can cook foods within cast iron as if they are in the oven.  Just be sure to pack the hot coals around the cast iron after placing the pan in the coal bed.  Perfect items to try: vegetable medley, roasted potato, curry dishes, au gratin dishes.

Tip #2: Cast Iron and LP/Gas Grill

Just like having the side burner on a grill, cast iron on the grill is like having an extra pot on the stove.  Cast iron comes in lots of sizes and cookware type: saucepan, skillet, Dutch oven.  Anything you would traditionally make in cookware on the stove can be done on the grill.  The key is to ensure that you have this on a section of the grill that isn’t set to “high”, as cast iron holds heat.

Tip #3: The Upper Grill Rack

Though small in overall size, the upper grill rack is designed for those fragile items or for items that require simple warming.  Think melting butter for vegetables, heating sauces, warming bread and rolls.  Use it!  It can be of great value to keep you from needing anything indoors.

Tip #4: The Rotisserie

If you have a grill with a rotisserie, use it!  Keep in mind, as that item turns on that rod, the meat or poultry renders some fantastic juices.  Catch them!  Put a high heat pan under the food item with some great vegetables and use the drippings to add superb flavor to the cooking process.

Flavor It Up!

Now, let’s be clear!  Unless you’ve invested in a dual fuel or hybrid grill, one that allows you to use charcoal and/or smoking wood, most standard LP grills are just that: grills not smokers.  If you don’t have a hybrid but want to get some smoking woods flavoring to your foods, then start thinking of adding charcoal and wood chunks!

Yes, you heard me right.  Wood Chunks vs. woodchips which was the product of choice for years with LP grills.

Why Smoking Wood Chunks?

Most grills today are designed with covers for the gas burners to diffuse the heat more evenly.  They go by a lot of names: heat distributors, flame tamers, heat plates, burner shields, flavorizer bars.  The addition to the traditional LP grill is the reason why you can use smoking wood chunks.  Simply place a few small wood chunks under the grill grate right on top of the heat diffuser.  Be sure you only put chunks on a burner you will ignite.  Replace the grill grate and you’re ready to go!  And, yes, you will get real wood smoke vapor to flavor whatever you’re cooking on the grill.  I promise!

Final Points

"Man”-ing the grill is no different than planning a meal in your conventional kitchen.  Pick out the components of the meal and decide what needs to cook where on the grill: directly on the grate, on the rotisserie, in cast iron, on the coals.  If doing a meat, be sure to marinate 6 hours or best, overnight, to ensure a moist outcome and to reduce cooking time.
Have everything prepped including the grilling tools you will need and this is a walk in the park for the woman that is use to planning daily meals for her family.  The best part, you can enjoy more of those great warm days and not sweat in the confines of the hot summer kitchen!

Thursday, June 1, 2017

HOW TO TURN YOUR LP/GAS GRILL INTO A SMOKER

Gas grill technique for adding smoking wood chunks to develop a smoke flavor to your cooking.

This is the year!  You made a promise to yourself, family and friends that this outdoor cooking season, you were going to bring more flavor to meals cooked on the grill by incorporating smoking wood and grilling wood.  All you need to know is, what are the options for setting up the grill for this type of cooking without purchasing a smoker?

We have the answer and lots of options to utilize your existing equipment!

LP/Gas Grills of All Types

There is a great deal of variation in LP/Gas Grilling equipment in terms of grilling surface space, number of burners, BTU rating, etc.  Know up front, that this will play into how frequently you need to replenish grilling or smoking wood or even to monitor the foods being smoked on the grill.  Essentially, these tips will work on any brand/model that you may own.

How To Add Grilling Woods to the LP/Gas Grill

Heat diffusers are commonly found on newer models of grills.  They are made of high heat tolerant metal and cover the actual burners of the unit.  Their purpose is to ensure even heat distribution throughout the grill so both radiant and conductive heat are maximized.

Wood Chunks On The Diffusers

If you have a grill model that has heat diffusers (remember, they may go by other names like flavorizer bars, flame tamers, heat plates, burner shields and heat distributors) then you’re ready to use smoking wood chunks on your unit!  Yes, I said smoking chunks.  This is by far the easiest method of getting true smoke flavor to the foods being cooked.  Plus, you can set up an indirect method of cooking using smoking chunks.

You will need 3-4 wood chunks sized to fit over your heat diffusers and under the grill grate when set in place.  A 2x2x3-inch size fits most units and these should have some measurable moisture level; at least 20% moisture is ideal meaning you won’t need to presoak the wood.  If you have an old grill model before heat diffusers were standard, you can still use smoking wood chunks by placing them in a smoker box.  These boxes will generally fit 3-4 chunks of the size referenced above but be sure to use a good quality box.  My preference is cast iron.  Insert the chunks into the smoker box and leave the lid off!

Indirect Cooking Method

What truly makes for barbecue and not just grilling or smoking on an LP/Gas unit is using the indirect method of cooking.  The smoking wood chunks will be set on a burner that is turned on to medium or medium-high heat depending on the BTU level of your unit.  The higher the BTU level, use a medium setting.  Overall, you want the grill’s temperature to average 225-250° F for cooking traditional BBQ items like ribs, brisket, pork shoulder, and poultry.  If using the smoker box, you will place the box on the grill grate of the side with the burner lit.  My preference is, if doing very large cuts of meat, to turn on two burners if you have a 3-burner or more unit.  The foods will be placed on the unlit side of the grill.

Water Keeps Everything Moist

To ensure that any meat or poultry cooked on the grill remains moist and tender, include a water pan or two in your set up.  This is easily done by purchasing readily available disposable pie tins from the discount store.  I like to add warm to hot water so the grill does not have to exert much energy to heat up the water, which takes heat away from the unit.  Remember, the water will be evaporating during the cooking or smoking process so have additional water available if it depletes before the cooking is complete.  Water pans are set on the unlit burner side of the grill, directly under the food.  This will also act as a drip pan, catching all those juices.

Moist Cold Surfaces Attract Smoke Vapor

You have your smoking wood chunks on the lit burner, your water pans on the unlit burner, the grill’s temperature is holding steady, the grill grate has been in place taking on heat – we’re now ready for the meat.  Always take the prepared meat directly from the refrigerator to the grill COLD!  Cold foods will attract smoke vapor faster, allowing the vapor to condense on the food’s surface.  A moist surface also help attract the smoke so feel free to keep a spray bottle of water to spritz your meat’s surface as needed, though this often is not needed.

Leave the Lid Alone!

Remember, this isn’t traditional grilling on the grill.  We are doing barbecue smoking using an indirect method of cooking.  Keep the lid closed!  Every time you do so, you release heat, smoke, and moisture.  What you do need to watch closely is the temperature of your unit as the consistent temperature is what ensures an evenly cooked food item, as well as a tender, moist outcome.

Was this just what you were looking for?  If so, leave a comment as we’d love to hear from you.  Don’t forget to let us know what other questions you have, as we also design our postings after the needs of our follows.  As always, subscribe and follow us, so you don’t miss a thing!